How Do I Change The Look Of A Check Box In Word Now
Want to change the look of a check box in Word? This guide shows you how to customize checkbox size, color, and style in just a few clicks. You will learn to insert checkboxes, modify their appearance, and fix common issues with your checkbox formatting in Word.
Have you ever opened a Word document and thought, “This checkbox looks boring”? You are not alone. Many people want to change the look of a check box in Word but do not know where to start. The good news is that Word gives you plenty of options to make checkboxes look exactly how you want them. Whether you need a bigger box, a different symbol, or even a splash of color, this guide has you covered.
In this article, we will walk you through every step. You will learn how to insert a checkbox, customize its appearance, and avoid common mistakes. By the end, you will feel confident making your documents look clean and professional. Let us dive right in and explore how simple it really is.
Key Takeaways
- Easy customization: You can change checkbox size, color, and symbol in Word using simple built-in tools.
- Two main methods: Use the Developer tab for interactive checkboxes or the bullet list for static ones.
- Visual styling matters: A well-designed checkbox improves the look and readability of your Word documents.
- Common issues are fixable: Most checkbox problems in Word have straightforward solutions.
- Pro tips save time: Small design tweaks make a big difference in document appearance and usability.
📑 Table of Contents
- Why You Should Customize Checkboxes in Word
- How to Insert a Checkbox in Word
- Changing the Look and Size of a Checkbox in Word
- Adding Color and Visual Style to Checkboxes
- Checkbox vs Bullet Point: Understanding the Difference
- Troubleshooting Common Checkbox Issues in Word
- Pro Tips for Beautiful Checkbox Design in Word
- Conclusion
Why You Should Customize Checkboxes in Word
Checkboxes are more than just small squares on a page. They help organize information, track tasks, and make forms easier to use. But the default checkbox in Word often looks plain and unremarkable. When you take a few minutes to customize it, your document instantly looks better.
Think about a to-do list you created last week. Did the checkboxes stand out? Could you easily see which items were done and which were not? Probably not. A simple change in size or color can make a huge difference. People respond better to documents that look polished and intentional.
Customizing your checkbox also shows attention to detail. Whether you are creating a form for work, a checklist for a project, or a printable planner, the little details matter. A well-styled checkbox tells your reader that you care about quality.
Here are some reasons why you should consider changing your checkbox look:
- Better readability: A larger or colored checkbox is easier to see and click.
- Professional appearance: Custom styles make your document look more polished.
- Brand consistency: You can match checkbox colors to your company or personal brand.
- User-friendly forms: Interactive checkboxes with a clear look guide users to fill them out correctly.
- Visual hierarchy: Styled checkboxes help organize content and draw attention to key areas.
The point is simple. A small design change can transform an ordinary document into something that looks and feels much better. And Word makes this process easier than you might think.
How to Insert a Checkbox in Word
Before you can change the look of a checkbox, you need to know how to insert one. Word offers two main ways to do this. Each method gives you a different type of checkbox, and understanding the difference is important.
Method 1: Using the Developer Tab
The Developer tab gives you access to interactive checkboxes. These are the kind you can click to check or uncheck. This method is perfect for forms and digital documents that people will fill out on their computers.
Here is how to enable the Developer tab and insert an interactive checkbox:
- Open Microsoft Word and go to File then Options.
- Click on Customize Ribbon in the left menu.
- Find Developer in the right column and check the box next to it.
- Click OK to save your changes.
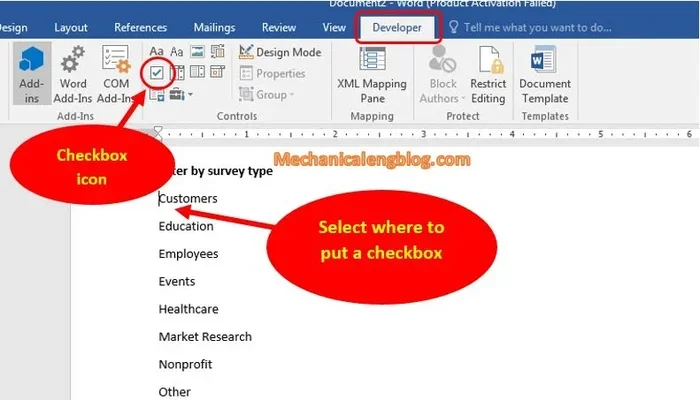
- Now click on the Developer tab at the top of the screen.
- Click the Checkbox Content Control icon in the Controls group.
That is it. You now have an interactive checkbox in your document. You can click it to toggle between checked and unchecked. But this is just the starting point. Next, we will look at how to change its appearance.
Method 2: Using the Bullet List
The second method is simpler and great for printed documents. This creates a static checkbox that people check with a pen or pencil. It does not work as a clickable box on screen, but it looks clean and is easy to use.
Follow these steps to insert a checkbox using the bullet list:
- Place your cursor where you want the checkbox.
- Go to the Home tab on the ribbon.
- Click the Bullet List dropdown arrow.
- Select Define New Bullet.
- Click the Symbol button.
- In the font dropdown, choose Wingdings or Wingdings 2.
- Find the checkbox symbol and click OK.
- Click OK again to apply the bullet.
Now every time you press Enter, a new checkbox bullet will appear. This method is fast and works well for simple checklists. However, your options for changing the look are more limited compared to the Developer tab method.
Changing the Look and Size of a Checkbox in Word
Now let us get to the fun part. Once you have inserted a checkbox, you can change how it looks. Word gives you control over size, symbol, and spacing. Let us break down each option.
Resizing Your Checkbox
The default checkbox in Word is often too small for some documents. If you are creating a form that people will print and fill out by hand, a bigger box makes life much easier. Here is how to resize it.
For interactive checkboxes from the Developer tab, right-click the checkbox and select Properties. In the Properties window, you will see options for size. You can set a specific height and width in inches or centimeters. Try starting with a size of 0.3 inches by 0.3 inches for a comfortable clickable box.
For bullet-style checkboxes, resizing works differently. You can change the font size of the bullet, which will also change the size of the checkbox symbol. Simply highlight the text and adjust the font size. A font size of 14 or 16 usually works well for printed checklists.
Changing the Checkbox Symbol
Did you know you can change what symbol appears inside the checkbox? Instead of the standard checkmark, you can use an X, a star, a checkmark, or even a custom symbol. This is a great way to match your document style.
For Developer tab checkboxes, right-click the box and choose Properties. Click the Change Checkbox Symbol button. You can browse different fonts like Wingdings, Segoe UI Symbol, or Arial. Pick a symbol that fits your needs and click OK.
Some popular checkbox symbols include:
- Checkmark (✓): Clean and classic. Best for formal documents.
- X mark (✗): Bold and easy to see. Great for printed forms.
- Star (★): Eye-catching. Useful for priority lists.
- Circle (○): Minimalist. Works well for surveys and quizzes.
- Square (□): Neutral and simple. Good for general use.
Experiment with different symbols until you find one that looks right for your document. The symbol you choose can completely change the feel of your checklist or form.
Adding Color and Visual Style to Checkboxes
Color is one of the easiest ways to make your checkboxes stand out. A splash of color can draw attention to important areas of your document and make it more engaging. Word offers several ways to add color to your checkboxes.
Coloring Interactive Checkboxes
For checkboxes created with the Developer tab, you can change the color of the box itself. Right-click the checkbox and select Properties. Look for the Color or Style options. You can choose from a range of colors to match your document theme.
Keep in mind that color options for Developer tab checkboxes are somewhat limited. If you need more control over colors, you might consider using a text-based checkbox symbol instead. You can insert a colored checkbox character using the Symbol dialog and then format it like regular text.
Using Colored Bullet Checkboxes
The bullet list method actually gives you more flexibility when it comes to color. Since the checkbox is treated as a font character, you can change its color just like any other text. Here is how:
- Highlight the checkbox symbol or the entire line of text.
- Go to the Home tab.
- Click the Font Color dropdown arrow.
- Choose your desired color.
This works great for creating color-coded checklists. For example, you could use red for urgent tasks, green for completed items, and blue for in-progress tasks. The visual difference makes your list much easier to scan.
You can also change the background color behind the checkbox. Select the checkbox or the entire paragraph, then go to Home > Shading. Pick a light background color to make the checkbox pop even more.
Checkbox Styling Tips for Professional Documents
If you want your checkboxes to look truly professional, keep these tips in mind:
- Use consistent sizing: All checkboxes in one document should be the same size.
- Stick to two or three colors: Too many colors make a document look messy.
- Match your brand: Use colors from your company logo or theme.
- Add spacing: Give each checkbox line enough space so it does not look cramped.
- Use bold labels: Bold the text next to each checkbox for better readability.
Small details like these add up. A well-styled document feels professional and polished. Your readers will notice the effort you put into the design.
Checkbox vs Bullet Point: Understanding the Difference
Many people confuse checkboxes with bullet points in Word. While they look similar, they serve different purposes and work differently. Understanding this distinction helps you choose the right method for your document.
A checkbox in Word is designed to represent a choice. It can be interactive (clickable on screen) or static (printed for manual checking). A bullet point is simply a visual marker for list items. When you use the bullet list method to create a checkbox, you are really using a bullet point styled to look like a checkbox.
Here is a quick comparison:
| Feature | Developer Tab Checkbox | Bullet List Checkbox |
|---|---|---|
| Clickable on screen | Yes | No |
| Works when printed | Yes | Yes |
| Customizable symbol | Yes | Yes |
| Customizable size | Yes (via Properties) | Yes (via font size) |
| Color customization | Limited | Full color support |
| Best for | Digital forms and templates | Printed checklists and simple lists |
| Ease of use | Requires Developer tab | Built into Word by default |
As you can see, each method has its strengths. For digital documents where people need to click checkboxes, use the Developer tab. For printed lists that look clean and simple, the bullet list method works perfectly. You can even use both methods in the same document if needed.
Troubleshooting Common Checkbox Issues in Word
Sometimes things do not go as planned when working with checkboxes in Word. Do not worry. Most common issues have simple fixes. Here are the problems you might run into and how to solve them.
The Checkbox Is Too Small or Too Big
If your checkbox does not look right, the first thing to check is the size. For Developer tab checkboxes, right-click and open Properties. Adjust the height and width values. For bullet checkboxes, change the font size of the text.
The Checkbox Will Not Click
If you are using an interactive checkbox but it does not respond when you click, make sure the Developer tab is enabled. Also check that you are using the Checkbox Content Control and not just a regular symbol. Sometimes document protection settings can also prevent clicking. Go to Review > Restrict Editing and make sure no restrictions are active.
The Checkbox Symbol Looks Different on Different Computers
This happens when the font used for the checkbox symbol is not available on another computer. To avoid this, use standard fonts like Segoe UI Symbol or Arial. You can also save your document as a PDF to preserve the appearance across devices.
Checkbox Alignment Is Off
If your checkbox does not line up with the text, try adjusting the paragraph indentation. Go to Home > Paragraph settings and modify the left indent and special indent. You can also use tab stops to fine-tune the position.
Checkbox Color Will Not Change
For bullet-style checkboxes, make sure you are highlighting the correct element. Click directly on the checkbox symbol to select it, then change the font color. If you are using the Developer tab checkbox, note that color options are limited for content controls. In that case, consider switching to a text-based symbol for more color freedom.
Pro Tips for Beautiful Checkbox Design in Word
Now that you know the basics, let us share some advanced tips that will take your checkbox design to the next level. These small tweaks can make a big difference in how your documents look and feel.
Use a checkbox template. Word offers built-in templates that include pre-styled checkboxes. You can find these by going to File > New and searching for “checklist” or “check box.” These templates save you time and give you a professional starting point.
Group related checkboxes. Use headings and spacing to organize your checklists into sections. This makes long documents much easier to navigate. A simple line or a colored heading between sections works wonders.
Add hover effects for digital documents. If you are creating a document that will be used on screen, consider adding hyperlinks or content controls that respond to user interaction. This makes your form feel modern and engaging.
Test on multiple devices. If your document will be shared digitally, open it on different computers and devices to make sure the checkboxes look the same everywhere. PDF export is a great way to preserve your formatting.
Keep it simple. The best checkbox designs are clean and uncluttered. Do not overdo it with colors or symbols. A simple, well-spaced checkbox list is often more effective than a heavily styled one.
These tips might seem small, but they add up. When you pay attention to the details, your documents stand out. People notice when something looks well-crafted, and it makes your work more impactful.
Conclusion
Changing the look of a check box in Word is easier than you might think. Whether you want to resize it, change the symbol, add color, or create an interactive clickable box, Word has the tools you need. The key is knowing where to look and understanding the difference between the Developer tab method and the bullet list method.
Start by choosing the right method for your document type. Use the Developer tab for digital forms and the bullet list for printed checklists. Then experiment with size, color, and symbols until the checkbox looks just right. Remember the pro tips we shared, and do not be afraid to try new things.
Your documents deserve to look their best. A well-designed checkbox might seem like a small detail, but it makes a real difference. So go ahead, open Word, and start customizing your checkboxes today. You will be amazed at how much better your documents can look with just a little effort.
Frequently Asked Questions
Can I change the color of a checkbox in Word?
Yes, you can change the color of a checkbox in Word. For bullet-style checkboxes, highlight the checkbox symbol and use the Font Color option on the Home tab. For Developer tab checkboxes, color options are more limited, but you can still adjust the appearance through the Properties settings.
How do I make a checkbox bigger in Word?
To make a checkbox bigger, right-click it and select Properties if it is a Developer tab checkbox. Then adjust the height and width values. For bullet-style checkboxes, simply increase the font size of the text containing the checkbox symbol.
What is the difference between a checkbox and a bullet point in Word?
A checkbox from the Developer tab is interactive and can be clicked to toggle between checked and unchecked. A bullet point checkbox is static and works like a symbol on a printed page. The Developer tab method is best for digital forms, while the bullet list method works well for printed checklists.
Can I use custom symbols for my checkbox in Word?
Yes, you can use custom symbols for your checkbox. In the Developer tab, right-click the checkbox, choose Properties, and click Change Checkbox Symbol. You can browse different fonts like Wingdings or Segoe UI Symbol to find a symbol that fits your document style.
Why does my checkbox look different on another computer?
This usually happens because the font used for the checkbox symbol is not installed on the other computer. To fix this, use standard fonts like Arial or Segoe UI Symbol. You can also save your document as a PDF to preserve the exact appearance across all devices.
How do I enable the Developer tab in Word?
To enable the Developer tab, go to File > Options > Customize Ribbon. In the right column, find Developer and check the box next to it. Click OK, and the Developer tab will appear in your ribbon at the top of the screen.
=== CONCLUSION ===
Changing the look of a check box in Word is a simple but powerful way to improve your documents. You now know how to insert checkboxes using two different methods, customize their size and symbol, add color and style, and troubleshoot common issues. The tips and tricks shared in this guide will help you create checklists and forms that look professional and are easy to use.
Remember, the details matter. A well-designed checkbox shows care and attention. It makes your documents more readable, more attractive, and more effective. So take what you have learned here and apply it to your next Word document. You will notice the difference right away.
Start experimenting today. Try different sizes, colors, and symbols. Find what works best for your needs. With a little practice, you will be able to change the look of a check box in Word quickly and confidently. Your documents will thank you for it.