Can You Download A Windows 11 Recovery USB Step By Step
Yes, you can download a Windows 11 recovery USB using Microsoft’s official Media Creation Tool, and it’s simpler than most people think. This bootable USB drive gives you a reliable way to reset, repair, or reinstall Windows 11 whenever your system runs into trouble. Whether you’re dealing with boot failures, malware, or just want a fresh start, having a Windows 11 recovery USB ready on hand saves you hours of frustration and keeps you in control of your PC.
Have you ever stared at a frozen computer screen, wishing you had a magic button to fix it? That is exactly why Can You Download A Windows 11 Recovery USB is such an important question to answer today. A recovery USB is your safety net when your PC decides to act up or suddenly stop working. It saves you from costly repairs and endless frustration with your daily driver. In this guide, I will walk you through the entire process of getting your own windows 11 recovery usb ready to go. You will learn exactly how to create one, use it, and why it is a lifesaver for any PC user.
Many people ignore the idea of a recovery drive until disaster strikes. They think it will never happen to them. But hardware fails, updates break things, and viruses strike when we least expect them. Trust me, waiting until your computer crashes is far too late to think about making a backup. Having a windows 11 recovery drive on hand means you can fix boot issues, restore your system, and even reinstall Windows completely. It is like having an insurance policy for your computer that you actually use. Let us dive into the details and get your USB drive ready to save the day.
Think about how much you rely on your computer every single day. You use it for work, school, shopping, and staying in touch with friends. When it breaks, your whole routine falls apart. A windows 11 recovery usb gives you the power to take control back. You do not have to panic or spend hundreds of dollars on a technician. With the right tools and a little patience, you can fix most problems yourself. That is the beauty of having a recovery drive ready to go.
Key Takeaways
- You can download a Windows 11 recovery USB directly from Microsoft’s official website for free.
- A 6GB+ USB drive is required to store the Windows 11 installation and recovery files properly.
- The Media Creation Tool is the simplest way to create your bootable recovery USB.
- Back up all data before creating a recovery USB, as formatting will erase everything.
- Third-party tools like Rufus offer more control if the built-in tool fails on your system.
- Enable UEFI and Secure Boot in BIOS settings to ensure your recovery USB boots correctly.
- Keep your recovery USB safe after creation, as it serves as a critical system rescue drive.
📑 Table of Contents
What Exactly Is a Windows 11 Recovery USB?
A windows 11 recovery usb is a bootable flash drive that contains a copy of your Windows environment. It allows you to access repair tools even when your computer will not start normally. Think of it as a spare key for your digital life. When your main operating system fails, this USB drive steps in to save the day and get you back online.
The drive contains the Windows Recovery Environment, also known as WinRE. This is a special mini version of Windows that loads before your main operating system. It gives you access to advanced troubleshooting tools. Without it, a simple problem could turn into a permanent data loss situation. Understanding what this drive does helps you appreciate its true value.
A windows 11 recovery drive is different from a regular backup. A backup copies your personal files like photos and documents. A recovery drive copies the core operating system files. It lets you fix the engine, not just the paint. You can use it to repair a corrupted system, fix startup errors, or even wipe the drive and start fresh. It is a Swiss Army knife for your PC.
A recovery drive is especially useful if you have a modern PC that uses UEFI firmware and GPT partitions. Older recovery methods sometimes fail on these newer systems. A properly created windows 11 recovery usb handles all of these modern setups automatically. It bypasses the need for a recovery partition on your hard drive. If your hard drive fails completely, the recovery partition goes down with it. But your USB drive remains safe and sound. This is why a physical USB drive is so much better than relying on hidden partitions.
Why You Need a Recovery Drive
Computers can fail for many reasons. Sometimes it is a bad Windows update that breaks the boot process. Other times, it is a virus, or simply hardware wear and tear over the years. Without a windows 11 recovery drive, you might be stuck staring at a black screen with no way forward. A recovery USB gives you the power to troubleshoot and repair your system from the outside. It is a simple tool that provides massive peace of mind.
- It lets you access the Windows Recovery Environment directly.
- You can use it to restore your PC to an earlier working state.
- It helps when you forget your password or face stubborn boot errors.
- It allows you to perform a clean installation of Windows 11.
- It saves you time and money compared to professional repairs.
Can You Download A Windows 11 Recovery USB
The short answer is yes, but there is a small twist you need to know. You cannot just download a pre-made recovery USB file from Microsoft and double click it. Instead, you download the tools to create one yourself. Can You Download A Windows 11 Recovery USB directly as a ready-to-use file? Not exactly. You download the ISO file or the Media Creation Tool. This tool then helps you build the recovery drive on your own. It is a two-step process, but it is very straightforward and safe.
The Official Microsoft Way
Microsoft provides the Media Creation Tool on their official website. This is the safest and most reliable method to get your files. You use this tool to grab the latest Windows 11 system files. Then, you put those files onto your USB drive. By doing this, you create a windows 11 installation media that doubles as a powerful recovery tool. Always make sure you are downloading from the official Microsoft site. Third party websites might bundle unwanted software or malware with the download.
When you visit the Microsoft website, you will see two main options. You can download the Media Creation Tool, or you can download the ISO file directly. The Media Creation Tool is the easiest path for most people. It guides you through every step with clear instructions. The ISO file is a disk image that you must burn to a USB yourself using extra software. For simplicity, stick with the Media Creation Tool. It removes the guesswork and makes the process foolproof.
Another way to think about it is like baking a cake. You cannot just download a baked cake. You download the ingredients and the recipe. The Media Creation Tool is your recipe. The USB drive is your pan. You combine them to bake your own windows 11 recovery usb. It takes a little effort, but the result is exactly what you need.
Step-by-Step Guide to Creating Your Recovery Drive
Creating your own windows 11 recovery usb is easier than you might think. You just need a blank USB drive and a few minutes of your time. Follow these steps carefully to make sure everything works perfectly when you need it most. Do not rush through the process, as skipping a step can cause problems later.
What You Will Need Before You Start
Before you begin, gather your supplies. You need a USB flash drive with at least 8GB of available space. All data on that drive will be erased permanently during the process. So, back up your files first to your main hard drive or cloud storage. You also need a working computer that is running Windows 11. Finally, you need a stable internet connection to download the necessary files and updates.
The Actual Creation Process Explained
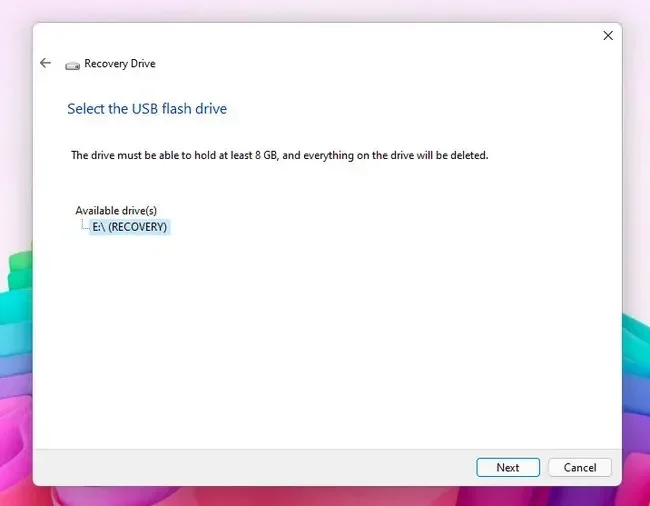
First, plug your USB drive into a USB port on your working computer. Next, click the Start menu and type “Create a recovery drive” into the search bar. Open the app that appears and accept the User Account Control prompt. The tool will open and give you a few options to choose from. It will ask if you want to back up system files to the recovery drive. I strongly recommend saying yes, as this gives you more options later if you need to reinstall Windows.
After you select the backup option, the tool will show you a list of removable drives. Select your USB drive carefully. Double check that you picked the right drive so you do not erase the wrong disk. Click the Next button and then click Create. The process might take a little while depending on your computer speed. Soon you will have a fully functional windows 11 recovery drive ready to use.
Here is a quick tip for you. Label your USB drive clearly with a permanent marker. When you have multiple drives lying around, it is very easy to lose track. A simple label like “Windows 11 Recovery” saves a lot of confusion when you are in a panic trying to fix a broken PC.
Common Mistakes to Avoid
Even with the best intentions, people make mistakes when creating a windows 11 recovery usb. Avoiding these common pitfalls will save you time and headache. Learning from other people’s errors is always a smart approach.
- Using a too-small USB drive. Always go for 8GB or larger.
- Skipping the system file backup option. Click yes when asked.
- Forgetting to back up existing data on the drive first.
- Using a faulty or old USB drive that fails halfway through.
Using Your Recovery USB to Fix Problems
So you have your drive ready. Now what? Knowing how to use your windows 11 recovery usb is just as important as making it in the first place. You need to boot your PC from the USB when things go wrong. This section covers the basics of using your new recovery tool effectively.
Booting From the USB Drive
To start the recovery process, you must change your PC’s boot order. Restart your computer and press the BIOS key repeatedly as soon as it turns on. This key is usually F2, F12, DEL, or ESC. It depends entirely on your PC brand and motherboard manufacturer. Once you are inside the BIOS menu, look for the Boot tab. Select your USB drive as the primary boot device and save your changes. Your computer will then restart and load the Windows setup or recovery environment from the USB.
Navigating the Recovery Menu
Once your PC boots from the USB, you will see several options on the screen. You can choose to repair your computer or install Windows fresh. The system recovery options let you access powerful built-in tools like Startup Repair and System Restore. If your PC is slow or acting strange, System Restore can roll things back to a time when it worked perfectly. It is a powerful feature that keeps your personal files safe while fixing system errors.
Another useful tool is the Command Prompt. Advanced users can type specific commands to repair the master boot record or fix disk errors. If you are not comfortable with typing commands, stick to the automatic repair options. The Windows setup wizard will also let you perform a clean install, wiping everything and starting fresh. This is a great last resort if nothing else works.
If you choose to use the Command Prompt, be very careful. Typing the wrong command can cause more problems. Only use commands you fully understand. A simple typo can overwrite important data. If you are not sure about a command, look it up first or stick to the automatic tools. The Windows Recovery Environment is designed to be user-friendly. You do not need to be a computer expert to fix most common issues.
Pros and Cons of Having a Recovery Drive
Like anything else in the tech world, having a windows 11 recovery usb comes with its own set of advantages and disadvantages. It is important to understand both sides before you commit to the process. Let us take a closer look at what you gain and what you give up when you make a recovery drive.
| Advantages | Disadvantages |
|---|---|
| Fixes boot issues without needing the internet | Requires an 8GB or larger USB drive |
| Allows fresh Windows installations if needed | Erases all data on the USB drive during creation |
| Provides access to advanced troubleshoot tools | Needs a working PC to create the drive |
| Saves money on expensive repair tech calls | USB drives can be easily lost or physically damaged |
| Restores your PC to factory settings quickly | Takes time to create and keep updated |
Overall, the benefits far outweigh the minor drawbacks. The small cost of a USB flash drive is nothing compared to the cost of replacing a computer or paying for professional repairs. Keeping your recovery drive updated every year is a great habit to form. It ensures your rescue media has the latest drivers and tools.
One thing to keep in mind is that a recovery drive does not back up your personal files. It only backs up the Windows system files. You still need a separate backup solution for your photos, documents, and videos. Many people confuse a recovery drive with a full backup. They are two different tools that serve different purposes. Use both for complete protection of your computer and your data.
Conclusion
Having a Can You Download A Windows 11 Recovery USB ready is one of the smartest things you can do for your computer today. It protects your valuable data and gives you control when unexpected problems arise. We covered how to create the drive, how to use it, and what mistakes to avoid along the way. Now you have all the knowledge you need to stay safe and prepared.
Take a few minutes today to create your windows 11 recovery usb. It is a simple task that could save you hours of stress and worry in the future. Do not wait for a computer emergency to realize you needed this tool. Be prepared, keep your PC running smoothly, and enjoy the peace of mind that comes with knowing you have a backup plan. Your future self will thank you when something goes wrong.
Frequently Asked Questions
Can You Download A Windows 11 Recovery USB Directly From Microsoft?
Yes, you can download a Windows 11 recovery USB straight from Microsoft’s official website. The Media Creation Tool lets you create a bootable USB drive with the full recovery environment. It is a free and straightforward process that anyone can follow.
What Do You Need To Create A Windows 11 Recovery USB?
You need a USB flash drive with at least 8GB of storage space and a reliable internet connection. The Media Creation Tool from Microsoft handles the rest of the download and setup automatically. Make sure your USB is empty because the process will erase all existing data on it.
How Long Does It Take To Download A Windows 11 Recovery USB?
The download time depends on your internet speed, but it typically takes between 15 and 45 minutes. After the download finishes, the tool needs extra time to prepare the USB drive properly. A faster internet connection will speed up the whole process significantly.
Can You Use A Mac To Create A Windows 11 Recovery USB?
Yes, you can use a Mac to download the Windows 11 recovery media, but the process is slightly different. You will need to format the USB drive as FAT32 using Disk Utility before running the Media Creation Tool on a Windows PC. Apple devices do not support the tool natively, so a Windows computer is still required for the final USB creation step.
Is A Windows 11 Recovery USB The Same As A Bootable Installation USB?
A recovery USB contains the full Windows recovery environment, while a standard installation USB only installs the operating system. The recovery USB lets you repair, reset, or restore your system when it fails to boot. Both are created using the same Media Creation Tool, but you choose the option that fits your needs.
Can You Use The Windows 11 Recovery USB On Any Computer?
You can use the Windows 11 recovery USB on most computers, but it works best on devices that support UEFI boot mode. Older PCs that only support legacy BIOS may have compatibility issues during the recovery process. Always check your PC’s firmware settings before attempting to boot from the recovery drive.