Can You Connect Arduino Nano To Wifi And Why It Matters
Yes, you can connect Arduino Nano to WiFi using external modules, specialized boards, or co-processors. WiFi connectivity transforms your Arduino Nano from a simple microcontroller into a powerful wireless IoT device. This guide walks you through every method, setup step, and pro tip you need for Arduino WiFi projects.
Arduino Nano is one of the most popular microcontroller boards in the maker community. It is small, affordable, and incredibly versatile. But there is one thing it lacks out of the box: WiFi.
So, can you connect Arduino Nano to WiFi? The short answer is yes. The longer answer is that it depends on which method you choose and how you set things up. Connecting Arduino Nano to WiFi opens up a whole new world of possibilities. You can build weather stations, home automation systems, and remote sensor networks without any hassle.
In this guide, we will walk you through every method, every step, and every tip you need. Whether you are a beginner or a seasoned maker, this article will help you get your Nano online. Let us dive right in.
Key Takeaways
- Multiple Methods Exist: You can use an ESP8266 module, the Arduino Nano 33 IoT, or an ESP32-based Nano clone to add WiFi.
- External WiFi Modules Are Affordable: The ESP8266-01 costs just a few dollars and works great with the standard Arduino Nano.
- The Arduino Nano 33 IoT Is Built-In: This variant has WiFi and Bluetooth already on the board, saving you extra hardware.
- WiFi Opens Up IoT Possibilities: You can build weather stations, home automation systems, and remote sensor networks.
- Power Management Matters: WiFi modules draw extra current, so plan your power supply carefully for reliable operation.
- Common Mistakes Are Avoidable: Wrong wiring, missing libraries, and weak antennas cause most connection failures.
📑 Table of Contents
- What Is the Arduino Nano and Why Does WiFi Matter?
- Can You Connect Arduino Nano To Wifi Using Different Methods?
- Step-by-Step Guide to WiFi Setup on Arduino Nano
- Comparison of WiFi Connection Options for Arduino Nano
- Common Mistakes and Expert Tips for Reliable Wireless Connections
- Why WiFi Connectivity Transforms Arduino Nano Projects
- Key Takeaways
What Is the Arduino Nano and Why Does WiFi Matter?
The Arduino Nano is a compact microcontroller board based on the ATmega328P chip. It shares many features with the Arduino Uno but packs them into a smaller form factor. You can program it using the Arduino IDE, and it supports a wide range of sensors, actuators, and modules.
But here is the catch. The standard Arduino Nano has no built-in WiFi capability. It relies on a USB connection for programming and a serial connection for communication. For many projects, this works perfectly fine. But if you want wireless data transmission or IoT prototyping, you need a workaround.
This is where WiFi modules and specialized Nano variants come into play. Wireless connectivity Arduino projects have exploded in popularity over the last few years. Makers want to control devices from their phones, send data to cloud platforms, and build IoT home automation systems. WiFi makes all of this possible.
There are several reasons why adding WiFi to your Arduino Nano matters:
- Remote Monitoring: You can check sensor data from anywhere in the world using a web browser or a mobile app.
- Wireless Control: No more cables. You can control lights, motors, and relays from your phone or computer.
- Cloud Integration: Send data to platforms like ThingSpeak, Blynk, or Adafruit IO for logging and visualization.
- Scalability: WiFi lets you connect multiple devices together to form a wireless sensor network.
- Future-Proofing: As IoT continues to grow, WiFi-enabled devices become more valuable and versatile.
Now that you understand why WiFi matters, let us answer the big question. Can you connect Arduino Nano to WiFi? Absolutely. Let us look at the different ways to do it.
Can You Connect Arduino Nano To Wifi Using Different Methods?
There are three main ways to add WiFi to your Arduino Nano. Each method has its pros and cons. Your choice depends on your budget, your project needs, and your skill level. Let us break them down.
Method 1: Using an External WiFi Module (ESP8266)
The most popular and affordable approach is to pair your Arduino Nano with an ESP8266 WiFi module. The ESP8266-01 is the go-to choice for most makers. It is tiny, cheap, and very capable. You can find it online for just a few dollars.
Here is how it works. The ESP8266 acts as a serial WiFi module. Your Arduino Nano sends commands to the ESP8266 over a serial connection. The ESP8266 handles the WiFi connection and data transmission on its own.
This method works well for simple projects. You can send and receive data over the internet without needing a full computer or a complex setup. The trade-off is that you need to manage two separate devices and handle the serial communication carefully.
Some key points about using the ESP8266 with the Nano:
- Cost: Very affordable. The ESP8266-01 costs around $2 to $4.
- Compatibility: Works with the standard Arduino Nano and the Arduino IDE.
- Complexity: Medium. You need to handle serial communication and AT commands.
- Flexibility: High. The ESP8266 can run its own code if you flash it with the ESP8266 firmware.
Method 2: Using the Arduino Nano 33 IoT Board
If you want a cleaner solution, consider the Arduino Nano 33 IoT. This is a specialized variant of the Nano that has WiFi and Bluetooth built right into the board. You do not need any external modules or extra wiring.
The Nano 33 IoT uses the u-blox NINA-W102 WiFi module. It supports both 2.4 GHz WiFi and Bluetooth Low Energy. You can program it using the Arduino IDE just like any other Nano board.
This method is perfect for IoT prototyping and projects where you want a clean, all-in-one solution. The downside is that the Nano 33 IoT costs more than the standard Nano plus an ESP8266 module. But for many makers, the convenience is worth it.
Benefits of the Nano 33 IoT:
- Built-In WiFi: No extra modules or wiring needed.
- Bluetooth Support: You can also add BLE connectivity to your projects.
- Easy Setup: Plug it in, select the board in the Arduino IDE, and start coding.
- Compact Design: Same small form factor as the standard Nano.
Method 3: Using an ESP32-Based Nano Clone
The third option is to use an ESP32-based Arduino Nano clone. These boards look like the standard Nano but have an ESP32 chip inside. The ESP32 is a powerful WiFi microcontroller with built-in WiFi and Bluetooth.
These clones are becoming increasingly popular. They offer the best of both worlds: the familiar Nano form factor and the powerful WiFi capabilities of the ESP32. You can find them on sites like AliExpress or Amazon for a very reasonable price.
The ESP32-based Nano clones often come with more memory, more processing power, and better WiFi performance than the standard Nano with an external ESP8266 module. They are an excellent choice for more demanding wireless sensor network projects.
Things to keep in mind:
- Pin Compatibility: Not all pins map exactly to the standard Nano. Check the datasheet of your specific clone.
- Library Support: Most Arduino libraries work fine, but some may need adjustments.
- Power Consumption: The ESP32 draws more power than the ATmega328P, so plan your power supply accordingly.
Step-by-Step Guide to WiFi Setup on Arduino Nano
Now let us get practical. Below, we walk you through the most common method: connecting an ESP8266 module to a standard Arduino Nano. This is the approach most makers start with, and it works great for a wide range of projects.
Wiring the ESP8266 Module to Your Nano
Before you start, make sure you have the following components ready:
- 1x Arduino Nano
- 1x ESP8266-01 module
- 1x 3.3V voltage regulator (like the AMS1117-3.3)
- 1x 10uF capacitor
- 1x 2kΩ resistor
- 1x 1kΩ resistor
- Jumper wires and a breadboard
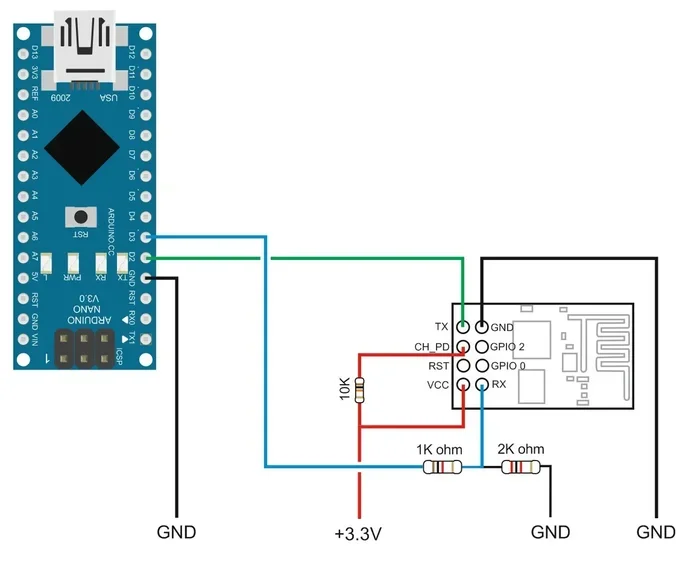
The ESP8266 operates at 3.3V logic levels, while the Arduino Nano works at 5V. You need a voltage regulator and a voltage divider to protect the ESP8266 from damage. Here is the wiring table:
| ESP8266 Pin | Arduino Nano Pin | Notes |
|---|---|---|
| VCC | 3.3V (from regulator) | Do not connect directly to 5V |
| GND | GND | Common ground is essential |
| TX | D2 (RX via voltage divider) | Use 2kΩ and 1kΩ resistors |
| RX | D3 (TX through voltage regulator) | 3.3V logic level required |
| CH_PD (EN) | 3.3V via 10kΩ pull-up | Keep this high to enable the module |
Take your time with this step. A single wrong connection can damage your ESP8266 module. Double-check every wire before powering up your circuit.
Installing the Right Libraries
To communicate with the ESP8266, you need the right software libraries. Open the Arduino IDE and go to Sketch > Include Library > Manage Libraries. Search for and install the following:
- SoftwareSerial: This comes built into the Arduino IDE. It lets you use digital pins for serial communication.
- ESP8266WiFi Library: If you are programming the ESP8266 directly, this library handles WiFi connections.
- Blynk or WiFiClient: Depending on your project, these libraries help you send data to the cloud.
For basic serial communication between the Nano and the ESP8266, SoftwareSerial is all you need. You create a secondary serial port on digital pins and send AT commands to the ESP8266 module.
Writing and Uploading the WiFi Code
Here is a simple example to get you started. This code sends an AT command to the ESP8266 to check if it is responding:
// Basic ESP8266 test code
SoftwareSerial esp8266(2, 3); // RX, TX
void setup() {
Serial.begin(9600);
esp8266.begin(115200);
Serial.println(“Testing ESP8266…”);
esp8266.println(“AT”);
}
If everything is wired correctly, you should see “OK” in the Serial Monitor. That means your Nano is talking to the ESP8266 module. From there, you can send more AT commands to connect to your WiFi network and start transmitting data.
Quick Tip: Always start with simple AT commands before building complex projects. It saves hours of debugging time and helps you confirm that your hardware setup is correct.
Comparison of WiFi Connection Options for Arduino Nano
Not all WiFi methods are created equal. Each approach has different costs, complexities, and capabilities. Here is a side-by-side comparison to help you choose the right one for your project.
| Feature | ESP8266 External Module | Nano 33 IoT | ESP32 Nano Clone |
|---|---|---|---|
| Cost | Low ($2-$5 for module) | Medium ($25-$35) | Low-Medium ($8-$15) |
| Built-In WiFi | No (external module) | Yes | Yes |
| Bluetooth | No | Yes (BLE) | Yes (Classic + BLE) |
| Ease of Setup | Medium | Easy | Easy |
| Processing Power | Moderate (ESP8266) | Moderate | High (Dual Core) |
| Memory | 80KB RAM | 256KB RAM | 520KB RAM |
| Pin Compatibility | Standard Nano pins | Standard Nano pins | Varies by clone |
| Best For | Budget projects | Clean IoT builds | Advanced WiFi projects |
As you can see, each option has its place. If you are on a tight budget, the external ESP8266 module is the way to go. If you want simplicity and built-in features, the Nano 33 IoT is excellent. For advanced projects that need more power and memory, the ESP32-based clone is the best choice.
Common Mistakes and Expert Tips for Reliable Wireless Connections
Adding WiFi to your Arduino Nano is not always smooth sailing. Many makers run into the same issues over and over again. Here are the most common mistakes and how to avoid them.
Common Mistakes
- Skipping the Voltage Regulator: The ESP8266 needs 3.3V. Connecting it directly to 5V will fry the module. Always use a proper 3.3V regulator.
- Ignoring Power Supply Limits: WiFi modules draw a lot of current during transmission. If your power supply is weak, your connection will drop or the module will reset unexpectedly.
- Using the Wrong Baud Rate: The ESP8266-01 defaults to 115200 baud. If your SoftwareSerial is set to a different rate, you will get garbled output.
- Forgetting the CH_PD Pin: If you do not pull the CH_PD (Enable) pin high, the ESP8266 will not start. This is one of the most common reasons for “no response” issues.
- Not Using a Voltage Divider on TX: The Nano sends 5V signals on its TX pin. Without a voltage divider, this can damage the ESP8266 RX pin over time.
- Weak WiFi Signal: Placing your Nano too far from the router or using a poor antenna can cause connection drops and data loss.
Expert Tips for Rock-Solid WiFi Connectivity
- Use a Quality 3.3V Power Supply: A dedicated voltage regulator with at least 500mA output will keep your ESP8266 stable during transmission bursts.
- Add a Capacitor Across VCC and GND: A 10uF to 100uF capacitor on the ESP8266 power pins helps smooth out current spikes during WiFi transmission.
- Keep WiFi Antennas Away from Metal: Metal objects can block or weaken WiFi signals. Keep your antenna in an open area for best results.
- Use Static IP for Stability: Assigning a static IP to your Nano device makes your connection more reliable and easier to debug.
- Implement Auto-Reconnect Logic: WiFi connections can drop unexpectedly. Code your Nano to automatically reconnect if the connection is lost.
- Monitor Power Consumption: If you are running on battery, WiFi is a major power drain. Consider deep sleep modes to extend battery life.
Expert Insight: Many experienced makers recommend using the ESP32 instead of the ESP8266 for new projects. The ESP32 is faster, has more memory, and offers better WiFi range. Even if your project does not need all that power, the extra headroom gives you room to grow.
Why WiFi Connectivity Transforms Arduino Nano Projects
Adding WiFi to your Arduino Nano is not just a technical upgrade. It fundamentally changes what your projects can do. Let us look at some real-world applications that demonstrate the power of wireless connectivity Arduino projects.
Home Automation: You can control lights, fans, and appliances from your phone. Connect relays to your Nano, add a WiFi module, and build a custom smart home system. It is cheaper and more flexible than commercial solutions.
Weather Stations: Connect temperature, humidity, and pressure sensors to your Nano. Send the data to a cloud platform over WiFi. Check your local weather from anywhere in the world. This is one of the most popular IoT projects Arduino for beginners.
Remote Plant Monitoring: If you have a garden or indoor plants, a WiFi-connected Nano can alert you when the soil is dry. You can even set up automatic watering systems that respond to sensor data in real time.
Security Systems: Connect motion sensors and cameras to your Nano. When motion is detected, send a notification to your phone over WiFi. Build a custom security system that is tailored to your needs.
Industrial Monitoring: In a workshop or factory, WiFi-enabled Nanos can monitor machine status, temperature, and vibration. The data can be logged and analyzed to prevent equipment failures before they happen.
All of these projects start with one simple step: connecting Arduino Nano to WiFi. Once you have that connection established, the only limit is your imagination.
When you think about Arduino WiFi setup, it can feel overwhelming at first. But the truth is, it is easier than most people think. You do not need to be an expert in networking or wireless technology. With the right module, the right libraries, and a little patience, you can get your Nano online in an afternoon.
Quick Tip: Start with a simple project. Build a basic temperature logger that sends data to a web server. Once you get that working, you can gradually add more features and complexity. This approach builds your confidence and helps you learn the fundamentals without getting frustrated.
The world of IoT prototyping is waiting for you. The Arduino Nano is a fantastic platform, and adding WiFi takes it to the next level. Whether you choose an external ESP8266 module, the Nano 33 IoT, or an ESP32-based clone, you have everything you need to succeed.
Remember to plan your power supply carefully, double-check your wiring, and test each step before moving on. WiFi connectivity is a game-changer for Arduino projects, and the skills you learn will serve you well in many future builds.
Now go ahead. Pick your method, gather your components, and start building. The Arduino WiFi world is open to you, and the possibilities are truly endless.
Key Takeaways
- Multiple Methods Exist: You can connect Arduino Nano to WiFi using an external ESP8266 module, the Nano 33 IoT board, or an ESP32-based Nano clone.
- External WiFi Modules Are Affordable: The ESP8266-01 costs just a few dollars and works great with the standard Arduino Nano for basic wireless projects.
- The Arduino Nano 33 IoT Is Built-In: This variant has WiFi and Bluetooth already on the board, making it the easiest option for clean IoT builds.
- WiFi Opens Up IoT Possibilities: You can build weather stations, home automation systems, security monitors, and remote sensor networks with WiFi-enabled Nanos.
- Power Management Matters: WiFi modules draw extra current, so use a proper 3.3V regulator and add capacitors for stable operation.
- Common Mistakes Are Avoidable: Wrong wiring, missing voltage dividers, and weak power supplies cause most connection failures. Follow the wiring table carefully.
- Start Simple and Scale Up: Begin with a basic project and gradually add complexity as you build your skills and confidence with WiFi connectivity.
Frequently Asked Questions
Do I need any extra hardware to connect Arduino Nano to WiFi?
Yes, unless you buy the Arduino Nano 33 IoT or an ESP32-based Nano clone. For the standard Nano, you will need an external WiFi module like the ESP8266-01, a 3.3V voltage regulator, and a few passive components. The total cost is usually under $10.
Is it hard to set up WiFi on an Arduino Nano?
Not at all. With the right module and a clear wiring guide, most people can get their Nano connected to WiFi within a few hours. The hardest part is getting the serial communication between the Nano and the WiFi module working correctly. Once that is done, the rest is straightforward.
Can I use Bluetooth instead of WiFi with Arduino Nano?
Yes, you can use Bluetooth modules like the HC-05 or HC-06 with the standard Arduino Nano. However, Bluetooth has a much shorter range than WiFi. If you need long-range connectivity or internet access, WiFi is the better choice. For short-range projects like controlling a robot from your phone, Bluetooth works great.
How much power does a WiFi module add to an Arduino Nano project?
The ESP8266-01 draws about 70 to 300 mA during WiFi transmission. This is significantly more than the standard Nano alone. Always use a quality 3.3V power supply rated for at least 500 mA. If you are running on battery, consider using deep sleep modes to reduce power consumption.
What is the best WiFi module to pair with Arduino Nano?
The ESP8266-01 is the most popular and affordable choice. It is widely available, well-documented, and works reliably with the Arduino Nano. For more advanced projects, the ESP32-based modules offer better performance, more memory, and dual-core processing power.
Can I connect my WiFi-enabled Arduino Nano to the internet without a router?
You need a router or access point for WiFi connectivity in most cases. However, the ESP8266 supports ESP-NOW protocol, which allows device-to-device communication without a router. This is great for local wireless sensor networks where internet access is not required.
=== CONCLUSION ===
Can you connect Arduino Nano to WiFi? Without a doubt, yes. You have several options at your disposal, from affordable external modules to all-in-one board variants. Connecting Arduino Nano to WiFi transforms it from a simple microcontroller into a powerful wireless IoT device capable of remote monitoring, cloud integration, and wireless control.
Whether you choose the budget-friendly ESP8266 approach, the convenient Arduino Nano 33 IoT, or the versatile ESP32-based Nano clone, the key is to start with a solid wiring setup and test each step carefully. Avoid the common mistakes we covered, follow the expert tips for reliable connections, and you will be building amazing WiFi projects in no time.
The world of Arduino WiFi projects is vast and exciting. From home automation to weather stations to security systems, the possibilities are limited only by your creativity. So gather your components, fire up the Arduino IDE, and take the first step toward wireless Arduino projects today.