Can You Connect A Camera Through Hdmi For Live Viewing
Yes, you can connect a camera through HDMI for live viewing, and it’s one of the easiest ways to see exactly what your lens sees on a bigger screen. Connecting a camera through HDMI delivers a clean, lag-free signal that’s perfect for streaming, events, and field work. In this guide, we’ll cover cables, monitors, setups, and troubleshooting so you can get started right away.
Have you ever wondered if you can connect a camera through HDMI and see what you’re shooting on a big screen in real time? Can you connect a camera through HDMI for live viewing? The short answer is yes, and it’s simpler than you might think. Whether you’re a vlogger, a wedding photographer, or a wildlife shooter, plugging your camera into an external monitor or TV can transform your workflow.
HDMI connections give you a direct, high-quality video feed with almost no delay. You get a clear picture of your composition, focus, and exposure right on the spot. This is especially helpful when you need to check your shots quickly or share a live feed with a client.
In this article, we’ll walk you through everything you need to know. We’ll cover the types of HDMI ports, the right cables to buy, how to set up a live viewing station, and common mistakes to avoid. By the end, you’ll feel confident hooking up your camera and monitoring your footage like a pro.
Key Takeaways
- Direct HDMI connection works on most cameras: You can use full-size, mini, or micro HDMI ports to send video to a monitor or TV with no lag.
- The right cable matters: Choose a high-speed HDMI cable that matches your camera’s port and your monitor’s input for the best picture.
- Live viewing improves your shooting: It helps you check focus, framing, and exposure instantly, which is crucial for events and streaming.
- HDMI beats wireless for reliability: Wired HDMI offers a stable, uncompressed feed, while Wi-Fi and USB can have delays or compression.
- Troubleshooting is simple: Most issues come from cable length, port type, or power settings, and they’re easy to fix.
- You can use HDMI with capture cards: An HDMI to USB capture card lets you stream your camera feed directly to a computer.
- Check your camera’s manual: Some cameras need a setting turned on to enable HDMI output for live viewing.
📑 Table of Contents
Understanding HDMI Connectivity for Cameras
Before you grab a cable, it helps to know the basics. HDMI stands for High-Definition Multimedia Interface. It carries both video and audio through a single cable. Most modern cameras include an HDMI port, but the size and shape can vary.
When you connect a camera through HDMI, you’re tapping into the camera’s raw video output. This gives you a clean, uncompressed signal that looks sharp on any compatible display. The signal travels fast, so you see what the lens sees with very little lag.
What HDMI Means for Your Camera
HDMI is the go-to standard for sending high-definition video from a source to a display. In the camera world, it lets you view your images and videos on a larger screen. This is called live view, and it’s a game-changer for many shooters.
When you use HDMI for live viewing, you bypass the camera’s small LCD screen. Instead, you get a bright, clear picture on an external monitor. This makes it easier to see details, check focus, and frame your shot precisely.
Types of HDMI Ports on Cameras
Cameras use three main HDMI port types. Knowing which one you have is the first step.
- Standard (Type A): The full-size HDMI port you see on TVs and monitors. Many larger cameras and camcorders use this.
- Mini HDMI (Type C): A smaller version found on some mirrorless cameras and action cams.
- Micro HDMI (Type D): The smallest size, common in compact cameras and older smartphones.
Check your camera’s manual or look at the port itself. The shape tells you which cable or adapter you need. Using the wrong type will not work, so always match the port to the cable.
Quick Tips for Choosing the Right Port
Here are a few fast tips to keep in mind.
- Look for the HDMI symbol next to the port on your camera.
- Use a magnifying glass if the label is tiny.
- Buy a cable that matches the port type, or get an adapter.
- Never force a cable in. If it doesn’t fit, check the size.
Taking a moment to identify your port saves time and frustration later.
How to Connect Your Camera to a Monitor or TV via HDMI
Setting up an HDMI connection is straightforward. You need three things: your camera, an HDMI cable, and a display with an HDMI input. Once you have those, you’re ready to go.
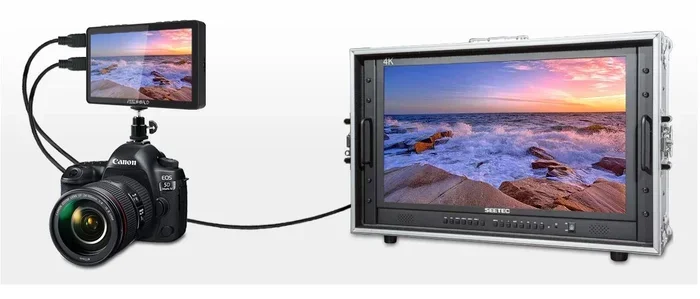
The process works the same way whether you’re using a TV, a field monitor, or a laptop with an HDMI capture card. The goal is to send the live video feed from the camera to the external screen so you can see exactly what the lens sees.
Step-by-Step Connection Guide
Follow these simple steps to get your live view up and running.
- Turn off your camera and your display device.
- Plug one end of the HDMI cable into the camera’s HDMI port.
- Plug the other end into the HDMI input on your monitor or TV.
- Turn on the display device and switch it to the correct HDMI source.
- Turn on your camera.
- Look at the display. You should see the camera’s live view image.
That’s it. If you don’t see an image, don’t worry. We’ll cover troubleshooting later in this guide.
Choosing the Right HDMI Cable
Not all HDMI cables are the same. The cable you pick affects picture quality and reliability. Here’s what to look for.
- High-Speed HDMI: Supports 4K and 1080p resolutions. This is the best choice for most cameras.
- Ultra High Speed HDMI: Designed for 8K and high frame rates. Overkill for most users, but great if you shoot in 4K 120fps.
- Cable Length: Keep it as short as possible. Longer cables can cause signal loss or lag. A 6-foot cable works well for most setups.
Buy a cable from a reputable brand. Cheap, unverified cables sometimes fail or deliver poor image quality.
Common Mistakes When Plugging In
Even simple setups can go wrong if you skip a step. Here are the most common mistakes.
- Forgetting to turn on HDMI output: Some cameras have a setting that disables HDMI output by default. You need to enable it in the menu.
- Using a damaged cable: A frayed or bent cable can cause a blank screen or flickering.
- Plugging into the wrong port: Some cameras have a USB port and an HDMI port close together. Double-check you’re using the HDMI port.
- Ignoring the display source: Your TV or monitor must be set to the correct HDMI input channel.
Avoid these simple errors and your connection will work the first time.
Live Viewing Benefits and Use Cases
Why bother connecting a camera through HDMI? The benefits are huge. Live viewing changes the way you shoot, whether you’re working alone or with a team.
When you see your image on a big screen, you can spot problems you’d miss on a tiny LCD. You notice if the horizon is crooked. You see if the focus is sharp. You check the exposure in real time. This level of control is especially valuable in professional settings.
Professional Streaming Setups
Streamers and content creators rely on HDMI live viewing every day. By connecting a camera to a capture card and then to a computer, you can broadcast your footage directly to platforms like Twitch or YouTube.
The HDMI feed gives you a clean signal with no compression artifacts. Your audience sees the same high-quality image you see on your monitor. You can adjust settings on the fly and respond to viewer feedback instantly.
Can you connect a camera through HDMI for live viewing in a streaming setup? Absolutely. It’s the backbone of many professional live broadcasts.
Wildlife and Event Photography
Wildlife photographers often shoot from a distance. A field monitor connected via HDMI lets them review shots without walking back to the camera. Event photographers use HDMI live view to show clients a preview on a large screen during weddings or parties.
In both cases, the instant feedback saves time. You can retake a shot immediately instead of discovering the problem later when you review images on a computer.
Key Takeaways for Live Viewers
- Live viewing helps you catch focus and framing errors before you miss the moment.
- It makes solo shooting much easier because you can monitor from a distance.
- Clients and audiences appreciate seeing a live feed on a big screen.
- HDMI delivers a lag-free, high-quality signal that wireless methods can’t match.
HDMI vs. Other Connection Methods
HDMI isn’t the only way to connect a camera to a screen. Let’s compare it with the most common alternatives so you can decide which method fits your needs.
Each method has strengths and weaknesses. Your choice depends on what you value most: speed, convenience, image quality, or cost.
| Feature | HDMI | USB (UVC) | Wi-Fi / App |
|---|---|---|---|
| Signal Quality | Uncompressed, high definition | Compressed, depends on camera | Compressed, can drop frames |
| Lag or Delay | Virtually none | Slight delay | Noticeable delay |
| Setup Complexity | Simple plug-and-play | Requires drivers or software | Easy, but needs app |
| Reliability | Very high | Good, but can disconnect | Can be affected by interference |
| Best For | Live viewing, streaming, events | Basic webcam use, file transfer | Quick sharing, remote control |
USB and Wi-Fi Alternatives
Many modern cameras can connect to a computer via USB and act as a webcam. This uses the UVC (USB Video Class) protocol. It’s convenient because you don’t need extra hardware.
Wi-Fi connections let you view your camera’s screen through a smartphone app or computer software. The trade-off is that wireless feeds often have a slight delay and lower resolution. For critical work like live streaming or client previews, this delay can be a problem.
When HDMI Wins
HDMI is the clear winner when you need a reliable, high-quality live feed. It’s the standard for professional cameras, broadcast setups, and any situation where lag or signal loss is not acceptable.
If you’re shooting a wedding and the bride wants to see herself on a large monitor, you can’t afford a Wi-Fi delay. HDMI delivers a perfect, real-time image every time.
Expert Insights on Signal Quality
According to camera engineers, the HDMI output on your device is designed to carry the full resolution of your sensor. When you use a high-quality cable, you get every detail the camera captures. This is why HDMI live view looks so much better than the compressed feeds you get through Wi-Fi or Bluetooth.
One pro tip from experienced videographers: always use a powered HDMI hub if you run a cable longer than 15 feet. Passive cables lose signal strength over distance, and a powered hub keeps the picture crisp.
Troubleshooting HDMI Connection Issues
Even with the right gear, you might run into problems. Most HDMI issues are easy to fix once you know what to look for. Let’s walk through the most common ones.
Quick Tips to Avoid Signal Dropouts
- Check the cable connection: Unplug and replug both ends firmly.
- Try a different HDMI port: Some ports on TVs or monitors work better than others.
- Use a shorter cable: Long cables are the #1 cause of weak signals.
- Update your camera’s firmware: Manufacturers often fix HDMI bugs with software updates.
- Disable HDMI-CEC: This feature can sometimes interfere with the signal. Turn it off in your TV’s settings.
These quick fixes solve the majority of HDMI problems. Start with the simplest solution before moving on to more complex ones.
Common Mistakes and How to Fix Them
Here are the mistakes we see most often, along with their solutions.
- No image on the screen: Your camera’s HDMI output may be disabled. Go to the menu and look for “HDMI Output” or “Display Settings.” Turn it on.
- Black screen with sound: This usually means the camera is set to output a format your monitor doesn’t support. Try changing the resolution in the camera menu to 1080p or 720p.
- Flickering image: The cable might be damaged, or the connection is loose. Replace the cable or use a cable with ferrite cores to reduce interference.
- Camera won’t turn on when plugged in: Some cameras draw power through HDMI. If your monitor can’t supply enough power, the camera may not start. Use a USB cable for power and HDMI for video only.
Remember that can you connect a camera through HDMI is not just about plugging in a cable. It’s about making sure both devices are set up correctly.
Key Takeaways for a Stable Connection
- Always use a high-speed HDMI cable that matches your camera’s port type.
- Keep cable runs under 10 feet for the best signal integrity.
- Enable HDMI output in your camera’s menu before turning on the display.
- If you use a long cable, add a signal booster or powered hub.
- Update your camera firmware regularly to fix known HDMI bugs.
Final Thoughts and Getting Started
Now you know the answer to the big question: can you connect a camera through HDMI for live viewing? The answer is a resounding yes, and it’s one of the most useful skills you can add to your photography or videography toolkit.
With the right cable, a compatible monitor or TV, and a few minutes of setup, you can see exactly what your camera sees in real time. This makes it easier to nail focus, perfect your composition, and deliver a polished live feed to clients or audiences.
Start simple. Grab a high-speed HDMI cable, plug it into your camera and a TV, and turn on the live view. Experiment with different setups. Once you see the difference a big, clear screen makes, you’ll wonder how you ever shot without it.
The world of live viewing is at your fingertips. All you need is the right cable and a little confidence. Go ahead, plug in your camera, and enjoy the view.
Frequently Asked Questions
Do all cameras have an HDMI port for live viewing?
Most modern cameras, including DSLRs, mirrorless models, and many action cams, include an HDMI port. However, some very compact or budget cameras may omit it. Always check your camera’s specifications to confirm it has HDMI output before buying a cable.
Can I use any HDMI cable to connect my camera to a TV?
You should use a high-speed HDMI cable that matches your camera’s port size. Standard cables work fine for 1080p, but if you shoot in 4K, look for a cable rated for 4K bandwidth. Avoid very long or cheap unbranded cables, as they can cause signal loss.
Is there any lag when viewing through HDMI?
HDMI delivers a near-instantaneous signal with virtually no perceptible lag. This makes it ideal for live viewing, where you need to see exactly what the lens sees in real time. Wireless methods like Wi-Fi usually have more noticeable delay.
Can I stream directly from my camera using HDMI?
Yes, you can. By connecting your camera’s HDMI output to an HDMI capture card and then to a computer, you can stream live video to platforms like Twitch or YouTube. This is a popular setup for content creators and professional broadcasters.
Why does my camera show a black screen when connected via HDMI?
A black screen often means the camera’s HDMI output setting is disabled, or the TV is on the wrong input source. Check your camera menu for HDMI output and make sure your display is set to the correct HDMI channel. Also, try a different cable or port.
Do I need a special monitor to use HDMI live view?
Not necessarily. Any TV or monitor with an HDMI input will work. However, a dedicated field monitor offers features like focus peaking, zebras, and brighter screens that are helpful for outdoor shooting. For basic live viewing, a standard TV is perfectly fine.