How Do I Connect My Google Home App to My WiFi Network
Connecting your Google Home app to WiFi is simple when you follow the right steps. This guide walks you through the entire process from downloading the app to getting your smart speaker up and running. You will learn how to set up your device, fix common connection problems, and optimize your home network for the best performance.
Setting up a smart speaker at home feels exciting. You unbox your new device, download the Google Home app, and then… nothing happens. The screen says it needs a WiFi connection. Suddenly, the excitement turns into confusion. If you have ever wondered how to connect your Google Home app to WiFi, you are not alone. Millions of people face this same question every day.
The good news is that the process is much easier than it looks. You do not need to be a tech expert. With a few simple steps, your Google Home device will be up and running in no time. This guide covers everything you need to know. From the very first download to fixing common problems, you will find clear instructions that actually work. Let us get started.
Before you dive into the setup process, let us talk about what you need. Having the right tools ready saves time and frustration. A stable home network, a compatible smartphone, and a few minutes of free time are all you need. Once you have these basics covered, the rest is smooth sailing.
Key Takeaways
- Easy Setup Process: You can connect your Google Home app to WiFi in just a few minutes using your smartphone.
- Right Equipment Matters: A stable 2.4 GHz network and a strong WiFi signal make all the difference.
- Troubleshooting Is Simple: Most connection issues can be fixed by restarting your router or checking your network settings.
- Optimization Helps Performance: Placing your device correctly and updating firmware keeps your Google Home running smoothly.
- Multiple Devices Work Together: You can connect several Google Home devices to the same WiFi network with ease.
- Security Matters: Using a strong WiFi password and keeping your app updated protects your smart home setup.
📑 Table of Contents
- What You Need Before You Start
- Step-by-Step Guide to Connect Google Home App to WiFi
- Setting Up Your Google Home Device for the First Time
- Troubleshooting Common WiFi Connection Issues
- Optimizing Your WiFi Network for Google Home
- Advanced Tips for Google Home WiFi Setup
- Common Mistakes to Avoid During Setup
- Frequently Asked Questions
- Conclusion
What You Need Before You Start
Preparation makes any tech setup go faster. Here is a simple checklist of everything you need before connecting your Google Home app to WiFi.
- A smartphone or tablet: Use an Android or iPhone with the latest version of the Google Home app installed.
- A working WiFi network: Your router should be on and broadcasting a signal. Most Google Home devices work best on a 2.4 GHz network.
- Your WiFi password: Have it written down or saved on your phone. You will need to enter it during setup.
- A power outlet: Plug your Google Home device into a wall outlet before you begin.
- A stable internet connection: Make sure your internet is working on other devices first.
Take a moment to check each item on this list. If your WiFi is not working on your phone, fix that first. A weak signal causes most setup problems. Also, make sure your Google Home app is updated. Open the App Store or Google Play Store and check for any available updates. An outdated app can cause unexpected errors during setup.
Some people also ask whether they need a Google account. Yes, you do. A Google account lets you sign in to the app and link all your smart home devices together. If you already use Gmail, YouTube, or Google Drive, you are all set. Just sign in with your existing credentials.
Step-by-Step Guide to Connect Google Home App to WiFi
Now let us get into the actual setup process. Follow these steps carefully, and your Google Home device will connect to your WiFi network without any hassle.
Step 1: Open the Google Home App
Locate the Google Home app on your phone. The icon looks like a colorful house. Tap it to open the app. If this is your first time using it, you will see a welcome screen. Sign in with your Google account. This step links your phone to your Google Home ecosystem.
After signing in, the app will ask for permission to access your location and Bluetooth. Allow these permissions. They help the app find your Google Home device during setup. Without them, the app might not detect your smart speaker.
Step 2: Tap the Plus Sign
Look at the top left corner of the screen. You will see a plus sign (+). Tap it. A menu will pop up with several options. Choose “Set up device.” Then select “New device” from the list. The app will now start searching for available Google Home devices nearby.
This search usually takes just a few seconds. Make sure your phone is connected to the same WiFi network you want your Google Home device to use. If your phone is on mobile data, the app might not find your device. Switch to WiFi first.
Step 3: Select Your Device
Once the app finds your Google Home device, it will appear on the screen. Tap on it. The app will now show the device name and model. If you have multiple Google Home devices, pick the one you are setting up right now.
Some users have multiple smart speakers in different rooms. Naming each device correctly helps you manage them better. For example, you might name one “Living Room Speaker” and another “Bedroom Speaker.” This makes it easy to control each one with voice commands later.
Step 4: Connect to Your WiFi Network
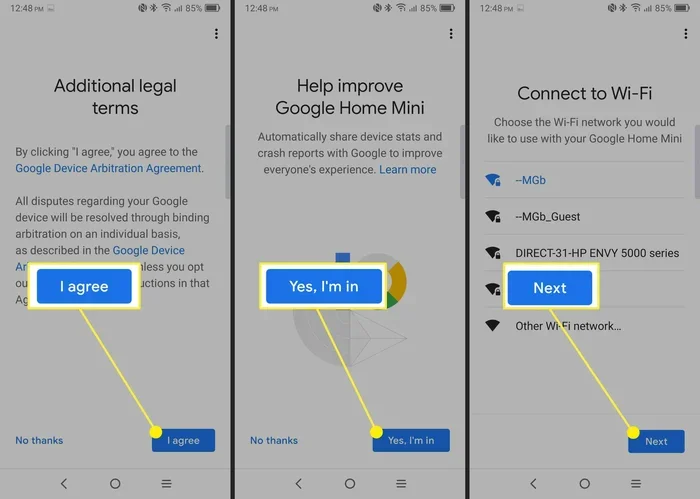
Here is the most important step. The app will show a list of available WiFi networks. Find your home network and tap on it. You will be prompted to enter your WiFi password. Type it carefully. Passwords are case-sensitive, so check for capital letters and special characters.
After entering the password, tap “Connect.” The app will send this information to your Google Home device. Wait for a confirmation message. It usually takes about 30 seconds. You will hear a chime from the speaker when the connection is successful.
If the connection fails, do not panic. Try these quick fixes. First, make sure you entered the correct password. Second, move your phone closer to the router. Third, restart your router and try again. Most WiFi issues get solved with these simple steps.
Step 5: Finish the Setup
Once your Google Home device connects to WiFi, the app will guide you through the final steps. You can name your device, assign it to a room, and choose your preferences. The setup wizard is very intuitive. Just follow the on-screen prompts.
At the end of the setup, you will see a confirmation screen. Your Google Home device is now connected to your WiFi network. Try saying “Hey Google” to test it. If the speaker responds, congratulations. You are all set.
Setting Up Your Google Home Device for the First Time
First-time setup can feel a little overwhelming. But it really is not that complicated. The Google Home app walks you through everything. Here are some tips that make the process smoother.
Place your Google Home device in a central location. A spot in your living room or kitchen works well. Avoid putting it in a closet or behind furniture. These spots block the WiFi signal and reduce performance. A clear line of sight to your router helps a lot.
Also, keep your device away from other electronics that might cause interference. Microwaves, baby monitors, and cordless phones can all disrupt your WiFi signal. If you notice connection drops, moving the device to a different spot often solves the problem.
During setup, the Google Home app will ask you to link additional services. You can connect Spotify, YouTube Music, Netflix, and other apps. This lets you control all your entertainment with voice commands. Take your time and link the services you actually use.
One thing many people overlook is updating the device firmware. Google pushes regular updates to improve performance and security. The app usually handles this automatically. But it is good practice to check for updates manually every few weeks. Go to the device settings in the app and look for any available updates.
Troubleshooting Common WiFi Connection Issues
Even with careful setup, things can go wrong. WiFi connection issues are the most common problem users face. Here is how to fix them.
Device Not Found During Setup
If the Google Home app cannot find your device, try these solutions. First, make sure Bluetooth is turned on. The app uses Bluetooth to discover new devices during setup. Second, check that your phone is connected to the 2.4 GHz WiFi band. Many Google Home devices do not support 5 GHz networks during initial setup.
Third, restart your phone and try again. Sometimes a simple reboot clears up connection glitches. Fourth, make sure your Google Home device is plugged in and powered on. A blinking light usually means the device is ready for setup.
WiFi Connection Keeps Dropping
A stable connection is important for smart speakers. If your Google Home device keeps disconnecting from WiFi, check a few things. First, test your WiFi speed. Slow internet causes frequent drops. Use a speed test app to check your connection.
Second, move your router closer to the Google Home device. Walls and floors weaken WiFi signals over distance. A mesh WiFi system can help extend coverage throughout your home. These systems use multiple nodes to create a strong, consistent signal in every room.
Third, reduce the number of devices connected to your network. Too many connected devices can slow down your router. Disconnect devices you are not using and see if that helps.
Forgot WiFi Password
Forgetting your WiFi password happens to everyone. You can find it on your router. Look for a sticker on the bottom or back of the device. It usually lists the default network name and password. If you changed the password and forgot it, you will need to log into your router settings.
Type your router IP address into a web browser. Common addresses are 192.168.1.1 or 192.168.0.1. Log in with your admin credentials. From there, you can view or reset your WiFi password.
Optimizing Your WiFi Network for Google Home
Once your Google Home device is connected, you want it to work reliably. Optimizing your home network makes a big difference. Here are some practical tips.
Use the 2.4 GHz frequency band for your Google Home device. Most smart home gadgets work best on this band. It has a longer range than 5 GHz and penetrates walls better. If your router supports dual band, make sure your Google Home device connects to the 2.4 GHz network.
Place your router in a central, open area. Avoid putting it inside cabinets or behind TVs. A clear, elevated position gives the best signal spread. If your home is large, consider buying a WiFi extender. These small devices boost your signal to far corners of your house.
Change your WiFi channel if you experience interference. Many routers automatically select a channel, but manual selection often works better. Use a WiFi analyzer app to find the least crowded channel in your area. Switch your router to that channel and see if your Google Home connection improves.
Keep your router firmware updated too. Router manufacturers release updates that improve performance and fix bugs. Check your router settings periodically for available updates. An up-to-date router provides a more stable connection for all your smart home devices.
Advanced Tips for Google Home WiFi Setup
Once you have the basics down, these advanced tips will take your setup to the next level.
Use a Mesh WiFi System
If you have a large home, a single router might not cover every room. A mesh WiFi system solves this problem. It uses multiple units placed around your home to create one seamless network. Google Nest WiFi and Google WiFi are popular mesh systems that work perfectly with Google Home devices.
Mesh systems are easy to set up. You place one unit near your modem and others in rooms that need better coverage. The units communicate with each other to create a strong, consistent signal. Your Google Home devices stay connected no matter where you place them in your home.
Set Up a Guest Network
Some users prefer to keep their smart home devices on a separate network. A guest network gives visitors internet access without letting them see your other devices. Most modern routers support guest networks. Check your router settings to enable one.
You can connect your Google Home devices to the guest network if you want extra privacy. Just make sure the guest network uses the 2.4 GHz band. Google Home devices generally do not work on guest networks that restrict device discovery.
Control Multiple Devices with One App
The Google Home app lets you manage all your smart devices from one place. You can add lights, thermostats, cameras, and more. Each device connects to your WiFi network and links to the Google Home app. This creates a unified smart home experience.
Group devices by room for easier control. For example, you can create a “Bedroom” group that includes your speaker, smart lights, and smart plug. Then you can control all of them with a single voice command. This is one of the biggest advantages of using the Google Home ecosystem.
Common Mistakes to Avoid During Setup
Learning from other people’s mistakes saves you time. Here are common errors to avoid when connecting your Google Home app to WiFi.
- Skipping app updates: An outdated Google Home app can cause setup failures. Always update before you begin.
- Using the wrong WiFi band: Some Google Home devices do not connect to 5 GHz networks during initial setup. Stick with 2.4 GHz.
- Entering the wrong password: Double-check your WiFi password before tapping connect. One wrong character will cause a failure.
- Placing the device too far from the router: A weak signal during setup leads to problems. Keep the device close to the router initially.
- Ignoring router restart: A simple router restart fixes many connection issues. Do not skip this step if something goes wrong.
- Not naming your devices: Unnamed devices are hard to control with voice commands. Always give each device a clear name.
Avoiding these mistakes makes the setup process much smoother. Take your time and follow each step carefully. Rushing through setup is the number one cause of connection problems.
Frequently Asked Questions
Can I connect my Google Home device to a 5 GHz WiFi network?
Most Google Home devices connect to 2.4 GHz networks during initial setup. However, once the device is set up, it may automatically connect to a 5 GHz band if available. To ensure a smooth setup process, keep your phone connected to the 2.4 GHz network throughout the process.
Why does my Google Home app not find my device?
This usually happens when Bluetooth is turned off or your phone is not on the same WiFi network. Make sure both Bluetooth and location services are enabled on your phone. Also, check that your Google Home device is plugged in and powered on with a blinking light.
How many Google Home devices can I connect to one WiFi network?
You can connect multiple Google Home devices to the same WiFi network. Most home routers support up to 250 connected devices, but performance may vary. For the best experience, keep your total connected devices under 30 to avoid network congestion.
What should I do if I forgot my WiFi password?
You can find your WiFi password on your router’s sticker or by logging into your router settings. Type your router IP address into a web browser, enter your admin credentials, and look for the WiFi settings section. From there, you can view or reset your password.
Can I use a mobile hotspot instead of home WiFi?
Yes, you can use a mobile hotspot during setup. However, this is not ideal for long-term use. Mobile hotspots have limited data and may not provide a stable connection. Use a hotspot only for initial setup, then switch back to your home WiFi network.
How do I reset my Google Home device if the WiFi connection fails?
To reset your device, unplug it from power, wait 10 seconds, and plug it back in. If that does not work, press and hold the microphone mute button for about 15 seconds. The device will reset to factory settings, and you can start the setup process again from scratch.
Conclusion
Connecting your Google Home app to WiFi does not have to be stressful. With the right preparation and a clear set of steps, you can get your smart speaker running in just a few minutes. Remember to check your WiFi network, use the 2.4 GHz band during setup, and keep your app updated. If problems come up, the troubleshooting tips in this guide will help you solve them quickly.
Once your Google Home device is connected, you open the door to a smarter home. You can control lights, play music, set timers, and get answers to questions all with your voice. The Google Home ecosystem makes daily life more convenient and fun.
Take the time to optimize your WiFi network for the best performance. Place your router centrally, update your firmware regularly, and keep your devices named clearly. These small efforts pay off in a smoother, more reliable smart home experience. Now that you know how to connect your Google Home app to WiFi, you are ready to enjoy all the benefits of a connected home.