Do Projectors Have To Be Centered For Perfect Setup
Do projectors have to be centered? The short answer is no, but centering your projector placement helps a lot. Modern projectors come with features like keystone correction and projector offset that give you flexibility. Still, proper projector alignment improves image quality and avoids distortion.
Setting up a projector can feel overwhelming. You unbox the device. You grab the mount. You stare at the wall. And then the big question hits you. Do projectors have to be centered? It is a simple question, but the answer has some layers. Whether you are building a home theater or setting up a presentation room, projector placement matters a lot. A poorly placed projector can give you a distorted, dim, or blurry image. But the good news is you have more flexibility than you might think.
In this guide, we will walk through everything you need to know about projector alignment. We will cover what centering means, why it matters, and when you can skip it. You will learn practical tips, common mistakes, and easy fixes. By the end, you will feel confident about your projector setup and get the best image quality possible.
Key Takeaways
- Projectors do not need to be perfectly centered: Most modern units have keystone correction and lens shift features that allow flexible placement.
- Centering improves image quality: A centered projector delivers sharper images with less distortion and better color accuracy.
- Keystone correction is a useful tool: It digitally adjusts the image shape when the projector is angled or off-center.
- Throw distance matters: Your projector screen size and throw distance affect where you should place the device.
- Common mistakes ruin the picture: Placing the projector too high, too low, or at the wrong angle causes image problems.
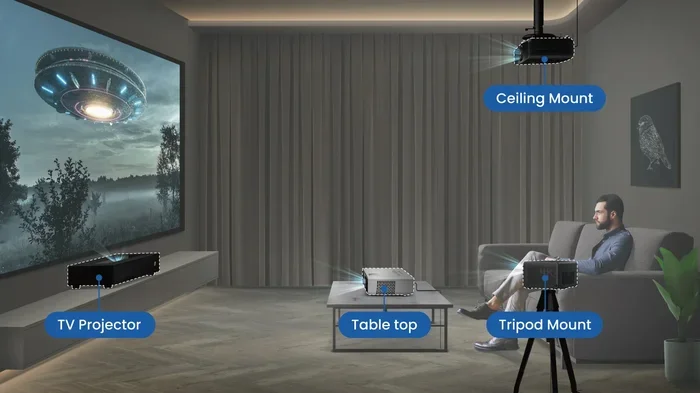
- Ceiling mount vs. table placement: Both work, but each requires different setup considerations for best results.
📑 Table of Contents
- What Does It Mean to Center a Projector?
- Why Does Projector Placement Matter?
- Keystone Correction: Your Best Friend for Off-Center Setup
- How to Properly Position Your Projector
- Common Mistakes People Make with Projector Placement
- When Off-Center Placement Actually Works
- Quick Tips for the Best Projector Setup
- Final Thoughts
What Does It Mean to Center a Projector?
When people say a projector needs to be centered, they usually mean the lens sits directly in front of the middle of the projector screen. The beam shoots straight out. The image lands perfectly square on the wall or screen. No tilting. No stretching. No weird trapezoid shapes.
But centering goes beyond just the horizontal position. You also need to think about vertical placement. Is the projector at the same height as the center of the screen? Is it sitting on a table or mounted on the ceiling? Each of these factors changes how the image looks. A centered projector gives you a clean rectangle. An off-center one can give you a trapezoid or a skewed rectangle.
Here is the thing most people do not realize. Centering is a goal, not a hard rule. Modern projectors have built-in tools that let you adjust the image even when the device is not perfectly centered. So do you always need to center it? No. But understanding what centering does for you helps you make better decisions.
Why Does Projector Placement Matter?
You might wonder why anyone fusses over projector placement in the first place. Can you not just set it anywhere and go? Well, you can. But the results will not be great every time. Placement affects several things that directly impact your viewing experience.
Image Shape and Distortion
The most obvious issue is image shape. When a projector sits off-center or at an angle, the light hits the screen at a slant. The result is a trapezoid shape instead of a rectangle. This is called keystone distortion. It makes text hard to read. It makes movies look awkward. And it pulls you out of the experience.
Now, modern projectors fix this with digital keystone correction. The device adjusts the image for you. But here is the catch. Digital correction reduces image quality. It crops the resolution. It can introduce noise. So while you can fix a crooked image, you lose some sharpness in the process.
Brightness and Color Accuracy
When the projector is not centered, the light spreads unevenly across the screen. The center might look bright. The edges might look dim. This is called brightness uniformity. It also affects color accuracy. Colors can shift when the light hits the screen at an extreme angle.
For a home theater setup, this matters a lot. You want every part of the screen to look equally vivid. For a business presentation, you want text to be crisp and colors to be true. Proper projector alignment helps you achieve both.
Throw Distance and Screen Size
Throw distance is the space between the projector and the screen. It determines how big the image will be. Every projector has a specific throw ratio. This ratio tells you how far back you need to sit to get a certain screen size.
When the projector is off-center, the throw distance changes on each side of the screen. The left side might be closer than the right side. This creates uneven sizing. One side of the image might be bigger than the other. Keeping the projector centered helps maintain a consistent throw distance across the entire image.
Keystone Correction: Your Best Friend for Off-Center Setup
Let us talk about keystone correction. This is the feature that saves most people from obsessive centering. Keystone correction is a digital adjustment that reshapes the image into a proper rectangle. It works even when the projector is sitting at a weird angle or off to the side.
There are two types of keystone correction. The first is manual keystone. You adjust it using the projector’s buttons or remote. The second is automatic keystone. The projector detects the angle and fixes it on its own. Both are useful. But automatic keystone is more convenient.
Here is what you should know. Keystone correction is a great backup plan. It is not a replacement for proper projector placement. Every time you use digital keystone, you lose a small amount of resolution. The image gets slightly softer. For casual movie watching, this does not matter much. For a sharp presentation or a serious movie night, you want to minimize keystone use.
Some projectors also offer vertical keystone and horizontal keystone separately. This gives you more control. You can fix the height without affecting the width. Or you can fix the side-to-side angle without changing the vertical alignment. This level of control makes flexible projector placement much easier.
Lens Shift: The Pro Alternative
If you want to place your projector off-center without losing quality, look for a model with lens shift. Lens shift moves the physical lens up, down, left, or right. It does this without changing the image digitally. That means zero quality loss. Zero resolution reduction.
Lens shift is common in higher-end projectors. It is a feature you see in home theater projectors and professional installation units. If you are serious about projector setup and image quality, lens shift is worth the investment. It gives you the freedom to mount the projector off-center while keeping the image perfect.
How to Properly Position Your Projector
Now that you understand why centering matters, let us talk about how to actually position your projector. Whether you are mounting it on the ceiling or setting it on a table, the steps are similar.
Step 1: Measure Your Throw Distance
Start by measuring the distance between where the projector will sit and the screen. Check your projector manual for the throw ratio. This tells you how large the image will be at that distance. You can also use an online throw distance calculator. These tools make it easy to get the right screen size for your room.
Step 2: Find the Center Point
Mark the center of your projector screen on the wall. Then measure the distance from that center point to where the projector will sit. This gives you a baseline for projector alignment. You want the lens to line up with the center of the screen as closely as possible.
Step 3: Adjust for Height
Most projectors project upward slightly. This is called the offset angle. If you place the projector on a table, it will project up toward the screen. If you mount it on the ceiling, it will project down. Make sure the projector is at the right height so the image does not point above or below the screen.
A good rule of thumb is to keep the center of the lens at the same height as the center of the screen. This minimizes vertical keystone and keeps the image balanced.
Step 4: Level the Projector
Use a small bubble level to make sure the projector is straight. Even a few degrees off can cause noticeable distortion. Most projectors also have built-in leveling guides or digital levels in their menus. Use these tools to get the best projector alignment.
Step 5: Test and Fine-Tune
Turn the projector on. Display a test image or a plain white slide. Look at the edges and corners. Is the image a perfect rectangle? Are the corners sharp? Is the brightness even across the screen? Make small adjustments until everything looks right. This final step is what separates a good setup from a great one.
Common Mistakes People Make with Projector Placement
Even experienced users make mistakes when setting up a projector. Here are the most common ones and how to avoid them.
Placing the Projector Too Close
One of the biggest mistakes is putting the projector too close to the screen. This creates an oversized image that looks blurry and pixelated. Check your throw ratio before you set up. Give the projector enough distance to produce a clear, sharp image.
Ignoring Room Lighting
Brightness is a key part of projector performance. A bright room washes out the image. If you place your projector in a room with lots of windows or overhead lights, the picture will look faded. Consider blackout curtains or dimmable lights for your home theater. The projector placement also matters here. A centered projector in a darker room always looks better.
Forgetting About Ventilation
Projectors generate heat. If you place yours in a tight enclosed space, it can overheat. This reduces the lamp life and can cause shutdowns. Make sure there is enough airflow around the unit. Keep vents clear and do not push the projector flush against a wall.
Using the Wrong Cables
The cable you use to connect your source device matters for image quality. If you want to project Netflix from your laptop to a projector, you need the right connection. Most modern projectors accept HDMI input. Make sure your cable supports the resolution you want. If your laptop only has USB-C, you may need a USB to HDMI adapter to make the connection work properly.
For those connecting mobile devices, you can pair your phone to a projector using wireless casting or a direct cable. Wireless options are convenient, but a wired connection usually gives you a more stable and higher-quality image.
Skipping the Keystone Adjustment
Some people set up the projector and never touch the keystone settings. If the image is slightly off, take two minutes to adjust it. A small tweak makes a big difference. Your eyes will thank you during a long movie or a full-day presentation.
When Off-Center Placement Actually Works
Here is the part that surprises most people. Off-center placement can work well in certain situations. You do not always need a perfectly centered projector. Let us look at when it is okay to be flexible.
If you are using a projector with strong keystone correction, you have more freedom. The digital adjustment can handle moderate off-center angles without a noticeable drop in quality. For everyday presentations or casual movie nights, this is perfectly fine.
Another situation where off-center works is when you are projecting onto a large screen and the projector physically cannot sit in the center. Maybe the table is too small. Maybe the ceiling mount only allows a certain position. In these cases, use keystone correction and lens shift to get the best possible image.
Also, if you are using the projector in a multi-purpose room, perfect centering might not be practical. The projector might need to move between different setups. In this case, a flexible placement with digital corrections is the way to go.
The key takeaway is this. Do what works for your space. Use the tools your projector gives you. Just be aware of the trade-offs. Every bit of digital correction costs you a little image quality. Keep it minimal for the best results.
Quick Tips for the Best Projector Setup
- Always measure your throw distance before buying or mounting the projector.
- Use a bubble level to keep the projector straight during installation.
- Turn on keystone correction last after you have positioned the projector as close to center as possible.
- Choose a projector with lens shift if you plan to mount it off-center frequently.
- Test with a real image before finalizing your setup. A test pattern reveals problems a blank wall hides.
- Keep the projector clean and free of dust for the best display sharpness over time.
- Consider the aspect ratio of your screen and source content to avoid black bars or stretching.
Final Thoughts
So, do projectors have to be centered? The answer is no, not strictly. But centering your projector is the best path to a great picture. It gives you the sharpest image, the most accurate colors, and the most even brightness across the screen. Modern features like keystone correction and lens shift give you flexibility when perfect centering is not possible.
Take the time to plan your projector placement. Measure your distances. Level the device. Fine-tune the image. These small steps pay off in a big way. Whether you are watching a movie, giving a presentation, or gaming on a big screen, proper projector alignment makes everything better.
Remember, the goal is not perfection. The goal is a setup that looks great and feels easy to use. With the right approach, you can enjoy a fantastic image no matter where your projector sits. Trust the process. Experiment with your setup. And most importantly, enjoy the show.
Frequently Asked Questions
Can I place my projector on the side instead of the center?
Yes, you can. Most modern projectors have keystone correction that lets you adjust the image when the device is off to the side. However, using digital correction reduces image quality slightly. For the best results, try to keep the projector as close to center as possible.
Does ceiling mounting require the projector to be centered?
Ceiling mounting works well when the projector is centered below the screen. But many ceiling mounts allow for angle adjustments. If you cannot mount it directly in the center, use keystone correction or lens shift to fix the image shape.
What is the difference between keystone correction and lens shift?
Keystone correction is a digital adjustment that reshapes the image using software. Lens shift is a physical adjustment that moves the lens without changing the image digitally. Lens shift preserves full image quality, while keystone correction can reduce sharpness slightly.
How far should my projector be from the screen?
The distance depends on your projector model and the screen size you want. Check the throw ratio in your projector manual. A shorter throw ratio means the projector can create a large image from a shorter distance. You can also use an online throw distance calculator for quick estimates.
Will an off-center projector affect brightness?
Yes, it can. When the projector is off-center, the light hits the screen at an uneven angle. This causes some areas of the image to look dimmer than others. Centering the projector helps distribute brightness more evenly across the entire screen.
Can I connect my laptop wirelessly to a projector?
Many modern projectors support wireless connectivity. You can also connect your laptop to a projector using an HDMI cable for the most reliable connection. Wireless options are convenient, but a wired connection usually delivers better stability and higher image quality.
=== INTERNAL LINKS ===
Want to watch movies on the big screen from your laptop? Learn how to project Netflix from your laptop to a projector with ease.
Need to share your presentation from your phone? Find out how to pair your phone to a projector for seamless connectivity.
Not sure which cables to use? Check out how to convert USB to HDMI for the right connection to your projector.
Looking for flexible connection options? Learn about how to convert HDMI to AV for older devices and projectors.