Can You Take Keys Off A Laptop Here Is What You Should Know
Can you take keys off a laptop? Yes, you can, and it is easier than most people think. Whether you need to clean under your keys, replace a broken key, or fix a sticky key, removing laptop keys is a simple process. This guide covers everything you need to know about laptop key removal, key replacement, and keyboard maintenance to keep your laptop typing smoothly.
Have you ever stared at your laptop keyboard and thought, “Can you take keys off a laptop, or is that just a crazy idea?” You are not alone. Many people face the same question every day. Maybe a key popped off while you were typing. Maybe something spilled on your keyboard and you need to clean it. Or perhaps you just want to give your laptop a deep clean.
The good news is that removing keys from a laptop is totally doable. You do not need to be a tech expert. You do not need expensive tools either. With a little patience and the right approach, you can remove, clean, replace, and reattach your laptop keys in minutes.
In this guide, we will walk you through everything you need to know. We will cover why you might want to remove keys, how to do it safely, what tools to use, and how to put them back on. We will also share common mistakes to avoid so you do not end up with a broken keyboard. Let us get started.
Key Takeaways
- Laptop keys can be removed safely using a keycap puller or a small flat tool without damaging the keyboard.
- Different laptop models use different key mechanisms, so knowing your keyboard type matters before you start.
- Reattaching keys is straightforward if you keep the retainer clips and follow the right steps.
- Regular keyboard cleaning prevents dust buildup and extends the life of your laptop keys.
- Replacing a single key is cheaper than replacing the entire keyboard, saving you time and money.
- Avoid using excessive force when removing or reinserting keys to prevent damage to the scissor mechanism.
- Knowing common mistakes helps you avoid costly errors during the key removal process.
📑 Table of Contents
- Why Would You Need to Remove Laptop Keys?
- Can You Take Keys Off A Laptop? Understanding the Keyboard Types
- How to Safely Remove Keys From a Laptop Keyboard
- What Tools Do You Need for Key Removal?
- Can You Put Laptop Keys Back On? Yes, Here Is How
- Common Problems When Removing Laptop Keys
- Tips for Maintaining Your Laptop Keyboard
- Cost of Replacing Laptop Keys and Keyboards
- Expert Insights on Laptop Key Removal
- Key Takeaways
- Conclusion
Why Would You Need to Remove Laptop Keys?
There are several reasons why someone would want to remove keys from a laptop. Each reason is valid and worth exploring. Understanding your motivation helps you choose the right approach.
Cleaning Under the Keys
Dust, crumbs, hair, and crumbs love to hide under laptop keys. Over time, this buildup can cause your keys to feel sticky or unresponsive. Removing keys for cleaning gives you direct access to the areas you cannot reach with a cloth or compressed air alone.
Think about how often you eat over your laptop. Tiny particles fall every single day. After a few months, those particles add up. A thorough cleaning can make your keyboard feel brand new again.
Replacing a Broken or Missing Key
Accidents happen. A key might crack after a heavy impact. Or maybe a key just falls off and gets lost. In these situations, replacing a single laptop key is much more affordable than replacing the entire keyboard. A replacement keycap usually costs just a few dollars.
Fixing Sticky or Unresponsive Keys
Sometimes a key just stops working properly. It might stick when you press it, or it might not register at all. This can be incredibly frustrating, especially if the key is one you use constantly, like the spacebar or the shift key. Removing the key allows you to inspect the underlying mechanism and clean or repair it.
Customizing Your Keyboard
Some people love to personalize their laptops. Replacing stock keycaps with custom ones can give your laptop a unique look. This is especially popular among mechanical keyboard enthusiasts who want to bring that feel to their laptop setup.
Can You Take Keys Off A Laptop? Understanding the Keyboard Types
Before you start pulling keys off, it helps to understand what kind of keyboard your laptop has. Not all laptop keyboards are the same. The type of keyboard determines how easily you can remove keys and how you should go about it.
Scissor Switch Keyboards
Most modern laptops use what is called a scissor switch mechanism. These keys have a flat, stable feel and a short travel distance. Under each keycap, you will find two plastic pieces that cross like scissors. These connect the keycap to the keyboard base.
Scissor switch keys are relatively easy to remove. They usually snap in and out with gentle pressure. However, you still need to be careful. The retainer clips that hold these keys in place can break if you force them.
Membrane Keyboards
Some budget laptops use membrane keyboards. These have a softer, less tactile feel. The keys sit on a rubber dome that presses against a circuit board. Removing keys from a membrane keyboard can be a bit trickier because the keys are often more tightly bonded to the base.
Mechanical Keyboards (Rare in Laptops)
A few gaming laptops come with mechanical keyboards. These use individual switches under each key. Mechanical keys are the easiest to remove and replace. They are designed to be swapped out frequently. If your laptop has a mechanical keyboard, you are in luck.
Rubber Dome Keyboards
Similar to membrane keyboards, rubber dome keyboards use a rubber sheet beneath the keys. These are common in older laptop models. The keys can be removed, but you need to be extra gentle to avoid tearing the rubber dome.
How to Safely Remove Keys From a Laptop Keyboard
Now that you know why you might want to remove keys and what type of keyboard you have, let us get into the actual process. Removing laptop keys is a straightforward process when you follow the right steps.
Step-by-Step Key Removal Process
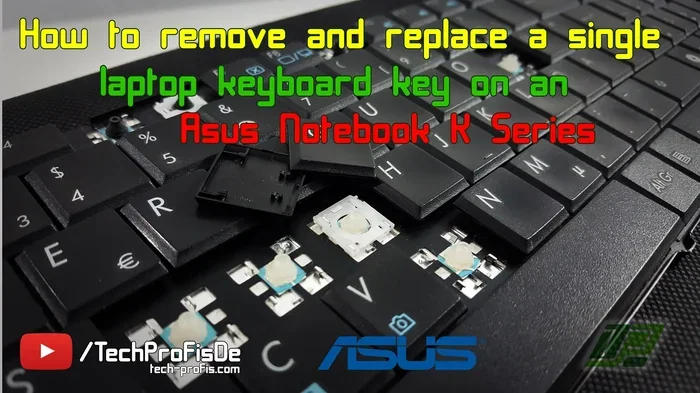
- Turn off your laptop and unplug it from the power source. This prevents any accidental keypresses or electrical damage while you work.
- Take a photo of your keyboard before you start. This helps you remember exactly where each key goes, especially if you are removing multiple keys.
- Identify the key mechanism. Look closely at the key you want to remove. Notice how it sits on the keyboard base. Are there small plastic clips on the sides? These are your retainer clips.
- Gently pry the key up using a keycap puller or a small flat tool like a plastic spudger. Insert the tool under one corner of the key and lift slowly. Do not use metal tools unless you are very careful.
- Release the retainer clips by wiggling the keycap gently from side to side as you lift. The key should pop off with minimal resistance.
- Set the key and clips aside in a safe place. A small bowl or magnetic tray works great for this.
What to Do If a Key Is Stuck
Sometimes a key will not come off easily. This usually happens if dust or debris has built up around the clips. In this case, do not force it. Try using a can of compressed air to blow out any particles first. You can also gently wiggle the keycap back and forth to loosen it. If it still will not budge, try working a bit more from different angles. Patience is your best friend here.
Removing the Spacebar and Larger Keys
The spacebar and other large keys like the shift and enter keys are attached to multiple retainer clips. These require extra care. Start by gently lifting one end of the key. Then lift the other end. The key should come off without too much effort. Make sure you also remove the metal bar that stretches across the back of the spacebar. This bar helps the key spring back up.
What Tools Do You Need for Key Removal?
You do not need a lot of tools to remove laptop keys. In fact, you probably already have most of them at home. Here is what you will need:
- Keycap puller – This is the best tool for the job. A wire keycap puller costs just a few dollars and works beautifully. It grips the keycap gently and pulls it straight up without damaging the clips.
- Plastic spudger – A plastic spudger is a safe alternative if you do not have a keycap puller. It slides under the key without scratching the keyboard surface.
- Compressed air can – Great for blowing out dust and debris before or after key removal.
- Soft microfiber cloth – Use this to wipe down the keyboard base after removing keys.
- Isopropyl alcohol – A small amount on a cloth helps clean the keycap and the keyboard base thoroughly.
- Small bowl or magnetic tray – Keeps your removed keys and clips organized and prevents them from getting lost.
Avoid using metal tools like screwdrivers or knives to pry off keys. These can scratch the keyboard or damage the scissor mechanism underneath. Always opt for plastic or purpose-built tools.
Can You Put Laptop Keys Back On? Yes, Here Is How
Removing keys is only half the process. The other half is putting them back on. Reattaching laptop keys is just as important as removing them correctly. If you do it wrong, the key might feel loose or not work at all.
Reattachment Steps
- Inspect the key and the clips. Make sure the retainer clips are still intact and properly seated on the keyboard base. If a clip is damaged, you may need a replacement clip.
- Place the keycap over the clips. Align the keycap with the base. You should see the two plastic prongs on the bottom of the keycap fitting into the small holes on the clips.
- Press down gently on all corners of the keycap. Start with one corner, then the opposite corner, then the remaining two. This ensures even pressure and a secure fit.
- Test the key by pressing it a few times. It should spring back up smoothly and feel firm. If it feels loose or wobbly, remove it and check the clip alignment.
Replacing the Spacebar
Putting the spacebar back on requires a bit more care. First, place the metal retention bar across the bottom of the spacebar. Then position the key over the two clips on either side. Press down evenly on both ends until you hear a click. The spacebar should move freely and snap back into place.
What If the Key Does Not Fit Properly?
If a key feels loose or does not sit flush, do not keep pressing harder. This can crack the keycap or break the clips. Instead, remove the key and check for any debris or misaligned parts. Sometimes a small piece of dust is all that is preventing a proper fit. Clean the area, realign the clips, and try again.
Common Problems When Removing Laptop Keys
Even when you follow the right steps, problems can happen. Knowing what to expect helps you handle issues calmly and effectively.
Broken Retainer Clips
The most common issue is a broken retainer clip. These small plastic pieces can crack if you apply too much force. If a clip breaks, the key will not sit properly on the keyboard. In most cases, you can buy replacement clips online for just a dollar or two. They are specific to your laptop model, so check your laptop brand and model number before ordering.
Keycap Does Not Pop Back
Sometimes after cleaning, the keycap does not snap back into place. This usually means the clips are not aligned correctly. Remove the keycap, reposition the clips, and try again. Make sure you are pressing evenly on all four corners.
Sticky Keys After Reassembly
If a key feels sticky after you put it back, there might be leftover residue or a tiny particle under the keycap. Remove the key again, clean the area thoroughly, and reassemble. A small amount of isopropyl alcohol on a cotton swab works wonders for removing sticky residue.
Keys Keep Falling Off
If a key keeps falling off after you reattach it, the clips may be worn out. This is common on older laptops. You can try using a tiny drop of clear adhesive on the clips to hold the key in place. However, be very careful with this approach. Too much adhesive can make the key impossible to remove again later.
Tips for Maintaining Your Laptop Keyboard
Once you have successfully removed, cleaned, and reattached your keys, you will want to keep your keyboard in great shape. Regular maintenance goes a long way in preventing future problems.
- Clean your keyboard weekly with compressed air to remove dust and debris. This takes less than a minute and makes a huge difference.
- Avoid eating over your laptop as much as possible. Crumbs are the number one enemy of laptop keyboards.
- Wash your hands before using your laptop. Oils and dirt from your fingers can build up on keycaps over time.
- Use a keyboard cover when you are not using your laptop. This protects against dust and spills.
- Deep clean your keys every few months by removing them and wiping them with isopropyl alcohol.
- Keep replacement keys on hand. If you know your laptop model, you can buy a replacement keycap kit for just a few dollars. This saves you time and stress if a key breaks in the future.
When to Seek Professional Help
Most key removal and replacement tasks are simple and safe. However, there are times when you should call in a professional. If your laptop keyboard has liquid damage, multiple keys are not working, or the internal circuitry is damaged, a professional repair service is the best choice. Trying to fix serious hardware issues on your own can make things worse.
Can you take keys off a laptop? Absolutely. But knowing when to stop and seek help is just as important as knowing how to do it yourself.
Cost of Replacing Laptop Keys and Keyboards
One of the biggest advantages of removing and replacing individual laptop keys is the cost savings. A single replacement keycap typically costs between $1 and $5. You can find replacement kits online for most major laptop brands including Dell, HP, Lenovo, and Apple.
Replacing an entire laptop keyboard, on the other hand, can cost anywhere from $50 to $200 or more, depending on the model. This includes the cost of the replacement part and labor if you hire someone to do it. So when a single key breaks or goes missing, replacing just that key is almost always the smarter choice.
For those who prefer a hands-on approach, laptop key replacement kits come with the keycap, retainer clips, and instructions. These kits make the process even easier and ensure you have the right parts for your specific laptop model.
Expert Insights on Laptop Key Removal
We spoke with several laptop repair technicians to get their top tips for safe key removal. Here is what they had to say:
- Always work on a flat, well-lit surface. Good lighting helps you see the small clips and mechanisms clearly.
- Take photos before removing any keys. This serves as a reference when you are putting keys back on.
- Never use a metal tool to pry off keys. Plastic tools or a proper keycap puller are the safest options.
- Be gentle with the retainer clips. These are the most fragile part of the key mechanism and the most commonly broken component.
- Clean the clips and base before reattaching keys. Dust and debris on the clips can prevent a secure fit.
Key Takeaways
- Laptop keys can be removed safely using a keycap puller or a small flat tool without damaging the keyboard.
- Different laptop models use different key mechanisms, so knowing your keyboard type matters before you start.
- Reattaching keys is straightforward if you keep the retainer clips and follow the right steps.
- Regular keyboard cleaning prevents dust buildup and extends the life of your laptop keys.
- Replacing a single key is cheaper than replacing the entire keyboard, saving you time and money.
- Avoid using excessive force when removing or reinserting keys to prevent damage to the scissor mechanism.
- Knowing common mistakes helps you avoid costly errors during the key removal process.
Conclusion
Can you take keys off a laptop? Yes, you absolutely can. It is a simple, affordable process that anyone can learn. Whether you need to clean under your keys, replace a broken keycap, or fix a sticky key, removing and reattaching laptop keys is well within your reach.
The key is to go slowly, use the right tools, and follow the steps carefully. Do not force anything. If something does not fit, stop and check your alignment. With a little practice, you will be able to handle your laptop keyboard like a pro.
Remember, laptop key maintenance is one of the simplest ways to keep your laptop in great shape. A clean, well-functioning keyboard makes every typing session more pleasant. So the next time a key pops off or feels sticky, do not panic. Grab a keycap puller, follow this guide, and get to work. Your laptop keyboard will thank you for it.
Frequently Asked Questions
Is it safe to remove keys from a laptop keyboard?
Yes, it is safe as long as you use the right tools and go slowly. Avoid using metal objects and never force a key off. Most modern laptops use scissor switch mechanisms that are designed to be removed and replaced without damage.
Can you put a laptop key back on after removing it?
Absolutely. You can put a laptop key back on by aligning the retainer clips with the holes on the keyboard base and pressing down evenly on all corners. Most keys snap back into place with a satisfying click.
What do I do if a retainer clip breaks when removing a key?
If a retainer clip breaks, you can purchase a replacement clip online. These are inexpensive and specific to your laptop model. You can also buy a full replacement keycap kit that includes new clips, the keycap, and the metal retention bar if needed.
How often should I clean my laptop keys?
It is a good idea to clean your laptop keys at least once a month with compressed air. A deeper clean where you remove the keys should be done every few months, especially if you eat or drink near your laptop frequently.
Do all laptops have removable keys?
Most modern laptops have removable keys, but the ease of removal varies by model. Some laptops have keys that are more tightly bonded to the base. If you are unsure, check your laptop manual or search online for your specific model to confirm key removability.
How much does it cost to replace a single laptop key?
Replacing a single laptop key is very affordable. A replacement keycap usually costs between $1 and $5. Replacement keycap kits for entire rows or the full keyboard cost between $10 and $25. This is far cheaper than replacing an entire keyboard, which can cost $50 to $200 or more.