Can You See Dead Cells With A Light Microscope Explained
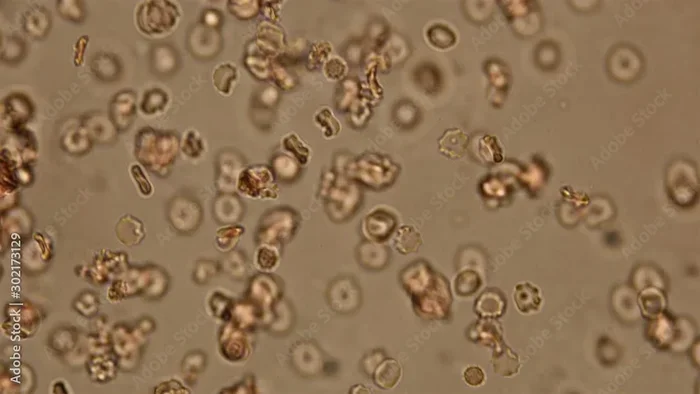
Yes, you can see dead cells with a light microscope. Dead cells are actually easier to observe than living ones because they hold their shape better. With the right staining techniques and sample preparation, a standard light microscope reveals detailed cell structures, making dead cell observation a staple in labs and classrooms alike.
Have you ever wondered what happens to cells after they die? Can you actually see them under a microscope? The short answer is yes. You can absolutely see dead cells with a light microscope, and people do it every day in labs, classrooms, and research facilities around the world.
Dead cells offer a unique advantage over live cells. When a cell dies, it keeps its shape. It doesn’t move around or change shape constantly like living cells do. This makes dead cells much easier to observe, photograph, and study. Whether you are a student learning cell biology or a researcher studying biological samples, understanding how to view dead cells opens up a huge world of microscopic discovery.
In this guide, we will walk through everything you need to know. We will cover how dead cells differ from live ones, what staining methods work best, how to prepare your specimens, and which types of light microscopy give you the clearest results. By the end, you will feel confident setting up your own dead cell observation session.
Key Takeaways
- Dead cells are visible under a light microscope: They maintain their structure after death, making them easier to study than live cells.
- Staining is essential: Techniques like hematoxylin and eosin staining make dead cell structures clearly visible.
- Fixation preserves cell shape: Chemical or heat fixation keeps cells intact for long-term observation.
- Multiple microscope modes work: Brightfield, phase contrast, and fluorescence microscopy all support dead cell viewing.
- Resolution has limits: Light microscopes can resolve structures down to about 200 nanometers, which covers most cellular features.
📑 Table of Contents
- What Happens to Cells After Death
- How Light Microscopes Work for Dead Cell Observation
- Preparing Dead Cell Samples for Microscopy
- Common Applications of Dead Cell Microscopy
- Tips for Getting the Best Results
- Common Mistakes to Avoid
- Expert Insights on Dead Cell Microscopy
- Dead Cell Microscopy vs. Live Cell Microscopy
- Final Thoughts
What Happens to Cells After Death
The Biology of Cell Death
When a cell dies, several things happen quickly. The cell membrane loses its integrity. The contents inside the cell start to break down. However, the overall shape of the cell often remains intact for hours or even days after death. This is great news for anyone using a light microscope.
There are two main types of cell death. The first is called necrosis. This happens when a cell dies from injury or lack of nutrients. The second is apoptosis, which is programmed cell death. Both types of dead cells can be viewed under a microscope, but they look different. Necrotic cells tend to swell and look rough. Apoptotic cells shrink and form neat packages called apoptotic bodies.
Why Dead Cells Are Easier to Observe
Live cells are constantly moving. They change shape. They divide. They respond to their environment. All of this movement makes it hard to get a clear picture under a light microscope. Dead cells, on the other hand, stay still. They hold their position on the slide. They keep their original shape.
This stability means you can spend more time focusing on cellular morphology without worrying about the specimen moving out of view. You can also take your time adjusting the focus, switching between magnifications, and capturing images. For beginners, working with dead cells is often the recommended starting point.
How Light Microscopes Work for Dead Cell Observation
Basic Principles of Light Microscopy
A light microscope uses visible light and a system of lenses to magnify small objects. The optical magnification typically ranges from 40x to 1000x. This is enough to see individual cells and even some internal structures.
The microscope works by passing light through a thin specimen. The lenses bend the light and enlarge the image. Your eye sees a much bigger version of the tiny cell. For dead cells, this process works very well because the cells are usually transparent or semi-transparent, allowing light to pass through cleanly.
Resolution and What You Can See
Resolution is the ability to distinguish two close objects as separate. A standard light microscope has a resolution limit of about 200 nanometers. This means you can see structures that are larger than 200 nanometers apart.
For dead cells, this resolution is more than enough. You can see the cell membrane, the nucleus, and large organelles like mitochondria and vacuoles. You may not see the tiny protein complexes inside the cell, but you can definitely observe the major cell structures that define cell type and condition.
Different Microscope Modes for Dead Cells
Not all microscopy modes work the same way. Here are the most common modes used for dead cell observation:
- Brightfield microscopy: The most basic mode. Light passes straight through the specimen. Dead cells often appear darker after staining.
- Phase contrast microscopy: Enhances contrast in transparent specimens. Great for unstained dead cells that still have some internal structure.
- Fluorescence microscopy: Uses fluorescent dyes that bind to specific cell parts. Very powerful for identifying dead cells specifically.
Each mode has its strengths. Brightfield is simple and widely available. Phase contrast gives better detail for transparent samples. Fluorescence allows you to target specific structures or confirm cell death. Most labs use a combination of these modes.
Preparing Dead Cell Samples for Microscopy
Fixation: The First Critical Step
Before you can view dead cells, you need to preserve them. This process is called fixation. Fixation stops any further decay and locks the cell in its current state.
There are two main fixation methods. Chemical fixation uses solutions like formaldehyde or glutaraldehyde. These chemicals cross-link proteins and stabilize the cell structure. Heat fixation involves passing the slide through a flame briefly. This kills remaining cells and makes them stick to the glass slide.
Both methods work well for microscope resolution purposes. Chemical fixation is gentler and preserves more detail. Heat fixation is faster and simpler. Choose based on your needs and the type of specimen you are working with.
Sectioning and Mounting
Once fixed, the specimen needs to be cut into thin sections. For tissue samples, this means using a microtome to slice sections about 5 to 10 micrometers thick. Thinner sections allow more light to pass through, giving you a clearer image.
After sectioning, the slices are placed on glass slides and mounted with a coverslip. Mounting media can be aqueous or organic, depending on whether you plan to stain the sample. Proper mounting prevents the sample from drying out and keeps it flat for viewing.
If you are capturing images of your prepared slides, you might save them on a USB drive for later analysis. In fact, many researchers find it convenient to put a link on a USB drive for quick file sharing between lab computers.
Staining Techniques That Reveal Dead Cell Structures
Staining is where the real magic happens. Dead cells are mostly transparent, which means they are hard to see without contrast enhancement. Stains add color to specific cell parts, making them visible under the microscope.
Here are the most common staining techniques for dead cells:
- Hematoxylin and eosin (H&E): The gold standard in histology. Hematoxylin stains nuclei blue. Eosin stains cytoplasm and connective tissue pink.
- Methylene blue: A simple stain that colors cell nuclei dark blue. Great for beginners and quick observations.
- Crystal violet: Commonly used in Gram staining for bacteria. Also works well for dead animal cells.
- Propidium iodide: A fluorescent dye that only enters cells with damaged membranes. This makes it perfect for confirming dead cells.
Each stain targets different parts of the cell. H&E gives you a broad overview of tissue structure. Methylene blue is simple and fast. Propidium iodide is specific to dead or damaged cells, making it ideal for cell death studies.
Common Applications of Dead Cell Microscopy
Medical and Pathology Labs
Dead cell microscopy plays a huge role in medicine. Pathologists examine thin slices of tissue from biopsies to diagnose diseases. Cancer cells, infected cells, and damaged cells all look different under the microscope. These differences help doctors make accurate diagnoses.
H&E staining is the most widely used method in pathology labs worldwide. Every hospital pathology department relies on dead cell microscopy to identify abnormalities in tissue samples. Without this technique, modern diagnostics would look very different.
Educational Settings
Schools and universities use dead cell microscopy extensively in biology classes. Students learn to prepare slides, stain specimens, and identify cell structures. It is one of the most hands-on and engaging parts of the biology curriculum.
Working with dead cells is safer for students too. There is no risk of live pathogens or cultures. Teachers can prepare slides in advance, and students can practice at their own pace. It builds foundational skills that carry over into more advanced cell biology studies.
Drug Testing and Toxicology
Researchers use dead cell microscopy to test how drugs and chemicals affect cells. They expose cells to different substances, then observe the results under the microscope. Dead or damaged cells indicate toxicity or drug effectiveness.
Fluorescence microscopy with propidium iodide is especially popular in this field. It allows researchers to quickly distinguish between live and dead cells in a mixed population. This kind of assay helps pharmaceutical companies develop safer and more effective drugs.
Tips for Getting the Best Results
Start with Clean Equipment
Dirty lenses and slides will ruin your images no matter how good your sample is. Always clean your microscope lenses with lens paper before starting. Wipe your slides with ethanol to remove dust and oils from your fingers.
Clean equipment gives you sharper images and prevents contamination. This is a simple habit that makes a huge difference in the quality of your observations.
Use the Right Magnification
Start low and work your way up. Begin with the 4x or 10x objective to find your area of interest. Then switch to 40x or 100x for detailed views of cell structures.
Jumping straight to high magnification is a common mistake. You will struggle to find your specimen and may damage the lens by bringing it too close to the slide. Patience pays off when you are exploring magnified images of dead cells.
Adjust the Light Carefully
Too much light washes out your specimen. Too little light makes everything dark and hard to see. Find the sweet spot by adjusting the iris diaphragm and the condenser.
For stained samples, you usually need less light because the stain already adds contrast. For unstained dead cells, you may need to open the diaphragm wider to let more light through. Experiment until you see clear, well-defined structures.
Document Your Observations
Take notes, draw sketches, or capture photos every time you use the microscope. Documentation helps you track changes over time and share your findings with others.
If you are working with digital images from a camera attached to your microscope, you can share them easily with colleagues. Some researchers even boost their wifi at home to transfer large image files quickly between devices in the lab.
Common Mistakes to Avoid
Skipping the Fixation Step
Never skip fixation if you want to preserve your specimen properly. Without fixation, your dead cells will degrade quickly. They will lose shape, leak contents, and become impossible to identify. Always fix your samples before staining or mounting.
Using Too Thick a Section
Thick sections block light and produce blurry images. If you are cutting your own tissue sections, aim for 5 to 10 micrometers. Thinner is almost always better for light microscopy. If you buy pre-made slides, check the thickness specifications before purchasing.
Overlooking Stain Timing
Stains need the right amount of time to work. Leaving a stain on too long can over-darken your sample and hide important details. Rinsing too early can leave the stain uneven. Follow the protocol carefully and time each staining step precisely.
Forgetting to Calibrate Your Microscope
Microscopes drift over time. Lenses get misaligned. The light source weakens. Regular calibration ensures your images are accurate and your observations are reliable. A quick check before each session saves you from misleading results.
Expert Insights on Dead Cell Microscopy
Experienced microscopists agree that dead cell observation is one of the most rewarding techniques in the lab. Because the cells are stable and do not move, you can take your time and really study the details. Unlike live cell imaging, where you are racing against the clock, dead cell work lets you be methodical and precise.
Many experts recommend starting with simple brightfield microscopy and basic H&E staining. Once you are comfortable with those basics, you can explore more advanced techniques like fluorescence and phase contrast. The learning curve is gentle, and the results are immediately satisfying.
One piece of advice from seasoned researchers: always keep a stain log. Note which stain you used, how long you left it on, and what you observed. This habit saves time in future experiments and helps you reproduce your results consistently. Over time, your log becomes a valuable reference that builds your expertise in microscopy and sample preparation.
Dead Cell Microscopy vs. Live Cell Microscopy
It helps to understand how dead cell observation compares to live cell work. Here is a quick comparison:
- Stability: Dead cells stay still. Live cells move and change shape constantly.
- Preparation: Dead cells require fixation and staining. Live cells need special chambers and temperature control.
- Duration: Dead cell slides last indefinitely. Live cell observations are limited to hours or days.
- Detail: Dead cells show clearer internal structures after staining. Live cells reveal dynamic processes like division and movement.
- Safety: Dead cells are generally safer to handle. Live cells may require biosafety precautions.
Both approaches have value. Dead cell microscopy is ideal for studying structure and morphology. Live cell microscopy is better for observing processes in real time. Many researchers use both methods together to get a complete picture of cell behavior and health.
Final Thoughts
Seeing dead cells with a light microscope is not only possible, it is straightforward and deeply rewarding. With the right staining techniques, proper sample preparation, and a basic understanding of microscope operation, anyone can explore the intricate world of cell structures at the microscopic level.
Whether you are a student, a teacher, a medical professional, or a curious hobbyist, dead cell microscopy gives you a window into the building blocks of life. The cells may be dead, but the insights they provide are very much alive. Start with simple stains, practice your preparation skills, and gradually explore more advanced modes of observation. You will be amazed at what you can discover.
The world beneath the microscope is vast and full of detail. Every dead cell you observe tells a story about how living organisms function, respond to damage, and maintain their complex structures. So grab your slides, fire up your light microscope, and start exploring. The microscopic world is waiting for you.
And if you ever want to take your microscopy hobby further, consider exploring how digital tools can enhance your workflow. From saving images on a USB drive to projecting your microscope images on a wall for group viewing with a projector, there are many ways to share and enjoy the results of your microscopic discoveries.
Frequently Asked Questions
Can I see dead plant cells with a light microscope?
Yes, dead plant cells are visible under a light microscope. Plant cells have rigid cell walls that hold their shape even after death. You can see the cell wall, vacuole, and chloroplasts clearly, especially after staining with basic dyes like methylene blue or safranin.
Do I need a special stain to see dead cells?
You do not need a special stain, but staining greatly improves visibility. Simple stains like methylene blue or crystal violet work well for beginners. For more specific identification of dead cells, propidium iodide is the go-to choice because it only enters cells with damaged membranes.
Can a beginner use a light microscope to observe dead cells?
Absolutely. Dead cell observation is one of the best starting points for beginners. The cells are stable, do not move, and do not require special equipment like temperature-controlled chambers. With basic staining and a standard light microscope, you can see clear cell structures within minutes.
How long do prepared dead cell slides last?
Prepared dead cell slides can last for years if stored properly. Keep them in a dry, dust-free environment and store them flat. The fixation and mounting process preserves the cells indefinitely, making your slides a reusable resource for repeated observations.
Can I use a USB microscope camera to capture dead cell images?
Yes, USB microscope cameras work great for capturing dead cell images. You can plug the camera into your computer and use software to adjust focus, brightness, and contrast. Many researchers document their dead cell observations this way for lab reports and publications.
Is dead cell microscopy used in diagnosing diseases?
Yes, dead cell microscopy is a cornerstone of medical pathology. Doctors examine stained tissue sections from biopsies to identify cancer cells, infections, and tissue damage. The ability to clearly see dead and damaged cells under the microscope directly supports accurate disease diagnosis and treatment planning.
=== CONCLUSION ===
Can you see dead cells with a light microscope? Yes, and it is easier than you might think. Dead cells hold their shape, accept stains well, and provide clear, stable images under even basic microscope setups. With proper fixation, thoughtful staining techniques, and the right microscope mode, you can observe detailed cell structures and gain real insights into cell biology.
Start simple, practice your preparation skills, and build your confidence step by step. Whether you are studying tissue samples in a lab, learning microscopy in a classroom, or exploring the microscopic world as a hobby, dead cell observation is a skill that pays off every time you look through the eyepiece.