Can You Remove Laptop Keys Without Breaking Them Easily
Yes, you can remove laptop keys without breaking them — if you use the right method and tools. Whether you need to clean under sticky keys or replace a lost keycap, this guide walks you through every step safely. We cover the tools, techniques, and common mistakes that cause damage so your keyboard stays intact and fully functional.
Have you ever stared at your laptop keyboard and thought, “I really need to clean under these keys”? Or maybe one key popped off unexpectedly and you are not sure how to put it back. The question of can you remove laptop keys without breaking them comes up all the time, and the answer is a reassuring yes — with the right approach.
Removing laptop keys might feel intimidating. You worry about snapping a clip, cracking a keycap, or ruining the entire keyboard. But the truth is, most modern laptops are designed with removable keys. Whether you want to deep clean your keyboard, replace a worn-out keycap, or just satisfy your curiosity, this process is simpler than you think.
This guide covers everything you need to know. From understanding how laptop keyboards work to the exact tools and steps for safe removal, we have you covered. By the end, you will feel confident tackling your keyboard without any fear of damage.
Key Takeaways
- Safe removal is possible: Most laptop keys can be popped off gently using a keycap puller or flat tool without any damage.
- Know your keyboard type: Scissor-switch and butterfly keyboards require different removal techniques to avoid breakage.
- Use the right tools: A plastic keycap puller or a thin spudger prevents scratches and broken clips.
- Avoid excessive force: Yanking or prying too hard is the number one cause of broken keys.
- Reassembly is straightforward: Most keys snap back on easily once you align the retainer clip correctly.
- Know when to stop: Some laptop models have keys that are not designed for removal — seeking professional help is the smart move.
📑 Table of Contents
- Understanding Your Laptop Keyboard
- Tools You Need to Remove Laptop Keys Safely
- Step-by-Step Guide to Removing Laptop Keys
- Common Mistakes That Break Laptop Keys
- How to Put Laptop Keys Back On
- When to Seek Professional Help
- Maintaining Your Laptop Keyboard After Key Removal
- Key Differences Between Laptop and External Keyboards
- Final Thoughts
Understanding Your Laptop Keyboard
Before you start prying anything off, it helps to understand what is underneath those keycaps. Knowing how your laptop keyboard is built makes the removal process much safer and easier.
How Laptop Keys Are Attached
Most laptop keys are held in place by a small plastic mechanism. This mechanism usually includes two parts: the keycap and the retainer clip. The keycap is the part you actually press. The retainer clip is a small plastic piece that snaps onto the keyboard base and holds the keycap in position.
There are two main types of keyboard mechanisms found in laptops today:
- Scissor-switch keyboards: These are the most common in modern laptops. They use two crossing plastic pieces that create a stable, quiet typing experience. Keys are relatively easy to remove and reattach.
- Butterfly keyboards: Apple used these in some older MacBook models. They have a flatter design but are more fragile and harder to remove safely.
- Rubber dome keyboards: Older laptops sometimes use these. The keys sit on a rubber dome that provides the springy feel. These are generally easier to remove.
Why People Remove Laptop Keys
There are several reasons someone might want to remove their laptop keys. Here are the most common ones:
- Deep cleaning: Crumbs, dust, and debris get trapped under keys and cause sticky keys or unresponsive presses.
- Key replacement: A keycap cracks or goes missing, and you need a new one.
- Keyboard repair: Sometimes the underlying mechanism needs cleaning or replacement.
- Customization: Some users swap keycaps for a personalized look or better typing feel.
No matter the reason, understanding your keyboard type is the first step toward a successful and damage-free removal process.
Tools You Need to Remove Laptop Keys Safely
The right tools make all the difference when you are learning how to remove laptop keys. Using sharp or metal tools can scratch your keyboard or snap the retainer clips. Here is what you should have ready before you start.
Essential Tools
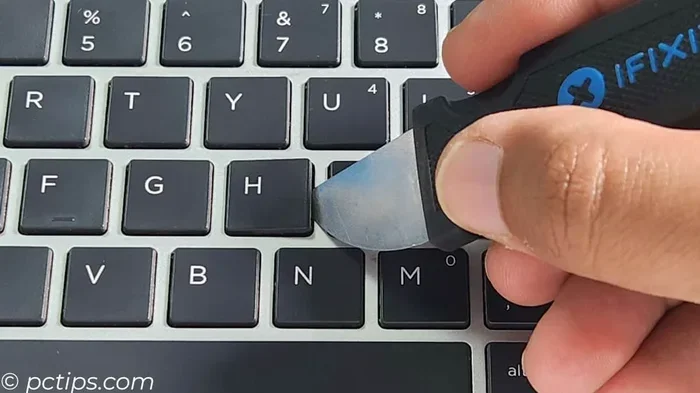
- Plastic keycap puller: This is the gold standard for safe key removal. It hooks under the keycap and lifts it off gently without applying pressure to the clips.
- Flat plastic spudger: A guitar pick or a thin plastic card works in a pinch. It slides under the keycap edge to pop it off.
- Soft microfiber cloth: You will need this for cleaning the exposed area after removal.
- Compressed air: Great for blowing out dust and crumbs from the keyboard base.
- Small bowl or tray: To keep track of removed keys so they do not get lost.
Tools to Avoid
Some tools seem helpful but can cause real damage. Steer clear of these:
- Metal screwdrivers: They can scratch the keyboard base and crack the retainer clips.
- Tweezers with sharp tips: These slip easily and can gouge the plastic.
- Excessive pulling force: If a key does not come off easily, stop. Forcing it almost always leads to broken keys.
Investing in a simple keycap removal tool set costs just a few dollars and saves you from expensive repairs. It is the best first step in any key removal project.
Step-by-Step Guide to Removing Laptop Keys
Now that you have your tools and understand your keyboard type, it is time to remove those keys. Follow these steps carefully to ensure a smooth, break-free experience.
Step 1: Power Off and Unplug Your Laptop
Before touching anything, shut down your laptop completely. Unplug the power cable and any external devices. This prevents accidental key presses and protects your electronics from any moisture or debris you might introduce during cleaning.
Step 2: Take a Photo of Your Keyboard
This is a simple trick that many people overlook. Take a clear photo of your keyboard layout before removing any keys. This reference will help you put every key back in the correct position later.
Step 3: Locate the Key Mechanism
Look closely at the key you want to remove. On most laptops, you will see small metal or plastic hooks on the sides of the keycap. These hooks sit inside the retainer clip. Gently press down on one side of the keycap to release one hook, then the other.
Step 4: Use the Keycap Puller
If the key is stubborn, attach the keycap puller to the keycap and pull straight up with gentle, even pressure. Do not yank sideways. The key should pop off with minimal effort.
If you do not have a keycap puller, slide the tip of a plastic spudger under one edge of the keycap. Gently pry upward until the key releases. Work slowly around the edges until the key lifts off.
Step 5: Clean the Area
With the key removed, you can now clean the exposed area. Use compressed air to blow out loose debris. Dampen a microfiber cloth with a small amount of isopropyl alcohol and gently wipe the base and the retainer clip.
Let everything dry completely before reassembling. Moisture inside your keyboard can cause serious damage.
Step 6: Remove the Retainer Clip (If Needed)
For a thorough clean, you can remove the retainer clip itself. It usually lifts off with gentle pressure. Be very careful — the clips are small and easy to lose. Place them in a safe spot.
Step 7: Reassemble the Key
When you are done cleaning or replacing, place the retainer clip back on the keyboard base first. Align it with the small tabs or guides. Then press the keycap firmly onto the retainer clip until you hear a soft click. Make sure the key sits evenly and does not wobble.
Common Mistakes That Break Laptop Keys
Knowing what not to do is just as important as knowing the right steps. Many people damage their keyboards by making avoidable mistakes. Here are the most common ones.
Using Too Much Force
This is the number one mistake. If a key does not come off easily, do not push harder. Instead, check if you are pressing the right release points. Sometimes keys are held more tightly than others, especially on older or heavily used laptops.
Using Metal Tools
Metal screwdrivers and knives might seem like quick solutions, but they leave scratches and can snap the retainer clips. Always stick to plastic tools designed for this purpose.
Forgetting the Retainer Clip
Some people remove the keycap but forget the retainer clip underneath. When they try to snap the key back on without the clip, the key feels loose and does not function properly. Always remove and replace both pieces together.
Removing Keys That Are Not Designed to Be Removed
Not all laptop keys can be safely removed. On some compact keyboards, especially certain Apple MacBook models, the spacebar and larger keys have complex mechanisms that are not meant for user removal. Attempting to pry these off almost always leads to breakage.
Skipping the Reference Photo
It sounds minor, but forgetting to photograph your keyboard layout before removal can lead to confusion during reassembly. Keys that look similar may have different functions, and putting them in the wrong spot causes frustration.
How to Put Laptop Keys Back On
Reattaching a laptop key is the reverse of removal, but it requires just as much care. A poorly reattached key can feel mushy, make rattling sounds, or fail to register presses.
Start by placing the retainer clip back onto the keyboard base. Make sure it sits flat and all the clips are properly seated. Then align the keycap over the retainer clip and press down firmly but gently. You should feel a satisfying snap when the key is in place.
Test the key by pressing it a few times. It should feel firm and responsive. If it feels loose or wobbly, remove it and check the alignment of the retainer clip. Adjust and try again.
Quick Tip: If you have multiple keys to replace, work on one key at a time. This prevents confusion and ensures each key is properly seated before moving on.
When to Seek Professional Help
While removing laptop keys is straightforward for most people, there are times when it is best to leave the job to a professional.
Consider seeking help if:
- Your laptop uses a butterfly keyboard or a sealed design that is not user-serviceable.
- Multiple keys have fallen off or broken, and the retainer clips are damaged.
- You notice liquid damage or corrosion under the keys.
- The keyboard still feels sticky or unresponsive after a thorough cleaning.
- You are unsure about the keyboard type and removal method for your specific model.
A professional laptop repair specialist has the right tools and experience to handle delicate keyboards without causing damage. It is always better to spend a little on professional help than to risk ruining an expensive keyboard.
Maintaining Your Laptop Keyboard After Key Removal
Once you have successfully removed, cleaned, or replaced your keys, keeping your keyboard in good shape becomes much easier. Regular maintenance prevents the buildup of dust and debris that leads to sticky keys and other issues.
Here are some simple habits that go a long way:
- Clean your keyboard weekly: A quick wipe with a microfiber cloth removes surface grime before it builds up.
- Use a keyboard cover: A thin silicone cover protects against spills and dust when you are not using the laptop.
- Avoid eating over your keyboard: Crumbs are the biggest enemy of laptop keys. If you must snack while working, try to keep food away from the laptop.
- Use compressed air monthly: A quick burst of air under the keys removes hidden debris without any disassembly.
- Keep your hands clean: Oils and dirt from your fingers can gradually degrade the keycaps and make them sticky over time.
These small habits extend the life of your keyboard and reduce the need for frequent key removal and replacement.
Key Differences Between Laptop and External Keyboards
It is worth noting that laptop keyboards differ significantly from external or desktop keyboards. These differences affect how keys are removed and reassembled.
External keyboards typically have larger, more robust keys with simpler mechanisms. They are generally easier to remove and replace. Laptop keyboards, on the other hand, are compact and tightly engineered. The keys are smaller, the retainer clips are more delicate, and the space between keys is narrower.
This means you need to be even more careful with a laptop keyboard. Patience and precision are your best allies. Rushing through the process is the fastest way to break something that is difficult and expensive to replace.
Final Thoughts
So, can you remove laptop keys without breaking them? Absolutely. With the right knowledge, the correct tools, and a patient approach, it is a task anyone can handle. Whether you are cleaning under a sticky keycap or replacing a damaged one, the process is well within your reach.
Start slow. Use plastic tools. Follow each step carefully. And if something does not feel right, stop and reassess. Your laptop keyboard is a precision instrument, and treating it with care pays off in years of smooth, responsive typing.
Now that you know how to safely remove and reattach your laptop keys, you have the power to keep your keyboard clean and functional without spending a dime on professional repairs. Grab your tools, take that reference photo, and give it a try. Your keyboard will thank you.
Frequently Asked Questions
Can removing laptop keys damage the keyboard?
It can, but only if you use the wrong tools or apply too much force. Using a plastic keycap puller and following the proper steps makes the process safe for most laptops. Avoid metal tools and never yank a key sideways.
Are all laptop keys removable?
No, not all of them. Most standard keys like letters and numbers are removable, but some laptops have keys like the spacebar or larger function keys that are not designed for user removal. Check your laptop model before attempting to remove any key.
What is the easiest way to remove a laptop key?
The easiest and safest method is using a plastic keycap puller. It hooks under the keycap and lifts it straight up without applying pressure to the retainer clips. If you do not have one, a thin plastic spudger or guitar pick works well too.
How do I clean under my laptop keys without removing them?
You can use compressed air to blow out loose debris from between the keys. A soft brush can also help dislodge dust. However, for a deep clean, removing the keys gives you much better access to the surfaces underneath.
Can I replace a lost laptop keycap myself?
Yes, you can. Replacement keycaps are available online for most laptop models. You simply snap the new keycap onto the retainer clip following the same steps used for removal. Make sure to get the correct size and shape for your specific laptop.
Why do my laptop keys keep falling off?
Loose keys usually mean the retainer clip is worn out or damaged. Over time, the plastic clips that hold keys in place can weaken from regular use. Replacing the retainer clip or the entire key mechanism often solves this problem.