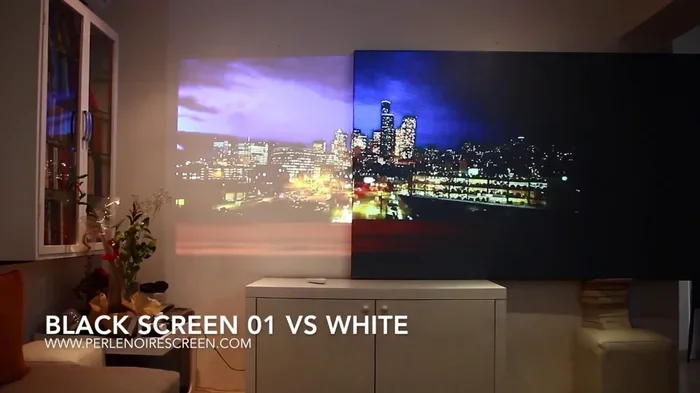
Does A Projector Look Better On A Screen Than A Wall
Yes, a projector looks significantly better on a screen than on a wall. A dedicated projector screen delivers sharper images, better contrast, and truer colors compared to most wall surfaces. Whether you are setting up a home theater or a casual movie night, choosing the right projection surface makes a big difference in your viewing experience.
Have you ever set up a projector and thought the picture just looked off? Maybe the colors were dull, or the edges looked blurry. You are not alone. Many people wonder whether a projector looks better on a screen than on a wall. The short answer is yes. But the full story is much more interesting.
Your choice of projection surface changes everything about how your movie or presentation looks. A proper projector screen brings out the best in your image. A bare wall can hold you back. Let us dive into why that happens and what you can do about it.
In this guide, we will break down the real differences between projecting on a screen versus a wall. We will cover image quality, color accuracy, contrast, and setup tips. By the end, you will know exactly what works best for your space and budget.
Key Takeaways
- A projector screen outperforms a wall in image sharpness, color accuracy, and contrast.
- Wall texture, paint color, and ambient light all affect projection quality significantly.
- DIY projector screens are affordable and easy to build at home.
- Gray screens improve contrast in rooms with some ambient light.
- Matte white paint is the best wall option if you must project on a wall.
- Screen gain and size should match your projector type and room layout.
📑 Table of Contents
- Why Does a Projector Look Better on a Screen?
- Projector Screen vs Wall: The Full Comparison
- Can You Project on a Wall? Yes, But With Trade-Offs
- Types of Projector Screens Worth Considering
- How to Get the Best Image Quality From Your Projector
- When a Wall Makes Sense
- Common Mistakes People Make With Projector Surfaces
- Expert Tips for the Best Viewing Experience
Why Does a Projector Look Better on a Screen?
The difference between a screen and a wall comes down to physics. A projector screen is designed to reflect light in a very specific way. A wall does not do that. Here is what makes a screen superior.
Image Sharpness and Clarity
A smooth, purpose-built screen surface keeps your image sharp from edge to edge. Walls are rarely perfectly flat. Even a small bump or crack can distort the picture. You might notice fuzzy lines or uneven brightness across the image.
A screen eliminates these problems. The surface is uniform and tightly woven. This means every pixel from your projector lands exactly where it should. The result is a crisp, clean picture that looks professional.
Color Accuracy and Brightness
Projector screens use special coatings that boost color accuracy. These coatings reflect light evenly across the entire surface. A regular wall absorbs some light and reflects the rest unevenly. This washes out colors and makes the image look flat.
Bright whites stay bright on a screen. Dark areas stay dark. This balance is what gives your image depth and realism. Without it, everything looks like a faded photograph instead of a vibrant picture.
Contrast Ratio
Contrast is the difference between the brightest whites and the darkest blacks on your screen. A high contrast ratio makes images pop. It gives movies that cinematic feel you love.
Walls struggle with contrast because they scatter light in all directions. A screen focuses the light where it needs to go. This keeps your blacks dark and your whites vivid. The gap in contrast between a screen and a wall is huge.
Projector Screen vs Wall: The Full Comparison
Let us put the two options head to head. This table shows exactly what you gain and lose with each choice.
- Image Quality: A screen wins clearly. Walls can never match the sharpness and color depth of a proper screen.
- Cost: A bare wall is free. A screen costs money, but DIY options are very affordable.
- Setup Time: Hanging a screen takes a few minutes. Preparing a wall properly can take longer.
- Portability: Portable screens are easy to move. A wall stays in one place forever.
- Ambient Light Handling: Gray screens handle ambient light better than most walls.
If image quality matters to you, a screen is the clear winner. But if you are on a tight budget, a well-prepared wall can still work. Let us look at how to make a wall work better.
Can You Project on a Wall? Yes, But With Trade-Offs
Some people do not have the option of buying or hanging a screen. That is totally fine. You can still project on a wall. But you need to know the limitations.
Many people ask, Can I use a projector on my wall? The answer is yes. But the image will not look as good as it would on a dedicated screen. Here is why and what you can do about it.
The Problem with Wall Texture
Most walls have texture. Paint has a slight grain. Drywall has seams and imperfections. All of these scatter the projector light in random directions. This creates a fuzzy, uneven image.
Smooth walls work better than textured ones. But even the smoothest wall is not as uniform as a screen surface. The difference is subtle at first. It becomes obvious on larger images or during dark scenes in movies.
Paint Color Matters
The color of your wall affects projection quality a lot. White walls reflect the most light. But they do not reflect it evenly. Matte white paint is your best bet if you must use a wall.
Avoid glossy or semi-gloss paint. These create hot spots and glare. They make parts of the image too bright while other parts stay dim. Flat or matte finishes spread light more evenly across the surface.
Some people wonder about painting their screen black. While that sounds creative, Can I paint my projector screen black? The answer is that black paint absorbs light. It kills the image. Stick with white or gray for the best results.
Ambient Light Is Your Enemy
Walls do not handle ambient light well. If you project in a room with windows or bright lamps, the image will look washed out. A screen with the right gain can fight ambient light better.
To improve wall projection, close the curtains. Turn off overhead lights. Dim the room as much as possible. This will help your wall-based setup look its best.
Types of Projector Screens Worth Considering
If you decide a screen is the way to go, you have options. Not all screens are the same. Let us look at the main types and when each one makes sense.
Fixed Frame Screens
Fixed frame screens are the most common type. They mount to the wall and stay in place permanently. These screens are flat and taut. They give you the best image quality for the price.
Fixed screens work great for a dedicated home theater room. They are affordable and easy to set up. If you watch movies or TV shows regularly, this is a solid choice.
Portable Screens
Portable screens fold up and come with a stand. They are great for people who move their projector around. You can set one up in a living room, bedroom, or even outdoors.
These screens are not as perfectly flat as fixed frames. But the image quality is still much better than a wall. They are a great middle ground for casual viewers.
DIY Screens
Want to save money? You can build your own screen. Many people ask, Can I make my own projector screen? Absolutely. All you need is a PVC pipe frame, some screen material, and a few basic tools.
You can buy projector screen fabric online for very little money. Stretch it over the frame and mount it on the wall. The result is surprisingly close to a store-bought screen. This is the best budget-friendly option for anyone who wants better image quality.
Gray Screens
Gray screens are designed for rooms with some ambient light. They absorb surrounding light while still reflecting the projector image. This keeps your contrast high even when the room is not fully dark.
Gray screens are a great choice for living rooms with windows. They are also popular for gaming setups where total darkness is not always possible.
How to Get the Best Image Quality From Your Projector
No matter what surface you use, a few setup tips can dramatically improve your image. Here are the most important things to get right.
Match Your Screen Size to the Throw Distance
Throw distance is the space between your projector and the screen. If the distance is wrong, your image will be too small or too large. Check your projector manual for the recommended throw ratio.
A simple rule of thumb: the further the projector, the larger the image. Measure your room before you buy a screen. This ensures you get the perfect size every time.
Level Your Projector
An unlevel projector creates a tilted image. This distorts the picture and makes it look amateur. Use a level when mounting your projector. Most projectors also have keystone correction, but it is best to get the angle right from the start.
Use the Right Resolution
A high-quality screen cannot fix a low-resolution image. Make sure your projector outputs at least 1080p for a sharp picture. If you can afford a 4K projector, even better. The combination of a good screen and high resolution is unbeatable.
Control the Room Lighting
Light is the biggest enemy of any projection setup. Even the best screen looks mediocre in a bright room. Close blinds, turn off lamps, and consider blackout curtains for the best results.
If you are curious about blackout curtains as a screen, keep in mind they are not designed for projection. They can work in a pinch, but a proper screen will always look better.
When a Wall Makes Sense
There are times when projecting on a wall is perfectly fine. Let us be honest about when this works and when it does not.
A wall works fine for quick presentations at work. If you are showing slides or spreadsheets, image perfection is not critical. A wall also works for kids watching cartoons on a Saturday morning. The colors do not need to be perfect for that.
But if you are setting up a serious home theater, a wall will hold you back. The difference in image quality is too big to ignore. Movie nights, gaming sessions, and sports viewing all benefit from a proper screen.
Common Mistakes People Make With Projector Surfaces
Avoid these common mistakes to get the best image from your setup.
- Using a colored wall: Colored walls tint the entire image. Stick with white or gray.
- Ignoring wall texture: Textured walls create uneven brightness. Smooth surfaces are always better.
- Projecting in a bright room: Ambient light washes out the image. Darken the room for the best results.
- Choosing the wrong screen size: Too large or too small ruins the viewing experience. Match the size to your room.
- Skipping screen gain: Screen gain affects brightness and viewing angle. Pick the right gain for your setup.
Expert Tips for the Best Viewing Experience
Here are a few extra tips from projection enthusiasts that make a real difference.
- Test before you commit. Project onto your wall first. See if the image quality is good enough for you. If not, it is time to invest in a screen.
- Clean your screen regularly. Dust and fingerprints reduce image clarity. A soft microfiber cloth keeps your screen looking great.
- Consider your seating position. Sit far enough back to see the full image comfortably. Too close and you will notice pixel structure.
- Match your screen to your projector type. Short-throw projectors need different screens than long-throw models. Check compatibility before buying.
The bottom line is simple. A projector looks better on a screen than on a wall. The difference is visible in sharpness, color, contrast, and overall brightness. If you care about your viewing experience, a screen is worth the investment.
But do not let budget stop you. DIY screens are affordable and easy to build. Even a well-prepared wall can deliver a decent picture for casual viewing. The key is knowing your options and choosing what fits your needs.
Start with what you have. Test your wall setup. If it is not good enough, try a simple DIY screen or a portable option. You will be amazed at the difference a proper surface makes. Your movies, games, and presentations will never look the same again.
Whether you go with a full screen or stick with a wall, the most important thing is to enjoy the experience. Grab some popcorn, dim the lights, and let your projector do its thing.
Frequently Asked Questions
Does a projector look better on a screen than a wall?
Yes, a projector looks significantly better on a screen than on a wall. Screens are designed to reflect light evenly, which gives you sharper images, better colors, and higher contrast compared to most wall surfaces.
Can I use my wall as a projector screen?
You can use a wall as a projector screen, but the image quality will not match a dedicated screen. Smooth, matte white walls work best. Textured or colored walls will reduce sharpness and color accuracy.
What is the best paint color for a projector wall?
Matte white paint is the best color for projecting on a wall. It reflects the most light evenly. Avoid glossy or dark-colored paints because they create hot spots or absorb too much light.
Do I need a projector screen if I have a good projector?
Yes, even a high-quality projector benefits from a proper screen. The screen surface affects sharpness, contrast, and color accuracy. A good projector on a wall will always look better on a dedicated screen.
How much does a projector screen cost?
A basic projector screen costs between 50 and 150 dollars. DIY screens can be even cheaper. Fixed frame screens offer the best value for permanent setups, while portable screens are great for flexibility.
Will a projector screen improve my image in a bright room?
A projector screen helps, but it cannot completely fix a bright room. Gray screens handle ambient light better than white screens. For the best results, also reduce ambient light by closing curtains and turning off lamps.