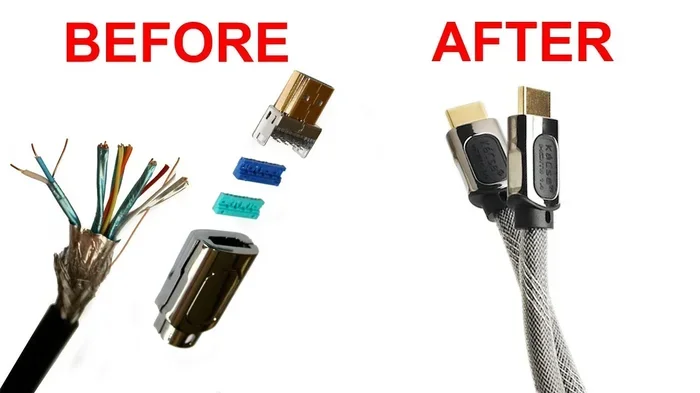
Can You Make Your Own Hdmi Cable Without Breaking The Bank
Yes, you can make your own HDMI cable with the right tools and a little patience. This guide walks you through the entire process, from picking the right HDMI connector to testing your finished cable. You will save money and gain a deeper understanding of how HDMI signals work.
Have you ever needed a specific length of HDMI cable and found that every store only sells long ones? Or maybe you wanted a cable with a particular connector type that just does not exist in the local shop. The thought of making your own HDMI cable might seem intimidating. You might wonder if it is even possible. The short answer is yes. You absolutely can make your own HDMI cable without breaking the bank. With a few basic tools and some clear guidance, you can create a custom cable that works perfectly for your setup.
This guide is for anyone who has ever been frustrated by overpriced cables or limited options. We will walk you through every step, from understanding the basics of an HDMI cable to testing your finished product. You will learn about the different connector types, what tools you need, and how to avoid the mistakes that trip up most beginners. By the end, you will have the confidence to build your own cables whenever you need them.
Key Takeaways
- DIY HDMI cables are possible: You only need a few affordable tools and some basic soldering or crimping skills.
- You can save a lot of money: Custom lengths and high-quality connectors cost far less than buying premium cables from retail stores.
- Know your HDMI type: Standard, Mini, and Micro HDMI each require a specific connector and wiring approach.
- Soldering or crimping both work: Soldering gives a more permanent connection, while crimping is faster and easier for beginners.
- Testing is essential: Always use an HDMI tester or a real device to verify signal quality before relying on the cable.
- Avoid common mistakes: Wrong pinout, weak solder joints, and poor strain relief are the top reasons DIY HDMI cables fail.
📑 Table of Contents
Why Make Your Own HDMI Cable?
Buying HDMI cables is easy, but it is not always the best deal. Store-bought cables often come with a big markup. A cable that costs a few dollars to make might sell for twenty times that price. When you make your own, you control the length, the quality of the connectors, and the overall build. This matters a lot for home theater setups, custom desk cable management, or repairing a broken cable.
Making your own HDMI cable also teaches you how the technology works. You will understand the pinout, the role of each wire, and why shielding matters. This knowledge helps you troubleshoot problems faster. You will no longer be stuck blaming a cable when the real issue is a dirty port or a wrong resolution setting.
Cost Savings
A basic HDMI cable assembly kit costs under ten dollars. You get enough connectors and tubing to make several cables. Compare that to a single high-speed HDMI cable from a big box store, which can easily run fifteen to thirty dollars. If you need multiple cables of different lengths, the savings add up quickly.
Custom Length
Need a cable that is exactly two feet long? Or maybe you need a ten-foot run between your AV receiver and a projector. Pre-made cables come in fixed lengths, and you often pay a premium for longer runs. With DIY HDMI cable making, you cut the cable to any length you want. No excess cord to bundle, no awkward loops behind your entertainment center.
Right Connector Type
Standard HDMI is the most common, but many devices use Mini or Micro HDMI. Finding the right cable off the shelf can be a headache. When you build your own, you simply choose the connector that matches your device. This is especially useful for cameras, tablets, and older gaming consoles.
Understanding HDMI Cable Basics
Before you start cutting wires, it helps to know what you are working with. An HDMI cable carries digital audio and video signals. It uses a specific pinout to route these signals through tiny conductors inside the cable. Each pin has a job, and getting the order right is critical.
The most common HDMI connector is the Type A standard. It has 19 pins arranged in two rows. The pins handle TMDS data channels, clock signals, and ground references. You do not need to be an electrical engineer to work with them. You just need to follow a clear diagram and take your time.
HDMI Cable Types and Connectors
There are three main types of HDMI connectors you might encounter in DIY projects:
- Standard HDMI (Type A): The full-size connector found on TVs, monitors, and most AV equipment.
- Mini HDMI (Type C): Smaller than standard, used on some cameras and tablets.
- Micro HDMI (Type D): Even smaller, common on older smartphones and action cameras.
Each type has a different housing and pin layout. Make sure you buy the correct connector for your project. A standard HDMI connector will not fit a Mini HDMI port, no matter how hard you try.
Cable Construction
A typical HDMI cable has four twisted pairs of wires inside a shielded jacket. Each pair carries one of the TMDS data channels. There are also separate wires for the clock signal, ground, and the 5V hot plug detect line. The outer shield protects the internal conductors from electromagnetic interference. Good shielding is what makes a reliable DIY HDMI cable stand out from a cheap one.
Tools and Materials You Will Need
Gathering the right tools before you start makes the process much smoother. You do not need a professional electronics lab. A few basic items will do the job.
Essential Tools
- HDMI cable assembly kit: Includes connectors, a crimping tool or soldering iron, and a strain relief boot.
- Wire stripper: For carefully removing insulation without nicking the copper strands.
- Soldering iron and solder: If you plan to solder the pins instead of using a crimp tool.
- HDMI cable tester: This small device checks all 19 pins for continuity and signal integrity.
- Wire cutters and tweezers: For trimming wires and holding small parts in place.
- Heat shrink tubing: To add strain relief and a professional finish to your cable ends.
Materials
- HDMI cable core: You can buy bulk HDMI cable in rolls or pre-sleeved kits. Look for cables with a high-quality shield and fine gauge conductors.
- HDMI connectors: Choose gold-plated connectors for better conductivity and corrosion resistance.
- Strain relief boots: These slide over the connector and prevent the cable from bending at the point of connection.
When you are shopping for supplies, search for an HDMI cable making kit. These kits often include everything you need in one box. They are a great starting point if you have never built a cable before.
Step-by-Step Guide to Making Your Own HDMI Cable
The process of building an HDMI cable is straightforward if you follow the steps in order. Take your time with each stage. Rushing through the wiring is the most common cause of a failed cable.
Step 1: Prepare the Cable Ends
Start by cutting the HDMI cable to your desired length. Use a sharp pair of cable cutters to make a clean, straight cut. Strip about one inch of the outer jacket from each end. Be careful not to damage the internal shielding or the twisted pairs underneath.
Step 2: Arrange the Wires
Inside the cable, you will find the four twisted pairs and a few individual wires. Lay them out according to the HDMI cable pinout. The standard pinout assigns each wire to a specific pin on the connector. You can find a pinout diagram on the connector packaging or online. Match each wire to its correct pin before you start soldering or crimping.
Step 3: Attach the Connector
If you are using a crimp style connector, slide the prepared wires into the connector housing. Make sure each wire sits firmly in its designated channel. Then use the crimping tool to squeeze the connector shut. A proper crimp holds the wires in place and makes contact with the metal pins.
If you prefer soldering, insert the wires into the connector first. Solder each pin carefully. Use a fine-tipped iron and a small amount of solder. Avoid using too much heat, as it can melt the plastic housing. Let each joint cool before moving to the next pin.
Step 4: Add Strain Relief
Slide the strain relief boot over the connector before you attach it to the cable. Once the connector is attached, push the boot down to the base of the connector. This creates a flexible joint that absorbs tension and prevents the wires from breaking inside the cable.
Step 5: Test the Cable
Before you plug the cable into your expensive gear, test it. Use an HDMI cable tester to check that all 19 pins are connected correctly. Then connect the cable between a source device and a display. Play a high-resolution video with audio to confirm that both the picture and sound work perfectly.
If the tester shows a missing connection, check your solder joints or crimps. Often a single loose wire is the culprit. Fix it, and test again.
Quick Tips for a Strong Connection
- Tin the wire ends with solder before inserting them into the connector.
- Keep the twisted pairs as tight as possible to reduce signal interference.
- Do not stretch the internal wires when assembling the connector.
- Use a helping hands tool to hold the connector steady while you work.
Common Mistakes and How to Avoid Them
Even with careful preparation, mistakes can happen. Knowing what to watch for helps you avoid frustration and wasted materials.
Wrong Pinout
The most common error is wiring the pins in the wrong order. This will not damage your devices, but it will result in no signal or a garbled picture. Always double-check the pinout diagram before you start crimping or soldering. Print the diagram and keep it in front of you while you work.
Weak Solder Joints
A cold solder joint looks dull and lumpy. It may hold for a little while but will eventually fail. Use enough heat and solder to create a shiny, smooth cone on each pin. If you are unsure about your soldering skills, a crimp connector is a safer option.
Damaged Shielding
The outer shield of an HDMI cable provides important noise protection. If you accidentally rip the shield while stripping the jacket, the cable becomes vulnerable to interference. Repair any damaged shield by folding it back and taping it before you attach the connector.
Skipping the Strain Relief
Without a strain relief boot, the cable will eventually break at the connector. The constant bending creates stress on the internal wires. A boot extends the life of your homemade HDMI cable significantly. Always use one.
Using the Wrong Cable Core
Not all HDMI cables are created equal. A cheap, unshielded cable will not deliver a reliable signal. Look for a cable that is specifically designed for high-speed HDMI. It should have a braided shield and well-insulated conductors. Avoid using a generic RCA cable or speaker wire as a substitute.
Testing and Troubleshooting Your DIY HDMI Cable
Once your cable is built, you want to be confident it will work reliably. Testing goes beyond simply plugging it in and hoping for the best.
Using an HDMI Cable Tester
An HDMI cable tester is a small, affordable device that checks each of the 19 pins for continuity. You plug the cable into both ends of the tester. If all the lights come on in the correct order, your cable passes the basic test. If any light is missing or out of order, you have a wiring problem to fix.
Real-World Signal Testing
A tester confirms electrical continuity, but it does not guarantee a perfect video signal. Connect the cable to a source device and a display. Play content at the highest resolution your equipment supports. Look for any sparkles, dropouts, or audio sync issues. A well-built cable should handle 4K content at 60Hz without any problems.
Troubleshooting No Signal
If your new cable does not work, do not panic. Start by checking the pinout again. A single misplaced wire will stop the signal. Next, inspect your solder joints or crimps for cold connections or loose wires. Finally, try the cable on a different device to rule out a problem with the source or display.
Expert Insights on Cable Quality
Experienced cable builders know that the quality of the cable core matters just as much as the connectors. A high-quality HDMI cable assembly uses fine-gauge oxygen-free copper conductors and a dense braided shield. This combination delivers the best signal integrity and durability. When you invest in good materials, your DIY cable can rival any commercial product.
When to Buy Instead of Build
Making your own HDMI cable is rewarding, but it is not always the best choice. There are situations where buying a pre-made cable makes more sense.
If you need a very long cable, say over 50 feet, building it yourself can be challenging. Long cables require active signal boosters or fiber optic technology to prevent signal loss. These specialized cables are best left to the professionals. Also, if you need a cable with built-in Ethernet or ARC (Audio Return Channel) features, the wiring becomes more complex. Standard DIY kits focus on basic high-speed HDMI connections.
For everyday lengths and standard connectors, building your own cable is the clear winner. It saves money, gives you a perfect length, and lets you customize the build quality. You get a cable that is exactly what you need.
Final Thoughts on DIY HDMI Cables
Learning how to make your own HDMI cable opens up a world of possibilities. You are no longer at the mercy of store shelves or inflated prices. Whether you need a short patch cable for your desk, a long run for a home theater, or a repair for a damaged connector, you now have the skills to handle it yourself.
Start with a simple kit and practice on a short length of cable. Once you succeed with your first build, you will feel confident tackling more projects. The process is satisfying, and the results are tangible. You will have a fully functional cable that you built with your own hands, and it will work just as well as anything you could buy off the shelf.
Remember to always test your work before installing it permanently. Use an HDMI cable tester and run real content through it. A little care at the building stage saves you from headaches later. With the right tools, a little patience, and this guide, you can make your own HDMI cable without breaking the bank.
Frequently Asked Questions
Is it hard to make your own HDMI cable?
It is not very hard if you follow a clear guide and take your time. The main skills involved are stripping wire and either soldering or crimping. Many beginners complete their first cable in under an hour. The most important part is getting the pinout correct.
What tools do I need to build an HDMI cable?
You need an HDMI cable assembly kit, which includes connectors and a crimping or soldering tool. You will also need wire strippers, tweezers, and an HDMI cable tester to verify your work. A heat gun and heat shrink tubing help create a professional finish.
Can I use any HDMI cable core for DIY?
You should use a high-speed HDMI cable core with proper shielding. Cheap, unshielded cables will not deliver a reliable signal. Look for cables that are rated for Ethernet and high bandwidth, as they have the right conductor size and shielding for DIY assembly.
How long does a homemade HDMI cable last?
A well-built DIY HDMI cable can last for many years. The key factors are good solder joints or a proper crimp, intact shielding, and a strain relief boot. If you avoid excessive bending at the connector, your homemade cable will hold up just as well as a store-bought one.
Will a DIY HDMI cable support 4K and HDR?
Yes, as long as you use a high-speed HDMI cable core and the correct connectors. The cable itself does not need to be labeled 4K or HDR. Any properly constructed high-speed HDMI cable will carry 4K signals and HDR metadata without issues.
Can I make a Mini or Micro HDMI cable myself?
Yes, but you need the specific connector type for Mini or Micro HDMI. The wiring process is similar to standard HDMI, but the connectors are smaller and more delicate. Use a fine-tipped soldering iron and a magnifying glass if needed. Crimp connectors for Mini and Micro HDMI are available in DIY kits.