Can You Connect Wii To Hdmi Socket Without Any Hassle
Yes, you can connect your Wii to an HDMI socket using a simple adapter or converter. The original Wii does not have built-in HDMI output, so you need a Wii to HDMI adapter or a component-to-HDMI converter. This guide covers every method, cable type, and troubleshooting tip so you can get your console hooked up in minutes.
Key Takeaways
- The Wii does not support HDMI natively: You need an external adapter or converter to get HDMI output from the console.
- Two main connection methods work: A direct Wii to HDMI adapter or a component cable paired with a converter box.
- You will need the right cables: Composite (red, white, yellow) cables come with the Wii, but component cables offer better quality.
- Setup is simple and fast: Most people can complete the connection in under 15 minutes with no technical skills needed.
- Common issues are easy to fix: No signal, no sound, or blurry picture problems usually have straightforward solutions.
- Consider your TV type: Older TVs may work fine with composite cables, but modern HDTVs benefit greatly from HDMI adapters.
📑 Table of Contents
- Can You Connect Wii To HDMI Socket Without Any Hassle
- Understanding Your Wii Console Video Output Options
- What You Need to Connect Wii to HDMI Socket
- Step-by-Step Guide to Connecting Your Wii to HDMI
- Common Problems When Connecting Wii to HDMI and How to Fix Them
- Is the Wii Worth Connecting to HDMI in 2024
- Expert Tips for the Best Wii HDMI Experience
- Final Thoughts
Can You Connect Wii To HDMI Socket Without Any Hassle
You bought a Wii console. You have a shiny new TV with HDMI ports. And now you are staring at the back of your Wii wondering why there is no HDMI cable in the box. It is a very common situation. The good news is that you can absolutely connect a Wii to an HDMI socket. It just requires a small adapter or converter. In this guide, we walk you through every step, every option, and every tip you need to get your Wii running on a modern display.
Whether you are setting up a retro gaming station or dusting off an old console for the kids, this article has you covered. We will talk about cable types, adapter choices, and common problems. By the end, you will know exactly what to buy and how to set it up. No guesswork. No frustration. Just clear, simple instructions that anyone can follow.
If you are also looking for other ways to set up your home entertainment system, you might want to check out alternatives to Dish Network and DirectTV for budget-friendly streaming options that pair well with retro consoles like the Wii.
Why Does the Wii Not Have HDMI?
The Nintendo Wii was released in 2006. At that time, HDMI was still becoming standard in homes. Most TVs used composite or component connections. Nintendo designed the Wii with those older cables in mind. The console outputs video through AV ports, not digital HDMI ports. This means the Wii sends an analog signal. HDMI is a digital signal. So you need a device that converts analog to digital. That is where adapters come in.
Do not worry if this sounds technical. The conversion happens inside the adapter box. You do not need to understand how it works. You just need to know which adapter fits your setup. We will cover all the options below.
Understanding Your Wii Console Video Output Options
Before you buy anything, it helps to know what cables your Wii actually uses. The console came with composite cables in the box. These are the red, white, and yellow RCA cables. They carry both audio and video. But they are not the only option. Let us look at all the video output choices available for the Wii.
Composite Cables (Red, White, Yellow)
Composite cables are the standard cables that come with every Wii. They use three RCA connectors. The yellow cable carries video. The red and white cables carry audio. Composite cables work fine on older TVs. But on modern HDTVs, the picture quality can look soft or blurry. This is because composite cables have a lower resolution limit. They max out at 480i, which is standard definition.
Composite cables are easy to use. They plug right into the back of the Wii and into the matching ports on your TV. If you just want to get the Wii working quickly, composite cables are fine. But if you want better picture quality, you have other options.
Component Cables (Red, Green, Blue, Red, White)
Component cables offer a big step up from composite. They use five separate cables for video and audio. The three video cables are red, green, and blue. The two audio cables are red and white. Component cables can support 480p resolution. That is still not full HD, but it looks noticeably better than composite.
You need to buy component cables separately because the Wii does not include them in the box. They are widely available and affordable. Many gamers prefer component cables for their Wii because the picture is sharper and colors are more vibrant. If you plan to connect your Wii to HDMI, component cables are the better starting point.
SCART and Other Regional Connections
In some countries, the Wii uses SCART connectors. These are common in Europe and parts of Asia. SCART cables can carry both audio and video through a single plug. If you live in a region that uses SCART, you may need a SCART-to-HDMI converter instead of the standard adapters we discuss later. Always check your console’s regional model before purchasing any adapter.
What You Need to Connect Wii to HDMI Socket
Now let us talk about the actual hardware you need. There are two main ways to get HDMI output from a Wii. Each method has its pros and cons. Let us break them down.
Method 1: Direct Wii to HDMI Adapter
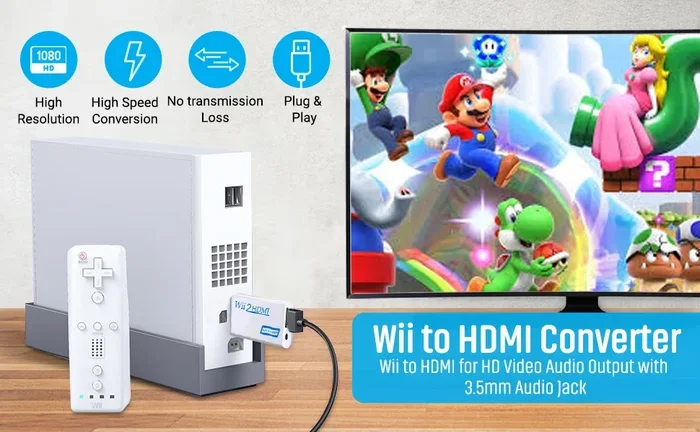
A direct Wii to HDMI adapter is the simplest solution. This is a small box that plugs directly into the AV ports on the back of your Wii. It then outputs a clean HDMI signal through a single HDMI cable. You connect the HDMI cable from the adapter to your TV. That is it.
These adapters are compact and easy to set up. They usually support both composite and component input. This means you can use the cables you already have or upgrade to component cables for better quality. Most adapters cost between 10 and 30 dollars. They are a great budget option for casual gamers.
Here is what you need for this method:
- A Wii console with AV ports
- A Wii to HDMI adapter
- An HDMI cable
- Your HDTV with an available HDMI port
Method 2: Component Cables Plus HDMI Converter Box
The second method uses component cables connected to a standalone HDMI converter box. This setup gives you more control over the video signal. Many converter boxes include features like upscaling, which improves the picture quality on your HDTV.
You plug the component cables into the Wii. Then you connect the other end to the converter box. Finally, you run an HDMI cable from the converter box to your TV. This method takes a few more minutes to set up. But it often produces a better image than a direct adapter.
This method is ideal if you care about picture quality. It is also useful if you want to connect multiple older consoles to a single converter box. Some converter boxes support several input types at once.
Step-by-Step Guide to Connecting Your Wii to HDMI
Now for the part you have been waiting for. Let us get your Wii connected to your HDMI TV. We will walk through the direct adapter method since it is the most common and easiest approach.
Step 1: Gather Your Equipment
Before you start, make sure you have everything ready. You need your Wii console, a Wii to HDMI adapter, an HDMI cable, and your TV. Turn off your TV and Wii before making any connections. Working with powered-off equipment keeps everything safe.
Step 2: Connect the Adapter to the Wii
Plug the Wii to HDMI adapter into the AV output ports on the back of your Wii. Match the colors. The yellow plug goes into the video port. The red and white plugs go into the audio ports. Push each connector in firmly until it clicks into place.
If you are using component cables instead, plug those into the adapter’s component input ports. Again, match the colors carefully. Green goes with green. Blue goes with blue. Red goes with red. The white and red audio cables connect to the matching audio ports.
Step 3: Connect the HDMI Cable
Take your HDMI cable and plug one end into the HDMI output on the adapter. Plug the other end into an available HDMI port on your TV. Most modern TVs have three or four HDMI ports. Pick whichever one is easiest to reach.
Label the HDMI port if you want to keep track. For example, you might use HDMI port 1 for your Wii. This makes it easy to switch inputs later.
Step 4: Power On and Select the Right Input
Turn on your TV and your Wii. Use your TV remote to switch to the HDMI input where you plugged in the cable. Most TVs have an Input or Source button on the remote. Press it and select the correct HDMI port. You should see the Wii menu on your screen.
If you see no picture, do not panic. Check that all cables are firmly connected. Make sure your TV is on the right input. Try unplugging and replugging the HDMI cable. Nine times out of ten, a loose connection is the culprit.
Step 5: Adjust Display Settings on the Wii
Once you see the Wii menu, go to the settings. Select Wii Settings from the main menu. Scroll to the right until you find Screen. Here you can adjust the screen format and TV resolution. Choose Widescreen if your TV supports it. Set the TV format to 480p for the best balance of quality and performance.
These settings make a real difference. A widescreen format fills your modern TV properly. The 480p resolution gives you a cleaner picture than the default 480i option.
Common Problems When Connecting Wii to HDMI and How to Fix Them
Even with the simplest setup, things can go wrong. Here are the most common issues people face when connecting a Wii to HDMI. And more importantly, how to fix each one.
No Picture on the Screen
This is the number one complaint. If you have sound but no picture, the issue is usually the cable connection or TV input. Try these fixes:
- Unplug the HDMI cable and plug it back in firmly
- Switch your TV to a different HDMI port
- Try a different HDMI cable
- Check that the adapter is properly seated on the Wii
- Make sure your TV is set to the correct input source
No Sound Through HDMI
Sometimes you get a picture but no sound. This usually happens when the audio cables are not connected properly. Check the red and white audio cables on your adapter or Wii. Make sure they are plugged into the correct ports. Also check your TV audio settings. Some TVs mute certain inputs by default.
Blurry or Fuzzy Picture
A blurry picture often means you are using composite cables instead of component cables. Upgrade to component cables for a sharper image. You can also adjust the Wii’s screen settings. Go to Wii Settings, then Screen, and change the TV format to widescreen and the resolution to 480p.
Wii Does Not Turn On After Connecting HDMI Adapter
If the Wii will not power on after you connect the adapter, the adapter may be drawing too much power or may be faulty. Try disconnecting the adapter and powering on the Wii alone. If it works without the adapter, the adapter may be defective. Contact the seller for a replacement.
Is the Wii Worth Connecting to HDMI in 2024
You might be asking yourself whether it is even worth the effort. The Wii is an older console. Its graphics are not on par with modern systems. But the Wii has a huge library of fun games. Games like Wii Sports, Mario Kart, and Super Smash Bros. remain incredibly popular. Many people still play the Wii for casual gaming and family fun.
Connecting the Wii to HDMI makes a big difference in how the games look on a modern TV. The upscaled picture is cleaner. Text is easier to read. Colors look better. If you have kids or guests who want to play, an HDMI connection makes the experience much more enjoyable.
The adapters are inexpensive. The setup takes minutes. And the result is a console that works perfectly with today’s displays. For the price of a fast food meal, you can bring your Wii into the modern era. That is a pretty good deal.
Expert Tips for the Best Wii HDMI Experience
Here are some pro tips that will help you get the most out of your Wii HDMI setup. These small tweaks make a big difference.
- Use a short HDMI cable: Shorter cables reduce signal loss and keep the picture crisp. You do not need a long cable if your Wii and TV are close together.
- Keep the Wii well-ventilated: The Wii generates heat during gameplay. Make sure the adapter and console have good airflow. Overheating can cause performance issues.
- Clean your AV ports: Dust can build up inside the Wii’s AV ports over time. Use a can of compressed air to clean them before connecting new cables.
- Buy from a reputable seller: Cheap no-name adapters can cause problems. Look for adapters with good reviews and a warranty. A reliable adapter costs a little more but saves you headaches.
- Consider a universal converter: If you have multiple retro consoles, a universal HDMI converter lets you switch between them easily. This is a great investment for retro gaming enthusiasts.
- Update your Wii firmware: Make sure your Wii is running the latest system menu. Updates can improve compatibility with modern displays and adapters.
Final Thoughts
Connecting your Wii to an HDMI socket is simple, affordable, and well worth the effort. You do not need to be a tech expert. With the right adapter and a basic HDMI cable, you can enjoy your favorite Wii games on a modern HDTV in less than 15 minutes. The key is choosing the right connection method for your setup and following the steps carefully.
Start with a direct Wii to HDMI adapter if you want the easiest setup. Choose a component cable plus converter box if you want the best picture quality. Either way, you will be amazed at how much better the Wii looks on a modern screen. Do not let an old console sit in a closet. Plug it in, fire it up, and enjoy some classic gaming fun.
Remember, the process is the same whether you have a standard Wii or a Wii Mini. The only difference is the physical port layout, which is very similar. Once you make the connection once, you will never want to go back to composite cables on your old TV. HDMI makes everything look sharper, cleaner, and more vibrant.
Frequently Asked Questions
Can I plug a Wii directly into an HDMI port without an adapter?
No, the Wii does not have an HDMI port built in. You must use a Wii to HDMI adapter or a component-to-HDMI converter to get HDMI output. The adapter converts the analog signal from the Wii into a digital HDMI signal that modern TVs can display.
What is the best Wii to HDMI adapter to buy?
Look for adapters that support both composite and component input. Popular brands include Nyrius, RetroTINK, and BNC LM. Check reviews and make sure the adapter supports 480p output for the best picture quality on your HDTV.
Will connecting my Wii to HDMI improve the picture quality?
Yes, absolutely. HDMI provides a digital signal that looks much cleaner than the analog composite cables. You will notice sharper text, better colors, and less flickering. The improvement is especially visible on larger modern TVs.
Can I use a Wii to HDMI adapter with a Wii U?
The Wii U has its own HDMI port built in. You do not need an adapter for the Wii U. This adapter is specifically designed for the original Nintendo Wii console. Always check which console model you have before purchasing any adapter.
Why does my Wii have no sound after connecting to HDMI?
Check that your red and white audio cables are firmly connected to the adapter. Also verify that your TV is not muted and that the correct audio input is selected. Some adapters pass audio through HDMI automatically, but loose cables are the most common cause of no sound.
Is a Wii to HDMI adapter the same as an upscaler?
Not exactly. A basic Wii to HDMI adapter simply converts the analog signal to digital. An upscaler does the same conversion but also improves the resolution and sharpness of the image. If picture quality matters to you, look for an adapter that includes upscaling features.