Can You Capture Video Through Hdmi With These Tips
Can You Capture Video Through Hdmi is a common question for gamers, streamers, and professionals. With the right HDMI capture card or video grabber, you can record any HDMI source directly to your computer or device. This guide covers the best devices, setup steps, and troubleshooting tips to get high-quality video capture every time.
Many people ask: “Can You Capture Video Through Hdmi?” The answer is a clear yes. Whether you want to record gameplay, capture a presentation, or archive old tapes, HDMI makes it possible. You just need the right hardware and a little know-how.
Capturing video over HDMI is simpler than most folks think. The HDMI signal carries both high-definition video and audio in one cable. That means you can grab crystal-clear footage without extra wires. In this guide, I’ll walk you through everything you need. You’ll learn about devices, setup steps, and common pitfalls. By the end, you’ll be ready to capture like a pro.
Key Takeaways
- HDMI capture cards are the most reliable way to record HDMI video from consoles, cameras, and PCs.
- USB HDMI grabbers offer a budget-friendly option for basic recording and streaming.
- Check HDMI version (2.0 or 2.1) to support 4K or 1080p60 capture without lag.
- Use capture software like OBS Studio for full control over resolution and frame rate.
- Watch out for HDCP copy protection that can block recording of protected content.
- Low latency is crucial for live streaming and gaming capture.
📑 Table of Contents
Can You Capture Video Through Hdmi? The Short Answer
Yes, you can capture video through HDMI. The process works with any device that has an HDMI output. Think of gaming consoles like PlayStation and Xbox. The Nintendo Switch also uses HDMI. Cameras, camcorders, and desktop PCs all output HDMI too. Even Blu-ray players and satellite boxes can be captured.
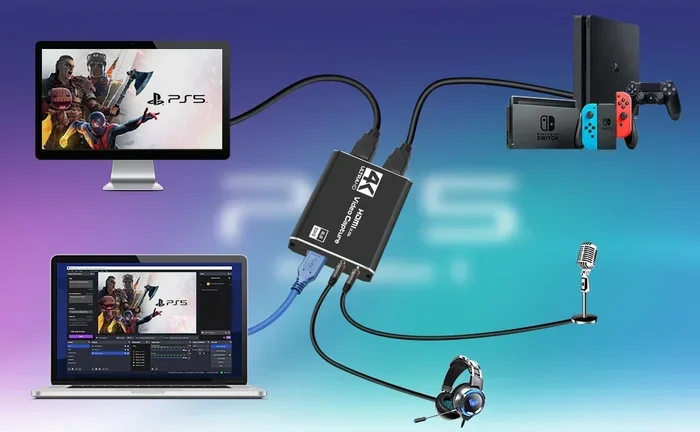
The key is a capture device. This device sits between the HDMI source and your computer or recorder. It takes the digital HDMI signal and turns it into a format your device can save. Some devices plug into a PCIe slot inside a desktop PC. Others connect through USB. A few can even stream over a network. Each type has its own strengths.
You might wonder about HDMI input versus output. A capture device needs an HDMI input to receive the signal. Many devices also have an HDMI output. This lets you still view the source on a monitor while recording. That feature is called loop-through or pass-through. It’s very handy for live streaming.
Quick Tip: Always check if your source device supports HDMI output. Some budget devices only have HDMI input and cannot send a signal out.
How HDMI Video Capture Works
What Is HDMI Capture?
HDMI capture means taking a raw HDMI signal and saving it as a digital file. The video grabber does the heavy lifting. It decodes the HDMI signal and re-encodes it for USB or PCIe. This process is called video encoding. The encoded data goes to your computer’s storage or memory.
Modern capture devices support capture resolution up to 4K. They can also handle high frame rates like 60 frames per second. This is called 1080p60 or 4K30 capture. The higher the resolution and frame rate, the smoother the video looks. But it also needs more processing power and storage.
Latency is the delay between the live event and the recorded file. Low latency is vital for gamers and streamers. A good capture device adds almost no delay. You see the action on your screen in real time. Cheap grabbers often add noticeable lag. That can ruin a gaming capture.
| Feature | HDMI Capture Card | USB Video Grabber |
|---|---|---|
| Connection | Internal PCIe slot | External USB 3.0 |
| Price Range | $100 – $300 | $15 – $80 |
| Max Quality | 4K60 or 1080p60 | 1080p30 or 1080p60 |
| Ease of Use | Needs desktop PC | Plug-and-play |
| Best For | Gaming, streaming, pro work | Basic recording, presentations |
Common Mistake: Using a cheap passive HDMI splitter instead of a capture device. A splitter just duplicates the signal. It does not record anything. You need an active capture device with a video encoder to save footage.
Expert Insight: Look for capture devices that support 1080p60 or 4K30. The frame rate matters for smooth motion in games and sports. A device that only does 1080p30 will look choppy with fast movement.
Key Takeaways
- HDMI capture involves converting a digital HDMI signal into a format your computer can record.
- The two main paths are internal capture cards and external USB grabbers.
- Latency and resolution are the biggest factors in capture quality.
Types of HDMI Capture Devices
HDMI Capture Cards (Internal)
These cards plug into a PCIe slot on your desktop motherboard. They connect directly to the motherboard’s PCIe lanes. This gives them very fast data transfer. That means low latency and high-quality 1080p capture or 4K capture. Popular brands include Elgato, AVerMedia, Magewell, and Blackmagic Design.
Internal cards often have extra features. Some include hardware encoders that use less CPU power. Others offer multiple HDMI inputs. You can capture from several cameras at once. This is great for video production and live events. The downside is they only work in desktop PCs. Laptops cannot use them.
USB HDMI Grabbers (External)
USB grabbers are small boxes that connect via USB. They are perfect for laptops and portable setups. You plug the HDMI source into the grabber. Then you plug the grabber into your computer’s USB port. It’s truly plug-and-play. No internal installation needed.
The Elgato Cam Link is a famous USB grabber. It handles 1080p60 capture with ease. Many generic USB grabbers cost under $30. They work well for basic recording and streaming. However, they can have more latency than internal cards. They also rely on your computer’s USB bus for power and data.
HDMI Splitters with Capture
Some HDMI splitters have a special capture output. The main output goes to your TV or monitor. The capture output goes to your recording device. This lets you watch the source while recording it. It’s a great solution for capturing console gameplay without a PC nearby.
Look for splitters that support the HDMI version you need. HDMI 2.0 splitters can handle 4K60. HDMI 1.4 splitters max out at 4K30. Always check the specs before buying.
Network HDMI Encoders
These devices stream HDMI over IP networks. They are used in professional broadcasting and corporate settings. A network encoder connects to your local network. You can capture the stream on a remote computer. This is useful for capturing events in large venues without running long HDMI cables.
Quick Tip: If you need long cable runs, use an active HDMI extender or fiber HDMI cable. Passive cables over 10 feet can lose signal and cause dropouts.
Key Takeaways: Choose a device based on your needs. Internal cards offer the best performance for desktop PCs. USB grabbers win on portability and price. Splitters with capture let you monitor and record at the same time.
Step-by-Step Setup Guide
Gather Your Equipment
Before you start, make sure you have everything. Here is a simple list:
- An HDMI source (console, camera, or PC)
- A capture device (card or grabber)
- A computer with enough processing power
- An HDMI cable (high-speed, preferably HDMI 2.0)
- USB cable (if using an external grabber)
- Capture software like OBS Studio or the device’s app
Connect the Hardware
Follow these steps in order:
- Connect the HDMI cable from your source device to the capture device input.
- If your capture device has a loop-through output, connect that to your monitor or TV.
- Connect the USB cable from the capture device to your computer.
- Power on the source device and the capture device.
- Wait for your computer to recognize the new device.
Install Drivers and Software
Internal capture cards need drivers. Visit the manufacturer’s website and download the latest version. External grabbers usually work without drivers on Windows and macOS. Still, check for firmware updates on the manufacturer’s site.
Next, install your capture software. OBS Studio is a free and powerful choice. It works with almost all capture devices. Other options include XSplit, Streamlabs, and proprietary software from Elgato or AVerMedia.
Configure Capture Settings
Open your capture software and add a video capture device. Select your capture device from the list. Then set the capture resolution and frame rate. For most gaming, 1920×1080 at 60fps is perfect. For presentations, 1080p30 is enough. For 4K content, set it to 3840×2160 at 30fps if your device supports it.
Common Mistake: Forgetting to set the audio input separately. HDMI carries audio, but some grabbers need a separate audio line or have audio settings you must enable. Check your software’s audio mixer to make sure sound is coming through.
Expert Insight: Use a dedicated audio interface if you need professional sound. HDMI audio can sometimes be compressed or have slight delays. An external audio interface gives you clean, sync’d audio for podcasts and videos.
Test and Record
Do a short test recording before your main session. Watch the playback carefully. Check for smooth motion, clear audio, and proper colors. If something looks off, adjust the settings. Lower the resolution or frame rate if your computer struggles. Once you are happy, you are ready to capture.
Key Takeaways: A simple setup requires just three things: an HDMI source, a capture device, and a computer with capture software. Test before you go live to avoid surprises.
Best Practices for High-Quality Capture
Choose the Right Resolution and Frame Rate
The capture resolution determines how sharp your video looks. 1080p is standard and works great for most uses. 4K capture gives stunning detail but needs more storage and a faster computer. The frame rate controls motion smoothness. 60fps feels buttery smooth for games. 30fps is fine for talking head videos and presentations.
Match your settings to your source. If your console outputs 1080p60, set your capture device to 1080p60. If your camera outputs 4K30, capture at 4K30. Forcing mismatched settings can cause stuttering or dropped frames.
Mind the HDCP Copy Protection
HDCP stands for High-bandwidth Digital Content Protection. It is a copy protection system built into HDMI. Many movies, TV shows, and streaming apps use HDCP. If you try to record a protected stream, you may get a black screen or an error message.
For personal recording of your own gameplay, HDCP is usually not an issue. Game consoles and PCs do not use HDCP for games. But if you try to capture a Blu-ray or a Netflix stream, HDCP will block it. Some capture devices have a feature to strip HDCP for personal backup. Use this feature responsibly and only for content you own.
Reduce Latency
Latency is the delay between the live action and what you see on your screen. It matters a lot for live streaming and competitive gaming. To reduce latency, use a wired USB connection instead of wireless. Close other programs that use your CPU. Lower the capture resolution if needed. Some capture software has a “low latency” mode. Turn it on.
Get Clean Audio
Audio capture is just as important as video. HDMI can carry multi-channel audio. But sometimes the audio and video get out of sync. This is called audio desync. To fix it, check your capture software’s audio sync settings. You can also use a separate audio input for better control. A simple USB microphone or audio interface works well.
Keep Your Cables Short and Quality
Use high-speed HDMI cables that are no longer than 6 feet when possible. Long cables can degrade the signal. If you must run a cable over 15 feet, use an active HDMI extender. These devices boost the signal so you do not lose quality. Fiber HDMI cables are another great option for long runs.
Common Mistake: Using a cheap HDMI cable that does not support the bandwidth for 4K. This causes flickering, sparkles, or a complete loss of signal. Always buy cables rated for HDMI 2.0 or higher if you want 4K capture.
Expert Insight: For 4K capture, ensure your capture device and HDMI cable are rated for HDMI 2.0 or higher. HDMI 1.4 limits you to 4K at 30fps. HDMI 2.0 unlocks 4K at 60fps.
Quick Tips for Best Results: Always start with a clean signal. Use the shortest possible HDMI cable. Keep your capture device drivers up to date. Record a test clip and review it before the real event.
Key Takeaways: High-quality capture depends on resolution, frame rate, and avoiding copy protection. Use good cables and check your device specs. Clean audio and low latency make your recordings professional.
Can You Capture Video Through Hdmi with Multiple Sources?
Using an HDMI Switcher
If you have several HDMI devices, an HDMI switcher helps. It lets you pick one source at a time. You connect your console, camera, and PC to the switcher. Then you send the switcher’s output to your capture device. This is a simple way to record different sources without buying multiple capture cards.
Manual switchers require you to press a button to change inputs. Automatic switchers detect which device is active and switch for you. Automatic switchers are more convenient but cost a bit more.
HDMI Matrix for Complex Setups
An HDMI matrix is like a switcher on steroids. It can route multiple inputs to multiple outputs. You could connect four cameras to a matrix. Then send one camera to a monitor and another to a capture device. Matrices are used in video production and live events. They offer a lot of flexibility.
Capture All Sources at Once
To capture multiple sources at the same time, you need multiple capture devices. You can use several USB grabbers or a multi-input capture card. Some capture cards have two or four HDMI inputs. This is ideal for multi-camera setups, interviews, and panel discussions.
Common Mistake: Trying to capture from two HDMI sources with one capture device. You can only capture one input at a time unless you have a switcher or matrix. Plan your setup before you buy gear to avoid this problem.
Expert Insight: For live events, consider a hardware video switcher like the ATEM Mini. It can capture and switch between sources in real time. It is a game-changer for live streaming with multiple cameras.
Quick Tip: Label your HDMI cables. When you have many devices, it is easy to get confused. A simple piece of tape with the source name saves a lot of time during setup.
Key Takeaways: Multiple HDMI sources require a switcher or matrix. Plan your setup before you buy gear. For multi-camera work, invest in a multi-input capture card or a hardware video switcher.
Troubleshooting Common HDMI Capture Problems
No Signal or Black Screen
If your capture software shows no signal, stay calm. First, check all the cable connections. Make sure the HDMI cable is fully seated in both the source and the capture device. Try a different HDMI cable. A faulty cable is a common culprit.
Next, ensure the source device is powered on and set to the correct output resolution. Some devices output a resolution your capture device cannot handle. Force the source to output 1080p before connecting. This often fixes the problem.
HDCP Error Messages
HDCP errors appear when you try to record protected content. The capture device detects the copy protection and blocks the signal. For personal recording of your own gameplay, you should not see HDCP errors. If you do, try a different HDMI cable or restart the devices.
If you need to record a Blu-ray or streaming video for personal backup, you may need a capture device with an HDCP stripper. Some HDMI splitters remove HDCP before the signal reaches the capture device. Use this only for content you own and for personal use.
Audio Desync or No Sound
Audio issues are common with HDMI capture. If you have video but no sound, check your capture software’s audio settings. Make sure the correct audio input is selected. Some grabbers need you to enable audio in the device settings.
If the audio and video are out of sync, try lowering the capture resolution or frame rate. High settings can overwhelm your computer and cause delays. You can also adjust the audio sync offset in your capture software. A value of +50ms or +100ms often fixes the problem.
High Latency or Lag
High latency makes your capture feel sluggish. The first fix is to lower the resolution or frame rate. 1080p30 requires less processing power than 1080p60. If you are using a USB grabber, plug it into a USB 3.0 port. USB 2.0 ports are too slow and add lag. Close other programs that use your CPU or GPU. A clean system gives the best performance.
Quick Tip: Restart your capture device and computer. A fresh start fixes many glitches and clears up communication errors between the device and software.
Common Mistake: Ignoring driver updates. Outdated drivers cause crashes, black screens, and compatibility issues. Check the manufacturer’s website once a month for updates.
Expert Insight: If you still get no signal, your HDMI source might be set to an unsupported resolution. Force the source to output 1080p before connecting. This bypasses many handshake problems.
Key Takeaways: Most capture issues stem from cables, drivers, or HDCP. A systematic check solves 90% of problems. Keep your drivers updated and use quality cables.
Final Thoughts
So, can you capture video through HDMI? Absolutely yes. The technology is mature, affordable, and works with almost any device. Whether you are a gamer, a content creator, or a business professional, HDMI capture gives you powerful recording and streaming capabilities.
Start with a simple USB grabber if you are new to this. It is cheap and easy to set up. If you want the best quality and lowest latency, invest in an internal PCIe capture card. Pair your hardware with good capture software like OBS Studio. Follow the setup steps carefully. Mind the HDCP rules and use quality cables.
The world of HDMI video capture is wide open. You can record your favorite console games, capture important presentations, or produce professional video content. The tips in this guide will help you avoid common pitfalls and get great results. Now it is your turn. Plug in your device, hit record, and start capturing the moments that matter.
Frequently Asked Questions
Do I need a special computer to capture HDMI video?
You need a computer with enough processing power and storage. For 1080p capture, most modern laptops and desktops work fine. For 4K capture, you need a faster CPU, more RAM, and a dedicated GPU. Check your capture device’s recommended system requirements before buying.
Can I capture HDMI audio along with video?
Yes, HDMI carries both video and audio in one cable. Your capture device and software will record both. If you have audio issues, check your software’s audio settings and make sure the correct input is selected.
Is HDCP a problem for recording my own gameplay?
Usually no. Game consoles and PCs do not use HDCP for games. HDCP only affects protected content like movies and streaming apps. If you get an HDCP error while recording a game, try a different HDMI cable or restart the devices.
What is the difference between 1080p30 and 1080p60 capture?
1080p30 records 30 frames per second. 1080p60 records 60 frames per second. 60fps looks much smoother for fast-moving content like games and sports. 30fps is fine for slower content like presentations and talking videos.
Can I use a USB HDMI grabber with a Mac?
Many USB grabbers work with macOS. However, you should check the manufacturer’s compatibility list before buying. Some grabbers only support Windows. Elgato Cam Link and similar branded grabbers usually work with both Mac and PC.
How long can my HDMI cable be without signal loss?
A standard passive HDMI cable works well up to about 10 feet. Beyond that, the signal can weaken. For longer runs, use an active HDMI extender or a fiber HDMI cable. These devices boost the signal and keep your picture and sound clear.