Can I Use Projector On Ceiling Everything You Need To Know
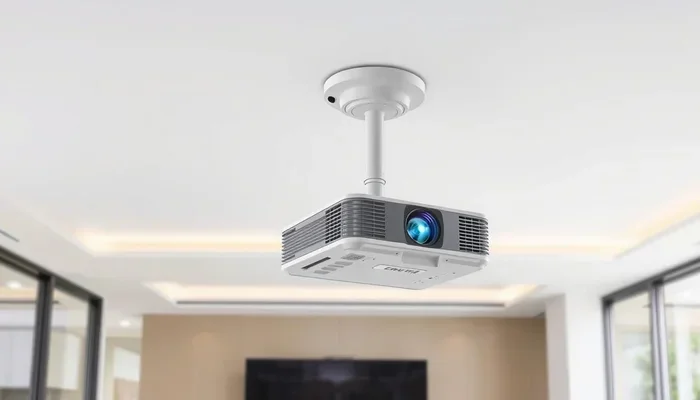
Yes, you can absolutely use a projector on the ceiling. Mounting your projector on the ceiling saves space, improves the viewing experience, and creates a clean, professional look. This guide covers everything from choosing the right mount to avoiding common setup mistakes.
Have you ever looked up at your blank ceiling and imagined a big, bright movie playing right above you? The idea of mounting a projector on the ceiling is exciting. It feels cinematic. It feels professional. But can you really use a projector on the ceiling? The short answer is yes. The longer answer is that it depends on a few key factors. In this guide, we will walk you through everything you need to know about using a projector on the ceiling. From choosing the right mount to avoiding common pitfalls, we have got you covered.
Ceiling projector setups are incredibly popular for home theaters, classrooms, and even gaming setups. They keep your floor clear and your room looking sleek. But a bad installation can ruin the whole experience. That is why we put together this detailed guide. Whether you are a first-timer or upgrading an existing setup, you will find practical tips and real advice here. Let us dive in.
Key Takeaways
- Ceiling mounting is a popular and practical choice: It frees up floor space and reduces tripping hazards.
- The right mount matters: You need a compatible ceiling projector mount for your specific projector model.
- Image inversion is normal: Most projectors have a built-in feature to flip the image when mounted upside down.
- Placement and throw distance are critical: Measure your room carefully before drilling any holes.
- Ventilation and cable management matter: Proper airflow and hidden wires keep your setup looking clean and running smoothly.
- Short throw projectors work great on ceilings: They are ideal for smaller rooms and tighter spaces.
- Avoid common mistakes: Don’t skip measuring, ignore ambient light, or forget about projector maintenance access.
📑 Table of Contents
- Why Mount a Projector on the Ceiling?
- How to Install a Projector on the Ceiling
- Choosing the Right Ceiling Projector Mount
- Dealing with Inverted Images and Keystone Correction
- Common Mistakes to Avoid When Mounting a Projector on the Ceiling
- Expert Tips for the Best Ceiling Projector Setup
- Ceiling Projector vs. Tabletop Projector: Which Is Better?
- Final Thoughts
Why Mount a Projector on the Ceiling?
There are many reasons people choose to mount their projector on the ceiling. Let us look at the biggest benefits first.
It Frees Up Floor Space
A projector sitting on a table takes up valuable real estate. When you mount it on the ceiling, that table space becomes free. You can use it for speakers, a gaming console, or simply keep it clutter-free. This is especially helpful in smaller rooms where every square foot counts.
It Creates a Better Viewing Angle
When a projector sits on a table, the light shoots upward at an angle. This can cause distortion and brightness loss. A ceiling mount positions the projector directly above the screen. This gives you a straight, centered projection. The result is a sharper, more evenly lit image.
It Looks Clean and Professional
Let us be honest. A projector sitting on a shelf looks bulky. Wires dangling everywhere make it worse. A ceiling mount hides the unit above your line of sight. The only thing people see is the beautiful image on the screen. It gives any room a high-end, theater-like feel.
It Reduces Accidental Damage
Projectors on tables can get bumped, kicked, or knocked over by pets or kids. A ceiling-mounted projector stays safely out of the way. This protects your investment and means fewer interruptions during movie night.
How to Install a Projector on the Ceiling
Installing a projector on the ceiling is not as hard as it looks. With the right tools and a little patience, most people can do it in under an hour. Let us break down the steps.
Step 1: Choose the Right Location
Start by picking the best spot on your ceiling. You want the projector centered above your screen. Make sure there is enough space between the projector and the ceiling for airflow. Most projectors need at least a few inches of clearance on all sides. Check your projector manual for the recommended ventilation space.
Also, think about how far the projector is from the screen. This is called the throw distance. A short throw projector can work in a small room. A standard throw projector needs more distance. Measure your room before you buy the mount.
Step 2: Gather Your Tools
Here is a quick list of what you will need:
- A drill with the right drill bits
- A stud finder
- A measuring tape
- A level
- A screwdriver
- A ceiling projector mount (more on this below)
- A pencil for marking holes
Step 3: Mark and Drill the Mounting Holes
Hold the mount bracket against the ceiling in your chosen spot. Use a pencil to mark the screw holes. Use a stud finder to locate the ceiling joists. Drilling into studs gives you a much stronger hold. If you cannot hit a stud, use appropriate ceiling anchors.
Once the holes are marked, drill them carefully. Attach the bracket to the ceiling using the screws provided. Use your level to make sure the bracket is perfectly straight. A crooked mount will lead to a crooked image.
Step 4: Attach the Projector
Most ceiling mounts use a VESA plate to attach the projector. Check your projector for VESA mounting holes on the back. These are the small threaded holes in a square pattern. Attach the VESA plate to your projector. Then hang the projector onto the ceiling bracket. Make sure it clicks or locks into place securely.
Step 5: Connect Your Cables and Test
Run your HDMI, power, and audio cables down to your devices. Use cable ties or cable channels to keep everything neat. Plug everything in and power on the projector. Test the image. Adjust the position if needed. You are all set.
Choosing the Right Ceiling Projector Mount
Not all ceiling projector mounts are the same. Choosing the wrong one can lead to a poor experience. Here is what you need to know.
Fixed Mounts
A fixed mount holds the projector in one position. It is the simplest and most affordable option. You cannot adjust the angle after installation. This works well when the projector is perfectly positioned from the start.
Adjustable Mounts
An adjustable mount lets you tilt, swivel, and sometimes even slide the projector. This is great if you need fine-tune the image position. It costs a bit more but offers much more flexibility. Most people prefer adjustable mounts for this reason.
Motorized Mounts
A motorized mount lets you adjust the projector position with a remote control. These are the most expensive option. They are perfect for people who want the ultimate convenience. You can reposition the projector without climbing a ladder.
What to Look for When Buying
Here are the key factors to consider:
- Weight capacity: Make sure the mount can handle your projector’s weight.
- VESA compatibility: Check that the mount fits your projector’s VESA pattern.
- Adjustability: Decide if you need tilt, swivel, or both.
- Cable management: Some mounts include built-in cable channels.
- Ceiling type: Different mounts work better on drywall, concrete, or wood ceilings.
Dealing with Inverted Images and Keystone Correction
One of the most common questions about ceiling projector setups is: why is the image upside down? The answer is simple. When you mount a projector on the ceiling, it hangs upside down. The light shines upward toward the screen. To fix this, you use the projector’s image rotation or flip setting.
How to Flip the Image
Most modern projectors have a built-in setting called “vertical keystone” or “image flip.” Go into your projector menu and look for the rotation option. Set it to 180 degrees. The image will now display right-side up. This is a standard feature on almost all projectors today.
What Is Keystone Correction?
Keystone correction adjusts the image shape when the projector is not perfectly aligned with the screen. If the projector is slightly off-center, the image might look like a trapezoid. Keystone correction fixes this by digitally stretching the image back into a rectangle.
However, there is a catch. Using digital keystone correction can reduce image quality. It compresses pixels and can make the picture look softer. The best practice is to position the projector as close to center as possible. This minimizes the need for keystone correction and keeps your image sharp.
Lens Shift: The Better Alternative
Some higher-end projectors offer lens shift instead of keystone correction. Lens shift physically moves the lens up, down, left, or right. It adjusts the image without losing any quality. If you are buying a projector for a ceiling mount, look for one with lens shift. It is a much better option for a clean, sharp picture.
Common Mistakes to Avoid When Mounting a Projector on the Ceiling
Even with the best intentions, people make mistakes when setting up a ceiling projector. Here are the most common ones and how to avoid them.
Skipping the Measurements
This is the number one mistake. People rush into drilling holes without measuring the throw distance. The result? The image is too small, too large, or does not even hit the screen. Always measure your room first. Use an online throw distance calculator if needed. Enter your projector model and screen size to find the perfect mounting spot.
Ignoring Ambient Light
A ceiling-mounted projector can still struggle with bright rooms. If your ceiling has windows or bright lights nearby, the image may look washed out. Consider using a projector screen with a high gain rating. You can also install blackout curtains to control light. A darker room always gives you a better projector image.
Forgetting About Ventilation
Projectors generate heat. When mounted on the ceiling, hot air can get trapped around the unit. This can cause overheating and shorten the projector lamp life. Make sure there is enough space around the projector for airflow. Do not mount it flush against the ceiling. Leave a gap for air to circulate.
Using the Wrong Mount
Not every mount fits every projector. Check the weight and VESA pattern before purchasing. A loose mount can cause the projector to wobble or even fall. Safety should always come first. If you are unsure, ask a professional for help with the installation.
Poor Cable Management
Visible cables hanging from the ceiling look terrible and can be a safety hazard. Plan your cable routes before you start. Use cable channels, raceways, or in-wall wiring to keep everything hidden. A clean setup looks professional and reduces the risk of cables getting pulled or damaged.
Not Planning for Maintenance
Ceiling-mounted projectors can be tricky to access for cleaning or lamp replacement. Before you mount it, make sure you can reach the filters and vents. Some people install a removable ceiling hatch or access panel. This makes maintenance much easier and saves you from climbing a ladder every time.
Expert Tips for the Best Ceiling Projector Setup
Want to get the most out of your ceiling projector? Here are some pro tips that make a real difference.
Use a Short Throw Projector in Small Rooms
If your room is small, a standard projector may not work well on the ceiling. A short throw projector can produce a large image from a short distance. This is perfect for bedrooms, offices, or any space where the ceiling is not very high. Look for a projector with a throw ratio of 0.4 to 0.7 for the best results.
Consider a White or Light-Colored Ceiling
Dark ceilings can absorb some of the projector light. This reduces the overall brightness of the image. A white or light-colored ceiling helps reflect more light and improves the picture quality. If you have a dark ceiling, consider painting it a lighter shade before you install the projector.
Invest in a Quality Screen
The projector and the screen work together. A cheap screen can ruin the image from an expensive projector. Invest in a good projector screen that matches your projector type. A tensioned screen keeps the surface flat and wrinkle-free. This gives you the sharpest possible picture.
Use an External Speaker Setup
Most built-in projector speakers are mediocre at best. For a true home theater experience, connect external speakers. A soundbar, a pair of bookshelf speakers, or a full surround system makes a huge difference. Run the audio cables alongside your video cables for a clean setup.
Keep the Room Dark for Best Results
Projectors work best in dim or dark environments. Even a small amount of ambient light can reduce contrast and color accuracy. Use blackout curtains, dimmable lights, or LED strips behind the screen for a subtle ambient glow. This enhances the cinematic feel without washing out the image.
Regularly Clean the Air Filter
Dust accumulates on the projector’s air filter over time. A clogged filter restricts airflow and causes the projector to overheat. Check and clean the filter every few weeks. Most projectors have a removable filter that you can tap clean or wash with water. Keeping it clean extends the life of your projector significantly.
Ceiling Projector vs. Tabletop Projector: Which Is Better?
Let us compare the two most common projector setups side by side.
| Feature | Ceiling Mount | Tabletop |
|---|---|---|
| Floor Space | Saves space | Takes up table space |
| Viewing Angle | Direct and centered | Angled, may need keystone |
| Aesthetics | Clean and hidden | Visible and bulky |
| Installation | Requires drilling | No installation needed |
| Portability | Fixed in place | Easy to move |
| Cost | Higher (mount needed) | Lower |
| Maintenance Access | Harder to reach | Easy to access |
| Best For | Home theaters, permanent setups | Rentals, temporary setups |
As you can see, a ceiling mount is the better choice for a permanent setup. If you rent or move often, a tabletop projector might be the way to go. Both options have their place. It all comes down to your situation and preferences.
Final Thoughts
So, can you use a projector on the ceiling? Absolutely. It is one of the best ways to set up a projector for a home theater or any room where you want a big, immersive image. A ceiling mount saves space, looks great, and delivers a better viewing experience. Just make sure you choose the right mount, measure your throw distance carefully, and plan for proper ventilation and cable management.
Avoid the common mistakes we covered, and follow the expert tips for the best results. Whether you are setting up a backyard theater, a classroom, or a dedicated home cinema, a ceiling projector setup will elevate your experience. Take your time, do it right, and enjoy the show.
Now that you know everything about using a projector on the ceiling, it is time to take action. Pick your spot, grab your tools, and get started. Your new setup is going to look amazing.
Frequently Asked Questions
Can any projector be mounted on the ceiling?
Most projectors can be ceiling-mounted as long as they have VESA mounting holes. Check your projector manual or look for the mounting pattern on the back of the unit. If it has VESA holes, you can find a compatible ceiling mount. Some projectors come with a ceiling mount bracket included in the box.
Do I need a special mount for a ceiling projector setup?
Yes, you need a ceiling projector mount specifically designed for your projector’s weight and VESA pattern. Regular table stands will not work for ceiling installation. Choose a mount that matches your projector size and offers the adjustability you need. Fixed mounts work for permanent setups, while adjustable mounts offer more flexibility.
Will the projector image look upside down on the ceiling?
The image will appear upside down when the projector is mounted on the ceiling because it hangs inverted. However, almost all modern projectors have a vertical flip or rotation setting in the menu. Simply set the rotation to 180 degrees, and the image will display right-side up on your screen.
What is the best throw distance for a ceiling-mounted projector?
The throw distance depends on your projector model and the screen size you want. A short throw projector can produce a large image from a few feet away, making it ideal for low ceilings. A standard throw projector needs more distance. Use an online throw distance calculator with your specific projector model to find the exact measurement you need.
How do I hide cables for a ceiling projector?
The best way to hide cables is to use in-wall cable channels or raceways. You can also run cables through the ceiling and down the wall using flat cable kits. Some people install a false ceiling or use cable channels painted to match the ceiling color. Cable ties and Velcro straps help keep everything organized and neat.
Is it hard to maintain a ceiling-mounted projector?
Maintenance is a bit more challenging than with a tabletop projector because it is harder to reach. However, you can make it easier by installing a removable ceiling access panel. Clean the air filter regularly to prevent overheating. Also, make sure the projector is positioned where you can reach the lamp compartment without a ladder if possible.
=== CONCLUSION ===
Mounting a projector on the ceiling is a fantastic way to upgrade your viewing experience. It is practical, it looks great, and it saves space. We have covered everything from choosing the right ceiling projector mount to avoiding common setup mistakes. You now know how to flip the image, manage cables, and pick the perfect spot in your room.
The key to a successful ceiling projector setup is preparation. Measure twice, drill once. Choose the right mount for your projector. And always plan for ventilation and maintenance access. Follow these steps and you will enjoy a stunning, cinema-quality image right from your ceiling.
So go ahead and give it a try. With the right setup, your projector on the ceiling will transform any room into an entertainment space you will love spending time in.