Can I Make My Own Projector Screen Your Easy DIY Guide
Yes, you can make your own projector screen at home with just a few simple materials and basic tools. This guide walks you through building a DIY projector screen that looks great and performs even better than store-bought options. You will learn about different screen materials, frame designs, and easy techniques that anyone can follow to create a stunning home theater setup.
Have you ever asked yourself, Can I Make My Own Projector Screen? The answer is absolutely yes, and it is easier than you might think. Building a DIY projector screen at home saves you money, lets you customize the size, and gives you a real sense of pride every time you press play. Whether you want a simple setup or a full home theater setup, this guide covers everything you need to know.
Most people assume a projector screen has to be expensive. But the truth is, a homemade projector screen can deliver incredible picture quality for a fraction of the cost. You do not need special skills or fancy tools. With a few basic supplies and about an hour of your time, you can have a screen that looks and feels professional.
Over the years, people have built projector screens out of everything from white bedsheets to specialized projector screen paint applied directly to walls. The options are nearly endless, and the cost is usually just a small part of what you would pay for a commercial screen. If you have been searching for ways to create a home theater setup on a budget, you are in the right place. Let us dive in and explore how you can bring your big-screen dreams to life.
Key Takeaways
- You can easily build a DIY projector screen using affordable materials found at any hardware store or around your home.
- Choosing the right screen material is the most important decision for image quality and brightness.
- A simple PVC pipe frame is one of the best and most popular options for a homemade projector screen.
- Outdoor projector screens are just as doable as indoor ones with the right setup and weatherproof materials.
- Avoid common mistakes like stretching fabric too loose or choosing the wrong aspect ratio for your projector.
- Custom sizing gives you flexibility that store-bought screens simply cannot match.
- Projector screen paint is a great option for turning any wall into a professional-quality projection surface.
📑 Table of Contents
Can I Make My Own Projector Screen? Here Is Why You Should Build One
Before we get into the how-to, let us talk about why building your own screen makes so much sense. When you buy a commercial projector screen, you are paying for branding, marketing, and a product that may not even fit your exact needs. A DIY projector screen solves all of those problems at once.
Save Money Without Sacrificing Quality
Store-bought screens can cost anywhere from 50 to several hundred dollars. A basic homemade projector screen can be built for under 30 dollars in most cases. You are mainly paying for the screen material and a few supplies. That is a huge savings, especially when you consider that the image quality of a well-made DIY projector screen can rival expensive commercial options. Your projector screen build does not have to break the bank.
Customize the Size and Shape
One of the biggest advantages of a DIY projector screen build is customization. Store screens come in standard sizes, and sometimes those sizes do not fit your room or your projector’s projector placement. When you build your own, you decide the dimensions. Want a wider screen? Go for it. Need a specific screen aspect ratio like 16:9 or 4:3? Just build it to those measurements. The flexibility is unbeatable, and you get the exact projector screen dimensions that work best for your space.
Learn a Useful New Skill
There is something deeply satisfying about creating something with your own hands. A projector screen build is a beginner-friendly project that teaches basic measuring, cutting, and design skills. Even if you have never done a movie night DIY project before, this one is approachable and rewarding. You will walk away with a functional screen and the confidence to tackle bigger projects in the future.
Materials You Need for a DIY Projector Screen
Getting the right materials is the foundation of any successful DIY projector screen. The good news is that most of these items are easy to find and affordable. Let us break down what you need for your projector screen build.
Screen Material Options
The screen material is the most critical part of your build. This is what the projector image lands on, so it directly affects picture quality. Here are the most popular options for your DIY projector screen:
- White blackout fabric: This is the go-to choice for most DIY builders. It is affordable, widely available, and provides a clean, bright surface for projection. You can find it at fabric stores or online. It is the perfect material for a homemade projector screen.
- PVC projector screen material: This is a more specialized option that offers better light reflection and durability. It is slightly more expensive but gives excellent results for home theater setups. Many people use PVC for outdoor screens because it resists moisture well.
- Projector screen paint: Brands like Screen Goo allow you to paint a wall or board with a specialized coating that turns it into a projection surface. This is perfect for a permanent, wall-mounted solution and eliminates the need for a removable frame entirely.
- White bedsheet: The simplest and cheapest option. A clean, wrinkle-free white sheet works in a pinch for a quick movie night DIY setup. The image will not be as sharp as with professional materials, but it gets the job done.
- Spandex or lycra fabric: This material stretches tightly and creates a smooth, wrinkle-free surface. It is a favorite among DIY projector screen enthusiasts because it pulls tight easily and holds its shape well.
Frame and Support Materials
Your screen needs a frame to hold the material taut and maintain its shape. Here are common frame options for your projector screen frame:
- PVC pipes: Lightweight, easy to cut, and inexpensive. PVC pipe frames are the most popular choice for DIY projector screen beginners. They are simple to assemble with elbow and T-joints.
- Wooden dowels or lumber: Sturdy and easy to work with. Wood frames give a more polished look and are great for wall-mounted screens. You can paint or stain them to match your room decor.
- Metal conduit: Very strong and durable. A good option if you need a large frame that can support heavier materials like PVC projector screen material.
- Broomsticks or dowel rods: For a super simple and ultra-budget option, two broomsticks with a fabric stretched between them work surprisingly well for a quick homemade projector screen.
Other Supplies You Will Need
Beyond the main materials, here is a quick checklist of supplies to have on hand:
- Measuring tape
- Saw or pipe cutter for PVC or wood
- Hot glue gun or staple gun
- Sandpaper if using wood
- Paint or primer if painting a wall
- Wall anchors or mounting brackets for a projector wall mount
- Scissors or a utility knife
- Clamps to hold material while it dries
- A level to ensure everything hangs straight
Step-by-Step Guide to Making a Projector Screen
Now for the fun part. Here is a clear, step-by-step walkthrough for building a basic DIY projector screen using a PVC pipe frame and blackout fabric. This is the most popular method because it is simple, affordable, and produces great results for any projector setup.
Step 1: Decide on Your Screen Size
Start by measuring the space where your screen will go. Consider your projector placement distance and the screen aspect ratio you want. A 16:9 ratio is standard for most modern projectors and works great for movies and gaming. Write down your width and height measurements before moving on. Having the right projector screen dimensions from the start saves you from rework later.
Step 2: Cut the PVC Pipes
Using a saw or pipe cutter, cut four pieces of PVC pipe to match your measurements. Two pieces for the width and two for the height. Make sure your cuts are straight and even. Sand down any rough edges with sandpaper so the joints fit smoothly. Clean up any dust with a damp cloth before assembly.
Step 3: Assemble the Frame
Connect the PVC pipes using elbow joints and T-joints to form a rectangular frame. Use PVC cement to secure the joints if you want a permanent frame. For a removable frame, you can use connectors that push in and hold tight without glue. Make sure the frame is square by measuring the diagonals. They should be equal. This is a crucial step for a projector screen build that looks professional.
Step 4: Attach the Screen Material
Lay your fabric flat on a clean surface, then place the frame on top. Pull the fabric taut over the frame and secure it using a staple gun, hot glue, or clips. Start from the center of each side and work your way outward to avoid wrinkles. The tighter the fabric, the better the image will look. For the best results with your DIY projector screen, take your time with this step.
Step 5: Mount or Position Your Screen
You can lean the screen against a wall, hang it from the ceiling, or mount it permanently using brackets. For a projector wall mount setup, attach L-brackets to the back of the frame and screw them into wall studs. Make sure the screen is level before you secure it fully. A projector screen frame that is not level will cause the projected image to look skewed.
Step 6: Set Up Your Projector and Test
Place your projector at the recommended distance for your screen size. Most projectors have a throw ratio chart in the manual that tells you how far to place it. Turn on the projector, adjust the keystone and focus, and enjoy your new DIY projector screen. Do a test run with a favorite movie to check for any wrinkles or brightness issues before your next movie night DIY event.
Types of Homemade Projector Screens You Can Try
Not all DIY projector screens look the same. Depending on your needs, budget, and space, different types of screens work better. Here are the most popular options you can build at home for your projector setup.
Frame and Fabric Screen
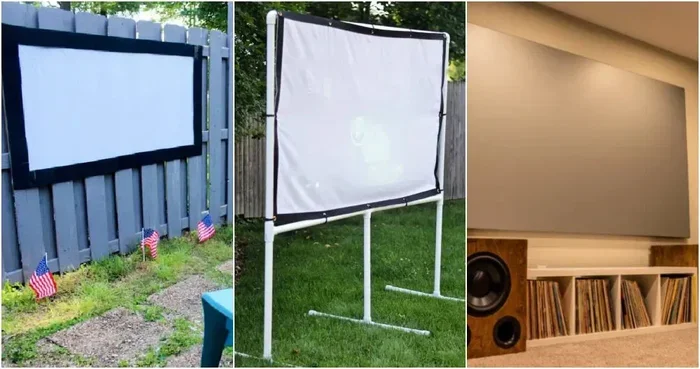
This is the classic homemade projector screen design. A rigid frame wrapped in blackout fabric or spandex. It is portable, affordable, and easy to store when not in use. This type works great for bedrooms, apartments, and casual movie night DIY gatherings. You can build one in under an hour with basic tools.
Wall-Mounted Painted Screen
If you want a permanent solution, painting a wall with projector screen paint is an excellent option. You apply the specialized coating evenly, let it dry, and you have a seamless projection surface. This eliminates the need for a frame entirely and gives your room a clean, professional look. Many people use this approach for dedicated home theater setups where the screen is always visible.
Outdoor Projector Screen
Movie nights in the backyard are a blast, and building an outdoor projector screen is easier than you might think. Use a PVC frame wrapped in white blackout fabric, and set it up on a patio or in the yard. Make sure to use a material that can handle a light breeze without billowing too much. You can also build a freestanding screen with a base that stakes into the ground for stability.
Retractable Pull-Down Screen
For a more advanced DIY projector screen build, you can create a retractable pull-down screen. This involves mounting a roller mechanism on the wall and attaching the screen material to it. When you are done watching, you pull a cord and the screen rolls up, hiding it from view. This is a great option for a dedicated home theater room where you want a clean, polished look and easy projector screen dimensions adjustment.
Tripod or Freestanding Screen
A tripod-style screen stands on its own without needing to be mounted on a wall. You build a triangular base and attach the frame to the top. This is the most portable option and works well for backyard screenings, camping trips, or temporary setups in any room. It is also one of the easiest projector screen builds for beginners.
| Screen Type | Best For | Cost Range | Portability |
|---|---|---|---|
| Frame and Fabric | Indoor casual use | 20 – 50 dollars | High |
| Painted Wall Screen | Permanent home theater | 30 – 60 dollars | Low |
| Outdoor Projector Screen | Backyard movie nights | 25 – 60 dollars | Medium |
| Retractable Pull-Down | Dedicated theater room | 50 – 100 dollars | Low |
| Tripod Freestanding | Portable and temporary use | 15 – 40 dollars | Very High |
Common Mistakes to Avoid When Building a Projector Screen
Building a DIY projector screen is straightforward, but there are a few common pitfalls that can ruin your results. Knowing what to avoid will save you time, money, and frustration. Here are the mistakes most people make, along with how to prevent them.
Using the Wrong Fabric
This is the number one mistake people make. Not all white fabrics are created equal. A textured cotton sheet will distort the image and reduce brightness. Always choose a smooth, matte white material like blackout fabric or spandex for the best results. Avoid fabrics with patterns, colors, or shiny finishes. The right projector screen material makes all the difference in image sharpness and color accuracy.
Stretching the Fabric Too Loose
A loose screen material creates wrinkles and ripples that distort the projected image. Take your time when attaching the fabric to the frame. Pull it tight and secure it evenly. Use clips or staples every few inches to keep it taut. A wrinkle-free surface makes a massive difference in picture quality. This is one of the most important tips for any projector screen build.
Ignoring the Aspect Ratio
Every projector has a native screen aspect ratio, usually 16:9 or 4:3. If you build a screen with the wrong ratio, you will get black bars on the sides or top and bottom of the image. Check your projector specifications before you cut any materials. Matching the projector screen dimensions to your projector’s native ratio is essential for the best viewing experience.
Placing the Screen in the Wrong Location
Your screen placement affects the entire viewing experience. Avoid placing the screen in direct sunlight, as it will wash out the image. Also, make sure the surface behind the screen is dark and does not reflect light back onto the screen. A projector wall mount or a dedicated screen area with controlled lighting gives the best results for your homemade projector screen.
Skipping the Keystone Correction
Even with a perfectly built screen, the projector image may appear skewed if the projector is not centered or level. Most modern projectors have keystone correction settings that fix this. Always adjust the keystone and focus after mounting the screen for the sharpest image possible. Proper projector placement is just as important as the screen itself.
Quick Tips for a Better DIY Projector Screen
- Measure twice, cut once. This old saying applies perfectly to building a projector screen. Double-check all your measurements before cutting any materials.
- Use a laser level to make sure your frame is perfectly square and your wall mounting is straight.
- Paint the back of the frame black to reduce light reflection from behind the screen material and improve contrast.
- Hang the screen in a room with dimmable lights so you can control the ambient lighting for the best viewing experience.
- Store your screen flat or rolled when not in use to prevent creases and warping.
- Test your setup before finalizing. Do a test run with the projector before you permanently mount or glue anything. Make adjustments as needed.
Conclusion
So, can you make your own projector screen? Absolutely. A DIY projector screen is one of the most rewarding and practical home projects you can take on. It costs a fraction of what a commercial screen costs, and the end result can be just as good or even better.
Whether you choose a simple frame-and-fabric design, a painted wall screen, or a portable outdoor setup, the key is to use the right materials and take your time with the build. Pay attention to screen aspect ratio, projector placement, and fabric quality, and you will be rewarded with a stunning home theater setup that you can enjoy for years to come.
Start small if you are new to DIY projects. Build a basic screen, test it out, and then upgrade or refine as you go. The beauty of a DIY projector screen build is that it is entirely yours. You control the size, the material, the design, and the cost. There is no better way to create a personalized entertainment experience that fits your life perfectly.
Grab your materials this weekend, follow the steps in this guide, and get ready to turn any wall or backyard into your personal cinema. Your homemade projector screen is waiting to be built, and the movie nights you create with it will be worth every bit of effort. Now you know the answer to can I make my own projector screen, and you have everything you need to get started today.
Frequently Asked Questions
Can I use a white bedsheet as a projector screen?
Yes, a clean white bedsheet can work as a basic projector screen in a pinch. However, it may not give you the sharpest or brightest image because most bedsheets have a slight texture that can distort the picture. For better results, use a smooth blackout fabric or spandex instead.
What is the best material for a DIY projector screen?
The best material depends on your needs and budget. Blackout fabric is the most popular choice because it is affordable, smooth, and widely available. PVC projector screen material offers better light reflection for a more professional look. Projector screen paint is ideal if you want a permanent wall-mounted solution without a frame.
How do I know what size projector screen to build?
Measure the distance between your projector and the wall where the screen will be placed. Check your projector’s manual for the recommended throw distance at your desired screen size. Also consider the screen aspect ratio, which is usually 16:9 for modern projectors. This ensures the image fills the screen properly without black bars.
Can I build a projector screen for outdoor use?
Absolutely. An outdoor projector screen can be built using the same frame-and-fabric method. Just make sure the fabric can handle light wind without wrinkling too much. You can also build a freestanding tripod screen or stake the frame into the ground for stability. Using projector screen paint on a portable board is another great outdoor option.
Do I need special tools to build a DIY projector screen?
No special tools are needed for a basic screen. A saw or pipe cutter, a measuring tape, a staple gun or hot glue gun, and some clamps are all you need. If you are building a wall-mounted screen, you will also need a drill and wall anchors. The entire DIY projector screen project can be completed with basic household tools.
How can I improve the picture quality of my homemade projector screen?
To improve picture quality, make sure the fabric is stretched as tightly as possible to eliminate wrinkles. Use a matte white material for the best color accuracy. Add a black border around the screen to improve contrast. Also, control the ambient light in the room by closing curtains or using dimmable lights. These small changes make a big difference in the final image of your DIY projector screen.