Can I Cut And Join Hdmi Cable Everything You Must Know
Yes, you can cut and join an HDMI cable, but it requires the right tools, patience, and technique. Whether you need a HDMI cable repair or want to create a custom HDMI cable length, splicing is possible when done correctly. This guide walks you through every step, from choosing the right HDMI cable types to avoiding common mistakes that cause HDMI signal loss.
Have you ever found yourself with an HDMI cable that is just a little too short? Maybe you moved your TV setup and now the cable does not reach. Or perhaps you bought a longer cable but want to shorten it for a cleaner look. Whatever the reason, the question Can I Cut And Join Hdmi Cable comes up a lot. And the answer is yes, you can do it. But it is not as simple as cutting a piece of string and tying the ends together.
HDMI cables carry both audio and video signals through tiny wires packed into a single shielded cable. Each wire has a specific job. Some carry data. Some carry clock signals. And some handle ground connections. When you cut the cable, you break that carefully designed path. So joining it back together requires care, the right tools, and a basic understanding of how the cable is built. In this guide, we will walk you through everything you need to know about HDMI cable repair and splicing.
We will cover the tools you need, the step by step process, common mistakes to avoid, and when it makes more sense to just buy a new cable instead. Whether you are a DIY enthusiast or someone who just wants to fix a cable without spending money, this guide has you covered. Let us dive in.
Key Takeaways
- Cutting and joining HDMI cables is possible with the proper tools and a steady hand.
- HDMI cable splicing involves stripping wires, soldering pins, and crimping a new connector.
- Signal loss is the biggest risk when cutting HDMI cables, so precision matters a lot.
- HDMI cable tools like a stripper, soldering iron, and crimping tool are essential for the job.
- Not all HDMI cables are easy to splice — flat cables and ultra-thin cables are much harder to work with.
- Testing the connection after splicing is critical to make sure audio and video work properly.
- Buying a new cable is often faster and more reliable than attempting a splice, especially for beginners.
📑 Table of Contents
- Why People Want To Cut And Join HDMI Cables
- How HDMI Cables Are Built Inside
- Can You Actually Cut And Join An HDMI Cable?
- Tools You Need For HDMI Cable Splicing
- Step By Step Guide To Cutting And Joining HDMI
- Common Mistakes That Ruin HDMI Splices
- When To Just Buy A New Cable Instead
- Expert Tips For The Best HDMI Splice Results
- Frequently Asked Questions About Cutting And Joining HDMI Cables
- Conclusion
Why People Want To Cut And Join HDMI Cables
There are several reasons why someone might want to cut and join an HDMI cable. Understanding these reasons helps you decide if splicing is the right move for your situation.
- Cable is too long: You bought a 50 foot cable but only need 15 feet. Extra cable length can cause signal degradation, especially at higher resolutions.
- Cable got damaged: A chewed wire from a pet, a cut from a door closing, or frayed shielding near the connector can make a cable unusable.
- Connector is broken: The HDMI plug on one end snapped off or the gold plating wore away. Replacing just the connector saves you from replacing the whole cable.
- Custom length needed: You are building a custom home theater setup and need exact cable lengths for a clean installation.
- Emergency fix: You need a cable to work right now and cannot wait for a new one to arrive.
No matter the reason, knowing how to splice an HDMI cable gives you flexibility. It is a useful HDMI cable DIY skill that can save you time and money. But it is not without risks, which we will talk about soon.
How HDMI Cables Are Built Inside
Before you start cutting any cable, it helps to understand what is inside. HDMI cables are not just simple wires. They are carefully engineered to carry high speed digital signals without interference.
The HDMI Connector Pins
An HDMI connector has 19 pins. Each pin does a specific job. Some pins carry the video data. Others carry audio data. Pin 16 is the hot plug detect pin, which tells your devices that something is connected. Pin 17 is the ground pin. When you splice a cable, you need to make sure every single one of these 19 connections is restored correctly. Even one missed pin can cause no signal, no audio, or a flickering picture.
Cable Construction Types
Not all HDMI cables are built the same way. There are two main types you will encounter:
- Standard round HDMI cable: This is the most common type. It has a round cross section with multiple layers of shielding around twisted wire pairs. These are the easiest to splice because the internal structure is accessible and organized.
- Flat HDMI cable: These are thin and flexible. They are popular for in wall installations or under carpet setups. However, they are much harder to splice because the internal wires are tightly packed and harder to separate without damaging them.
For HDMI cable splicing, a standard round cable is your best bet. If you have a flat cable, consider buying a new one instead. The extra effort and risk of failure is usually not worth it.
Can You Actually Cut And Join An HDMI Cable?
The short answer is yes. You can cut an HDMI cable and join it with a new connector. But the longer answer is that it requires skill, patience, and the right equipment. HDMI cable cutting and re-termination is something that professionals do every day. But for a home DIYer, it can be tricky.
The Real Answer
When you cut an HDMI cable, you are essentially creating two cable stumps. Each stump needs a new connector attached to it. This process is called HDMI cable termination. You strip the outer jacket, expose the internal wires, identify each wire’s function, solder it to the correct pin on the new connector, and then crimp or solder the connector in place.
If you do this correctly, the cable will work just as well as a brand new one. But if you make even a small mistake, like crossing two wires or missing a solder joint, the cable will not work properly. You might get no picture, no sound, or intermittent signal drops.
What Happens To The Signal
One concern many people have is HDMI signal loss after splicing. The truth is, a properly done splice should not cause any noticeable signal loss. The signal travels through copper wires, and as long as the connections are solid and the shielding is intact, the signal remains strong.
However, a poorly done splice can introduce problems. A weak solder joint can cause intermittent signal drops. A wire that is too short or too long can mess up the timing of the digital signal. And damaged shielding can let electromagnetic interference creep in, causing sparkles or lines on your screen. This is why precision matters so much when you are doing HDMI cable repair at home.
Tools You Need For HDMI Cable Splicing
You cannot splice an HDMI cable with just scissors and tape. You need proper tools to get a reliable connection. Here is what you will need.
Must Have Tools
- HDMI cable stripper: This tool removes the outer jacket without damaging the inner wires. You can also use a sharp X-Acto knife, but a stripper is safer and more consistent.
- Soldering iron: A 40-watt soldering iron with a fine tip works best for HDMI cable soldering. Make sure it is clean and tinned before you start.
- Lead free solder: Use quality solder with a rosin core. Avoid thick solder because it can bridge pins and cause short circuits.
- HDMI crimping tool: This tool presses the connector onto the cable after you have soldered the wires. Some connectors use screws instead of crimps, which makes the job easier.
- Wire stripper: You need to strip the insulation off each tiny wire inside the cable. A precision wire stripper with small gauge settings is essential.
- HDMI cable tester: After you finish the splice, you need to test all 19 pins. A basic HDMI cable tester checks continuity and signal quality. This is not optional. Always test your work.
Nice To Have Tools
- Helping hands tool: This is a clamp stand that holds the cable and connector in place while you solder. It is a game changer for precision work.
- Magnifying glass or loupe: The HDMI pins are tiny. A magnifying glass helps you see what you are doing and check your solder joints.
- Heat shrink tubing: This insulates each wire and protects the splice from moisture and movement.
- Electrical tape: For wrapping the splice point and adding extra strain relief.
Step By Step Guide To Cutting And Joining HDMI
Now that you have your tools ready, let us walk through the actual process of cutting and joining an HDMI cable. Follow these steps carefully and you will have a working splice in no time.
Step 1: Measure And Cut
First, decide where you want to cut the cable. Make sure you leave enough length on both sides to reach your devices comfortably. Use a sharp pair of cable cutters to make a clean, straight cut. Do not use scissors because they can crush the internal wires and damage the cable structure.
After cutting, remove about one inch of the outer jacket from each end. Be very careful not to cut into the inner wires or the shielding. If you damage the shielding, you will have HDMI signal loss problems later on.
Step 2: Strip The Wires
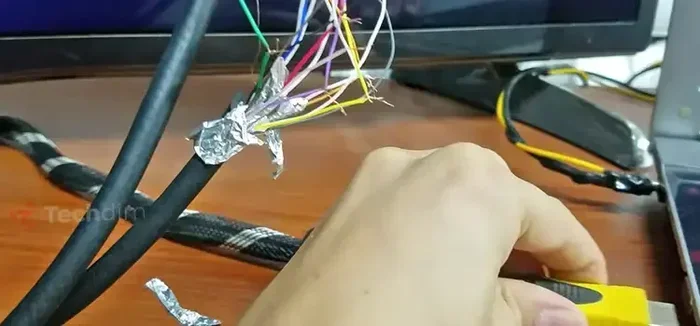
Once the outer jacket is removed, you will see the internal structure of the cable. There is usually a foil shield and a braided shield covering a bundle of twisted wire pairs. Carefully remove the foil shield first, then unwrap the braided shield.
You will now see 19 individual wires, each connected to a specific pin on the HDMI connector. Use your HDMI cable tools to strip about 3 millimeters of insulation from the end of each wire. Be gentle. These wires are delicate and breaking one will cause a connection failure.
Step 3: Solder The Pins
This is the most important step. Take your new HDMI connector and identify each pin position. Refer to the HDMI pinout diagram that comes with the connector or find one online. Each wire must be soldered to its correct pin.
Heat the pin and the wire with your soldering iron, then apply a small amount of solder. The solder should flow smoothly and create a shiny, cone shaped joint. Avoid using too much solder, as it can bridge adjacent pins and cause a short circuit. Let each joint cool completely before moving on to the next one.
Step 4: Attach The New Connector
After all 19 wires are soldered, carefully insert them into the HDMI connector housing. Make sure each wire goes into its correct slot. Use your crimping tool to secure the connector onto the cable. Some connectors use screws instead. In that case, simply tighten each screw firmly over its wire.
Once the connector is attached, wrap the splice point with heat shrink tubing or electrical tape. This provides strain relief and protects the connections from bending or pulling.
Step 5: Test Your Work
This step cannot be skipped. Plug the spliced cable into your devices and check for video and audio output. Try different resolutions if possible, including 4K if your setup supports it. Watch for any sparkles, flickering, or audio dropouts.
If everything works, congratulations. You have successfully completed an HDMI cable assembly. If something does not work, unplug the cable and check each solder joint. Use your HDMI cable tester to identify which pin is not making proper contact. Fix the problem and test again.
Common Mistakes That Ruin HDMI Splices
Even with the best intentions, mistakes happen. Here are the most common errors people make when cutting and joining HDMI cables, and how to avoid them.
- Cutting the cable at an angle: Always make a straight, perpendicular cut. An angled cut damages the internal wire layout and makes it hard to match the pin positions correctly.
- Removing too much shielding: The shielding protects the signal from interference. If you strip too much away, you invite noise into the cable and experience HDMI signal loss.
- Mixing up wire positions: HDMI cables have a specific wire order. If you swap two wires, the corresponding pins will not work. Double check every wire before you solder.
- Using too much solder: Excess solder can short out adjacent pins. Use just enough to create a smooth, shiny joint. A blobby solder joint is a bad solder joint.
- Skipping the testing phase: Never assume the cable works just because you finished the splice. Always test it before you hide it behind a wall or furniture.
- Using cheap connectors: Low quality HDMI connectors often have poor pin alignment and weak crimps. Invest in good quality connectors from reputable brands for reliable results.
When To Just Buy A New Cable Instead
While splicing an HDMI cable is a great skill, it is not always the best solution. Here are some situations where buying a new cable makes more sense.
- The cable is flat HDMI: These are extremely difficult to splice properly. The internal wires are hard to separate and the connector assembly is tricky. Just replace the cable.
- You need a long cable: If you need a 30 foot cable and your current one is only 6 feet, splicing two shorter cables together adds a connection point that can degrade signal quality. Buy one long cable instead.
- The cable is old and cheap: If the original cable was a budget option with thin shielding and low quality wires, a splice will not improve its performance. Upgrade to a better HDMI cable quality cable instead.
- You are not comfortable with soldering: If you have never soldered before, the learning curve for HDMI splicing is steep. It is easy to damage the cable or create a weak connection. A new cable is safer and more reliable.
- Time is more important than money: If you need the cable working today and cannot wait to learn the process, just buy a new one. A basic HDMI cable extension or a new cable of the right length costs very little and takes minutes to set up.
Sometimes the smartest DIY move is knowing when not to DIY. If the cable is under warranty or if replacing it costs less than the time you would spend splicing, go with the new cable.
Expert Tips For The Best HDMI Splice Results
If you do decide to splice your own HDMI cable, these expert tips will help you get the best possible results.
- Work on a clean, well lit surface. These tiny wires are hard to see in poor lighting. A bright desk lamp makes a big difference.
- Take photos of the cable before you cut. This gives you a reference for how the internal wires are arranged. It is easy to forget which wire goes where.
- Use a helping hands tool. Holding tiny wires steady while you solder is almost impossible with just your fingers. A helping hands clamp frees up both hands.
- Clean the soldering iron tip often. A dirty tip causes cold solder joints, which are weak and unreliable. Wipe the tip on a damp sponge between joints.
- Add strain relief at the connector. Use heat shrink tubing or cable ties to prevent the cable from pulling on the solder joints. Movement is the number one enemy of a good splice.
- Test at multiple resolutions. Just because the cable works at 1080p does not mean it will work at 4K. Test at the highest resolution your setup supports.
- Label your cables. If you have multiple HDMI cables, label them with tape so you know which ones are spliced and which ones are new. This saves confusion later.
Following these tips will give you a strong, reliable HDMI cable repair that lasts. Remember, practice makes perfect. If your first attempt does not work, do not get discouraged. Learn from the experience and try again with a spare cable.
Frequently Asked Questions About Cutting And Joining HDMI Cables
Can I cut and join any type of HDMI cable?
Most standard round HDMI cables can be cut and joined successfully. However, flat HDMI cables, ultra thin cables, and cables with built in equalizers are much harder to splice. For those types, buying a new cable is usually the better option. Standard round cables with a visible internal wire structure are the easiest to work with for HDMI cable DIY projects.
Will cutting and joining an HDMI cable cause signal loss?
A properly done splice should not cause noticeable HDMI signal loss. The digital signal either works or it does not, so as long as all 19 pins are connected correctly, you should get the same quality as a brand new cable. Poor soldering or damaged shielding, however, can introduce problems like sparkles, dropouts, or no signal at all.
How long does it take to splice an HDMI cable?
For a first time attempt, expect to spend about 30 to 45 minutes on each end. Experienced DIYers can complete both ends in about 15 to 20 minutes. The time includes stripping wires, soldering all 19 pins, attaching the connector, and testing the connection. Do not rush the process. Precision matters more than speed.
Do I need special HDMI connectors to splice the cable?
Yes, you need standard HDMI male or female connectors depending on which end you are replacing. You can buy HDMI connectors online or at electronics stores. Make sure the connectors match your cable type, whether it is standard HDMI, Mini HDMI, or Micro HDMI. The HDMI cable types differ in connector size but the internal wiring is similar for standard cables.
Is soldering the only way to join HDMI cables?
Soldering is the most common and reliable method for HDMI cable termination. Some connectors use screw terminals or clamp styles that do not require soldering. However, these alternatives are less common for HDMI and may not provide as secure a connection. Soldering gives you the best control over each individual pin connection.
Can I splice two HDMI cables together to make one longer cable?
Yes, you can join two HDMI cables by cutting both ends and attaching a new connector to each cut end. However, every splice point is a potential weak spot for signal quality. If you need a longer cable, it is usually better to buy one cable of the correct length rather than splicing two cables together. This reduces the number of connection points and gives you the best HDMI audio video signal quality.
Conclusion
So, can I cut and join HDMI cable? Absolutely yes. With the right tools, a little patience, and careful attention to detail, you can successfully splice an HDMI cable and get it working like new. Whether you are repairing a damaged connector, shortening a cable that is too long, or building a custom setup, HDMI cable repair is a valuable skill that saves you money and gives you more control over your home entertainment setup.
Just remember to take your time, follow each step carefully, and always test your work before you hide the cable away. Avoid the common mistakes we covered, and do not be afraid to buy a new cable if the situation does not call for splicing. The goal is a reliable connection that delivers crisp video and clear audio every time you turn on your TV or projector.
Now that you know how to cut and join an HDMI cable, you are ready to tackle the job with confidence. Grab your HDMI cable tools, find a spare cable to practice on, and give it a try. You might be surprised at how satisfying it feels to fix something yourself and get it working perfectly.