Can I Connect Raspberry Pi To Laptop With Hdmi Easily
Yes, you can connect Raspberry Pi to laptop with HDMI in most cases, but it depends on your laptop’s HDMI input capability. Many laptops only have HDMI output, not input, which creates a challenge. This guide walks you through every method, cable option, and workaround so you can get your Raspberry Pi display working on your laptop screen quickly and easily.
Have you ever wanted to use your laptop as a monitor for your Raspberry Pi? Maybe you are working on a project and do not want to buy a separate screen. Or perhaps you are traveling and need a portable setup. Whatever the reason, the idea of connecting Raspberry Pi to laptop with HDMI sounds simple enough. But here is the thing. It is not always as straightforward as plugging in a cable.
The truth is, most laptops do not have HDMI input ports. They only have HDMI output. So you cannot just connect a cable and expect your laptop screen to show what the Raspberry Pi is doing. But do not worry. There are several ways to make this work. Some are easy. Some need a small extra piece of equipment. And this guide covers every single method in detail.
By the end of this article, you will know exactly what your options are. You will understand which method works best for your setup. And you will have clear steps to follow. Whether you own a Raspberry Pi 4, a Raspberry Pi 3, or even a newer model, this guide has you covered. Let us dive in.
Key Takeaways
- HDMI input on laptops is rare: Most laptops only support HDMI output, not input, which limits direct connection options.
- USB capture cards solve the problem: An HDMI capture card lets you display Raspberry Pi output on your laptop screen even without HDMI input.
- Mini HDMI and micro HDMI matter: Different Raspberry Pi models use different HDMI connectors, so choosing the right cable is essential.
- Alternative connection methods exist: SSH, VNC, and remote desktop tools let you control Raspberry Pi from your laptop without any HDMI cable at all.
- Resolution and settings need adjustment: Getting the best display quality requires tweaking HDMI output settings on your Raspberry Pi.
- Troubleshooting is straightforward: Most HDMI connection issues come from cable type, adapter quality, or display settings.
📑 Table of Contents
- Can I Connect Raspberry Pi To Laptop With Hdmi Directly?
- Using An Hdmi Capture Card To Display Raspberry Pi On Laptop
- Choosing The Right Hdmi Cable And Adapter For Your Raspberry Pi
- Alternative Ways To Connect Raspberry Pi To Laptop Without Hdmi
- Hdmi Resolution And Display Settings For Raspberry Pi
- Common Hdmi Connection Problems And How To Fix Them
- Expert Insights On Raspberry Pi Hdmi Setup
- Key Takeaways
- Conclusion
Can I Connect Raspberry Pi To Laptop With Hdmi Directly?
The short answer is sometimes. But most of the time, the answer is no. Here is why. Your laptop likely has an HDMI port, but that port is designed to send video out to a monitor or TV. It does not receive video in. So when you try to plug a Raspberry Pi into your laptop using a standard HDMI cable, nothing happens on your laptop screen.
This is the biggest misconception people have about HDMI connections. HDMI cables carry a signal in one direction. The signal flows from the source device to the display device. Your Raspberry Pi is the source. Your laptop is not built to act as a display input in most cases. So a direct HDMI connection between the two simply does not work the way you might expect.
Which Laptops Support HDMI Input?
Some laptops do support HDMI input, but they are rare. Certain models from brands like Dell, HP, and Lenovo designed for multimedia use or as portable monitors include HDMI input functionality. If you are lucky enough to own one of these, then yes, you can connect your Raspberry Pi directly with an HDMI cable and see the display on your laptop screen.
To check if your laptop supports HDMI input, look at the port label or check the manufacturer specifications online. If the port is labeled HDMI IN or the specs mention HDMI input support, you are good to go. Just grab the right cable and plug it in.
What If Your Laptop Does Not Have HDMI Input?
For the vast majority of users, this is the situation you are in. Your laptop has an HDMI output port, but not an input. In that case, you need an alternative method to see your Raspberry Pi display. The most popular and reliable solution is an HDMI capture card. We will cover this in detail shortly.
Using An Hdmi Capture Card To Display Raspberry Pi On Laptop
This is the go-to method for most people who want to display Raspberry Pi on laptop without buying a separate monitor. An HDMI capture card acts as a bridge. It takes the HDMI signal from your Raspberry Pi and converts it into a USB signal that your laptop can understand and display.
How Does An Hdmi Capture Card Work?
The capture card has an HDMI input port where you plug in your Raspberry Pi. Then it connects to your laptop via USB. The laptop recognizes the capture card as a video source. Your Raspberry Pi screen then appears as a window on your laptop display. It works like magic, and the setup takes only a few minutes.
You can use the capture card for live streaming, recording, or just general use. It supports most resolutions up to 1080p and sometimes even 4K depending on the card you choose. The lag is minimal, making it perfect for everyday use and project development.
Best Hdmi Capture Cards For Raspberry Pi
Not all capture cards are created equal. Here are some reliable options that work well with Raspberry Pi setups:
- Elgato Cam Link 4K: A premium option with excellent video quality and low latency. Works flawlessly with Raspberry Pi.
- AVerMedia Live Gamer Mini: Compact and affordable. Great for basic Raspberry Pi projects and screen mirroring.
- Generic USB 2.0 Capture Card: Budget-friendly options available on Amazon for under $15. They work but may have slightly more lag.
- Raspberry Pi Official Touch Display: Not a capture card, but worth mentioning as an alternative that eliminates the need for a laptop altogether.
Step By Step Setup With A Capture Card
Setting up an HDMI capture card is simple. Follow these steps and you will be up and running in no time:
- Plug the HDMI cable from your Raspberry Pi into the HDMI input on the capture card.
- Connect the capture card to your laptop using a USB cable.
- Wait for your laptop to recognize the capture card. This usually takes a few seconds.
- Open your laptop’s camera or video app. On Windows, use the Camera app. On Mac, use Photo Booth or a third-party app.
- Select the capture card as your video source. You should now see your Raspberry Pi desktop on your laptop screen.
That is it. No complicated software. No driver headaches in most cases. Just plug and play.
Choosing The Right Hdmi Cable And Adapter For Your Raspberry Pi
Not all HDMI cables are the same. Different Raspberry Pi models use different HDMI connectors, and picking the wrong cable can cause frustration. Let us break down what you need to know about HDMI cable setup for your Raspberry Pi.
Understanding Raspberry Pi Hdmi Ports
Older Raspberry Pi models like the Pi 1, Pi 2, and Pi 3 use a standard full-size HDMI port. You can use any regular HDMI cable with these models. It is the same type of cable you use for your TV or gaming console. Plug it in and you are good to go.
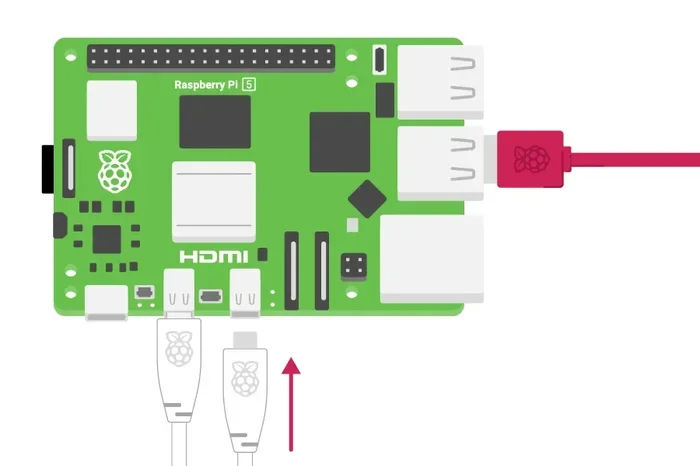
Newer models, especially the Raspberry Pi 4 and Raspberry Pi 5, use a micro HDMI port. This is a much smaller connector. You need a micro HDMI cable or a micro HDMI to HDMI adapter to connect to a display. Getting the right cable type is the first step to a successful setup.
Mini Hdmi Vs Micro Hdmi
These two connectors often get confused. The Raspberry Pi 4 and Pi 5 use micro HDMI. The Raspberry Pi Zero and Zero W use mini HDMI. They look similar but they are different sizes. Using the wrong adapter will not work and can damage your port if you force it.
Always double check your Raspberry Pi model before buying a cable or adapter. A quick search online for your specific model will tell you exactly which connector type you need.
Cable Quality Matters
A cheap HDMI cable can cause signal issues, flickering, or no display at all. Invest in a good quality cable from a reputable brand. Look for cables rated for high speed and 4K support even if you are only using 1080p. These cables have better shielding and carry a cleaner signal.
For longer cable runs, consider an active HDMI cable or a signal booster. This ensures the signal stays strong from your Raspberry Pi to your display or capture card.
Alternative Ways To Connect Raspberry Pi To Laptop Without Hdmi
If you do not want to buy a capture card or your laptop does not have any HDMI input at all, there are other ways to use your laptop as a Raspberry Pi display. These methods do not require any HDMI cable connection at all. They use your existing network connection instead.
Using SSH For Remote Access
SSH stands for Secure Shell. It lets you control your Raspberry Pi from your laptop through a command line interface. You do not see the graphical desktop. But you can run commands, install software, and manage your Raspberry Pi remotely. This is perfect for headless setups where you do not need a visual display at all.
To use SSH, you need to enable it on your Raspberry Pi first. Then open a terminal on your laptop and type ssh pi@[your Raspberry Pi IP address]. You will be connected and ready to go.
Using VNC For Remote Desktop
VNC stands for Virtual Network Computing. Unlike SSH, VNC gives you a full graphical remote desktop. You can see your Raspberry Pi screen on your laptop and even control it with your laptop mouse and keyboard. It feels like you are sitting right in front of the Raspberry Pi.
To set this up, install a VNC server on your Raspberry Pi and a VNC viewer on your laptop. Both devices need to be on the same network. Once connected, your laptop becomes a wireless monitor for your Raspberry Pi.
Using Remote Desktop Protocol (Rdp)
RDP is another remote desktop option. Windows laptops have built-in RDP client support. You can use a tool called xrdp on your Raspberry Pi to enable RDP connections. This method works well if you prefer a Windows-native experience without installing extra software on your laptop.
Hdmi Resolution And Display Settings For Raspberry Pi
Once you have your connection working, you will want to get the best picture quality possible. Raspberry Pi display settings let you adjust resolution, HDMI mode, and other video output options. Getting these settings right makes a big difference in how your setup looks and performs.
Configuring Hdmi Output On Raspberry Pi
The Raspberry Pi configuration tool lets you adjust HDMI settings easily. Open the terminal and type sudo raspi-config. Navigate to the Display Options section. From there, you can set the resolution, force HDMI or composite output, and adjust overscan settings.
If your display looks cut off or has black bars, the overscan setting is likely the culprit. Adjusting it by a few pixels can fix the issue completely.
Setting The Right Resolution
For most laptop screens, a resolution of 1920×1080 (1080p) works perfectly. If your laptop has a higher resolution, you can set the Raspberry Pi output to match. Just be aware that higher resolutions require more processing power from your Raspberry Pi.
You can also set a custom resolution in the config.txt file located in the boot folder. This is useful if your laptop has an unusual screen resolution that does not match standard options.
Common Hdmi Connection Problems And How To Fix Them
Even with the right setup, you might run into issues. HDMI connection problems are common and usually easy to fix. Here are the most frequent issues and their solutions.
No Display On Laptop Screen
If you see nothing on your laptop after connecting the Raspberry Pi, check a few things first. Make sure the HDMI cable is firmly plugged in on both ends. Try a different cable. Check if your capture card is properly recognized by your laptop. Sometimes simply unplugging and replugging the USB connection fixes the problem.
Flickering Or Distorted Display
A flickering screen usually means a cable quality issue or a resolution mismatch. Try lowering the resolution on your Raspberry Pi. Replace the HDMI cable with a higher quality one. If you are using an adapter, the adapter itself might be the problem. Try a different brand or model.
Laptop Does Not Recognize Capture Card
If your laptop does not detect the capture card, try a different USB port. USB 3.0 ports work best for capture cards. Also make sure you have the latest drivers installed. On Windows, the built-in camera app should detect the capture card automatically in most cases.
Expert Insights On Raspberry Pi Hdmi Setup
From years of working with Raspberry Pi setups, the most important thing to remember is that your laptop is not designed to be a monitor. Treat it as one only through the right tools. A capture card is your best friend here. It bridges the gap between what your Raspberry Pi outputs and what your laptop can accept.
Also, do not overlook the power of remote access methods. Many Raspberry Pi users never need an HDMI connection at all once they set up SSH or VNC. These methods are faster, cleaner, and free. If your project does not require a physical display, skip the cables entirely.
One more tip. Always keep your Raspberry Pi firmware updated. Display compatibility improves with every update. A simple sudo apt update && sudo apt upgrade command can fix display issues you did not even know you had.
Key Takeaways
- Direct HDMI connection rarely works: Most laptops only have HDMI output, not input, so a direct cable connection will not display your Raspberry Pi screen.
- Capture cards are the best workaround: An HDMI capture card converts the Raspberry Pi signal into USB, letting your laptop display the Raspberry Pi desktop easily.
- Get the right cable for your model: Micro HDMI, mini HDMI, and full-size HDMI are all different. Using the wrong one will not work.
- Remote access eliminates HDMI entirely: SSH, VNC, and RDP let you control your Raspberry Pi from your laptop over a network connection with no cables needed.
- Display settings need adjustment: Tweaking resolution and overscan in the Raspberry Pi config ensures the best picture quality on your laptop screen.
- Troubleshooting is simple: Most HDMI issues come from cable quality, loose connections, or missing drivers. A few quick checks usually solve the problem.
Conclusion
So, can you connect Raspberry Pi to laptop with HDMI? Yes, but the path depends on your laptop and your setup. If your laptop has HDMI input, a direct cable connection works. If not, an HDMI capture card gives you a reliable and easy solution. And if you do not want any cables at all, remote access tools like SSH and VNC let you control your Raspberry Pi from your laptop wirelessly.
The key is knowing your options and picking the method that fits your needs. Whether you are a beginner just getting started with Raspberry Pi or an experienced maker working on a complex project, understanding how to connect your devices opens up new possibilities. You can use your laptop as a monitor, a development station, or even a streaming setup for your Raspberry Pi projects.
Start with the method that sounds easiest for you. Try a capture card if you want a quick visual connection. Set up VNC if you prefer a wireless approach. Experiment and find what works best for your workflow. Once you get it working, you will wonder how you ever managed without this setup. Happy building.
Frequently Asked Questions
Can any laptop be used as a monitor for Raspberry Pi via HDMI?
Not every laptop supports HDMI input. Most laptops only have HDMI output ports designed to send video to external displays. You need to check your laptop specifications to confirm if it has HDMI input capability before attempting a direct connection.
What type of HDMI cable do I need for Raspberry Pi 4?
Raspberry Pi 4 uses a micro HDMI port. You need a micro HDMI to standard HDMI cable or a micro HDMI cable with a built-in adapter. Using the wrong cable type will result in no display output.
Is an HDMI capture card necessary to connect Raspberry Pi to a laptop?
Yes, if your laptop lacks HDMI input. The capture card converts the Raspberry Pi HDMI signal into a USB signal your laptop can display. It is the most reliable and simplest method for most users.
Can I use VNC to see my Raspberry Pi desktop on my laptop?
Absolutely. VNC provides full graphical remote desktop access. You can see and control your Raspberry Pi screen on your laptop over a shared network connection without any HDMI cable at all.
Why does my Raspberry Pi show no display when connected via HDMI?
Common causes include using the wrong cable type, a faulty HDMI adapter, incorrect resolution settings, or your laptop not supporting HDMI input. Try a different cable, check your settings, and verify your laptop’s input capabilities.
Are there free alternatives to buying an HDMI capture card?
Yes. Remote access methods like SSH, VNC, and RDP are completely free and require only a network connection. They let you control your Raspberry Pi from your laptop without any additional hardware purchase.
=== CONCLUSION ===
Connecting Raspberry Pi to laptop with HDMI is absolutely doable once you know the right approach. The method you choose depends on your laptop’s capabilities, your budget, and how you plan to use the setup. Whether you go with a capture card, a remote desktop tool, or a direct HDMI connection, each option has its strengths. The most important thing is to start. Pick one method, follow the steps in this guide, and you will have your Raspberry Pi display on your laptop screen in no time.