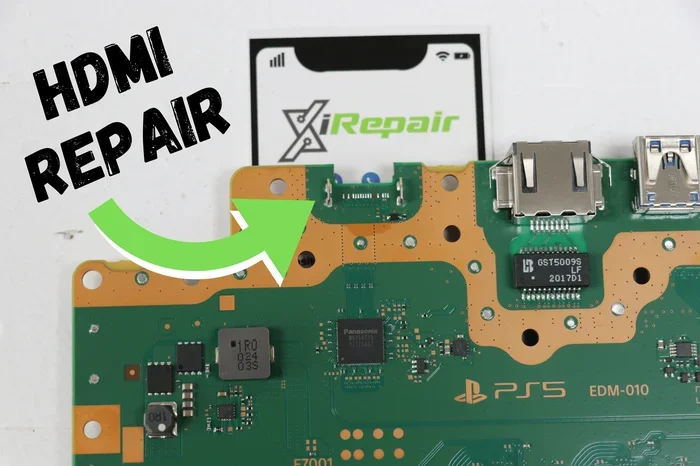
Can You Replace The Hdmi Port On Your Ps5 By Yourself
Yes, you can replace the HDMI port on your PS5 yourself, but it is a delicate and challenging repair. This guide walks you through everything you need to know, from the tools required to the risks involved. We also share when it is better to seek professional help instead of attempting a DIY fix.
If your PlayStation 5 is showing a blank screen or the HDMI cable keeps falling out, you might be wondering if you can fix it yourself. The question can you replace the HDMI port on your PS5 by yourself comes up a lot in gaming forums and repair communities. The short answer is yes, it is possible. But the longer answer is that it is not easy.
The HDMI port on your PS5 is a small but critical component. It is the bridge between your console and your TV or monitor. When it stops working, your gaming experience comes to a halt. You cannot play games, stream content, or even access the home screen. So fixing it fast becomes a priority.
In this guide, we will walk you through everything you need to know. We will cover the tools you need, the steps involved, the risks of DIY repair, and when it makes sense to call a professional. Whether your PS5 HDMI port is loose, damaged, or completely broken, this article has you covered.
Key Takeaways
- It is possible: You can physically replace the HDMI port on a PS5 with the right tools and patience.
- It is difficult: The PS5 has a complex internal design and the HDMI port requires soldering skills.
- You need specific tools: A precision screwdriver set, a soldering iron, and a heat gun are essential.
- Warranty is at risk: Opening your PS5 will void the manufacturer warranty in most cases.
- Professional repair may be better: For most people, paying a technician is safer and more reliable.
- Common HDMI issues: Loose ports, no signal, and flickering screens are signs your port may need replacement.
📑 Table of Contents
- Why Does the HDMI Port on PS5 Fail?
- Tools You Need to Replace the HDMI Port on PS5
- Step-by-Step Guide to Replacing the HDMI Port
- Common Mistakes to Avoid When Replacing the HDMI Port
- When Should You Not Replace the HDMI Port Yourself?
- Professional Repair vs. DIY: Which Is Better?
- How Much Does It Cost to Replace the HDMI Port on a PS5?
- Preventing Future HDMI Port Issues on Your PS5
- Final Thoughts on Replacing the HDMI Port on Your PS5 Yourself
Why Does the HDMI Port on PS5 Fail?
Before you attempt any repair, it helps to understand why the HDMI port fails in the first place. Knowing the root cause can save you time and money. It also helps you decide if the repair is even worth doing.
Loose or Worn-Out Connections
The most common reason is simple wear and tear. Every time you plug in or unplug the HDMI cable, the port experiences stress. Over months or years, the internal contacts become loose. You might notice the cable wiggles inside the port or does not sit snugly anymore.
Physical Damage
Accidents happen. A bump, a drop, or a cable getting yanked too hard can damage the HDMI port. The plastic housing can crack or the metal pins inside can bend. Even a small bend can cause a bad connection or no signal at all.
Power Surges and Electrical Issues
A power surge can fry the HDMI port on your PS5. If your area has frequent power fluctuations or lightning strikes, your console is at risk. The HDMI port is connected to the main board, and an electrical spike can damage both.
Manufacturing Defects
In rare cases, the HDMI port is faulty from the factory. Some PS5 owners have reported HDMI issues within weeks of purchase. If your console is new and the port is already failing, you may be dealing with a defect.
Tools You Need to Replace the HDMI Port on PS5
Replacing the HDMI port is not a job for a casual weekend. You need the right tools and a steady hand. Here is a list of everything you should gather before you start.
- Precision screwdriver set: You need small Phillips and Torx screwdrivers. The PS5 uses specific screw sizes.
- Soldering iron: A temperature-controlled soldering iron with a fine tip is essential. You will need it to remove the old port and solder the new one.
- Solder wire and flux: Good quality solder and flux make the job much cleaner and easier.
- Heat gun or hot air station: This helps you remove the old port without damaging the surrounding components.
- Tweezers and anti-static wrist strap: Static electricity can damage your PS5’s internal components. Always use an anti-static wrist strap.
- Replacement HDMI port: Make sure you buy the correct HDMI port for the PS5 model you have. There are differences between the PS5 disc edition and the digital edition.
- Magnifying glass or microscope: The components are tiny. A magnifying glass helps you see what you are doing clearly.
- Isopropyl alcohol and cleaning brush: You will need these to clean the old solder and the board before soldering the new port.
Having all your tools ready before you start is crucial. You do not want to be halfway through the repair and realize you are missing something.
Step-by-Step Guide to Replacing the HDMI Port
Now that you have your tools, let us walk through the process. This is a detailed guide, so take your time. Rushing through a soldering job is the number one cause of mistakes.
Step 1: Prepare Your Workspace
Find a clean, well-lit, and flat surface to work on. Lay down an anti-static mat if you have one. Make sure you are in a well-ventilated area because soldering produces fumes. Gather all your tools and place them within easy reach.
Step 2: Power Down and Unplug Your PS5
Turn off your PS5 completely. Unplug the power cable and the HDMI cable. Wait at least five minutes before you start opening the console. This allows any residual charge to dissipate.
Step 3: Open the PS5 Case
The PS5 has screws on the bottom panel. Use your precision screwdriver to remove them. Carefully lift off the bottom panel. Set the screws aside in a small container so you do not lose them. Inside, you will see the main board and other components.
Step 4: Locate the HDMI Port
The HDMI port is on the back panel of the PS5. You will need to remove the rear cover to access it. There are screws holding the rear panel in place. Remove them gently. The HDMI port will be visible once the panel is off.
Step 5: Remove the Old HDMI Port
This is the trickiest part. The HDMI port is soldered onto the motherboard. Use your heat gun on a low setting to heat the solder joints around the port. Apply gentle and even heat. Once the solder melts, carefully lift the old port off the board. Use tweezers if needed. Be very careful not to disturb any nearby components.
Step 6: Clean the Board
After removing the old port, use isopropyl alcohol and a small brush to clean the solder pads on the board. Remove any leftover solder or flux residue. The pads need to be clean and shiny for the new port to solder properly.
Step 7: Solder the New HDMI Port
Place the new HDMI port in position on the board. Use your tweezers to hold it steady. Apply a small amount of solder to each pad with your soldering iron. Make sure the solder flows evenly and connects properly. Check each joint carefully under your magnifying glass.
Step 8: Reassemble the PS5
Once the new port is soldered and the solder has cooled, you can reassemble the console. Put the rear panel back on and secure it with screws. Replace the bottom panel as well. Make sure everything is aligned correctly before tightening the screws.
Step 9: Test the New HDMI Port
Plug in the power cable and the HDMI cable. Turn on your PS5 and check if the signal reaches your TV or monitor. Try different HDMI cables and different TV ports to rule out other issues. If you see the PS5 home screen, congratulations, the repair worked.
Common Mistakes to Avoid When Replacing the HDMI Port
DIY repairs can go wrong if you are not careful. Here are the most common mistakes people make when replacing the HDMI port on a PS5.
- Applying too much heat: Excessive heat can damage the motherboard or nearby components. Keep your heat gun on a low setting and work quickly.
- Using the wrong replacement part: Not all HDMI ports are the same. Make sure you buy the exact port compatible with your PS5 model.
- Skipping the anti-static precautions: Static discharge can destroy sensitive components on the PS5 board. Always wear an anti-static wrist strap.
- Rushing the soldering: Cold solder joints are a common problem. Take your time and make sure each joint is clean and solid.
- Not testing before reassembly: Always test the new port before you put the case back together. If something goes wrong, it is much easier to fix when the console is open.
- Forcing parts into place: If a panel or screw does not fit easily, stop and check why. Forcing things can cause cracks and new damage.
When Should You Not Replace the HDMI Port Yourself?
Not everyone should attempt this repair. There are situations where DIY is a bad idea. Here are the key scenarios where you should skip the DIY route.
You Have No Soldering Experience
If you have never soldered before, this is not the project to start with. Soldering a tiny HDMI port on a complex motherboard requires skill and precision. A bad solder job can ruin your console entirely.
Your PS5 Is Still Under Warranty
Opening your PS5 will void the manufacturer warranty. If your console is less than a year old or still covered, contact Sony support. They may repair or replace it for free or at a reduced cost.
The Damage Is Extensive
If the HDMI port damage extends to the motherboard itself, a simple port replacement will not fix the problem. You may need a more extensive repair that only a professional should handle.
You Do Not Have the Right Tools
Soldering without the proper tools is a recipe for disaster. If you do not own a heat gun, soldering iron, and other essentials, it is better to save up for the tools or pay for professional repair.
Professional Repair vs. DIY: Which Is Better?
This is a common question, and the answer depends on your situation. Let us compare both options side by side.
| Factor | DIY Repair | Professional Repair |
|---|---|---|
| Cost | Lower parts cost only | Higher, includes labor |
| Skill Required | Soldering and technical skills | None required from you |
| Time | Several hours | A few days for turnaround |
| Risk | High if inexperienced | Low, handled by experts |
| Warranty | Voided by opening the console | Professional warranty often included |
| Tools Needed | Specialized tools required | All tools provided by the shop |
| Success Rate | Depends on your skill level | High, done by trained technicians |
If you are confident in your soldering skills and have the right tools, DIY can save you money. But for most people, professional repair is the safer choice. A trained technician can replace the HDMI port quickly and with a warranty to back it up.
How Much Does It Cost to Replace the HDMI Port on a PS5?
The cost varies depending on where you go and what model of PS5 you have. For a DIY repair, the replacement HDMI port itself costs between 10 and 30 dollars. The main expense is your time and the tools if you do not already own them.
Professional repair services typically charge between 100 and 200 dollars. This includes the cost of the part and the labor. Some repair shops may charge more or less depending on your location and the extent of the damage.
Compare the cost of professional repair with the cost of a new PS5. If your console is older and the repair cost is close to the price of a new one, you might want to consider upgrading instead.
Preventing Future HDMI Port Issues on Your PS5
Once you have fixed the HDMI port, you want to make sure it lasts. Here are some simple tips to prevent future HDMI port problems on your PS5.
- Plug and unplug the HDMI cable gently: Never force the cable or yank it out. A gentle push and twist motion works best.
- Use a high-quality HDMI cable: Cheap cables can cause connection issues and may damage the port over time.
- Keep the console in a stable position: Avoid placing your PS5 where it can easily get bumped or knocked over.
- Use a surge protector: A surge protector shields your PS5 from electrical spikes that can damage the HDMI port and other components.
- Keep the area around the port clean: Dust and debris can build up around the HDMI port and affect the connection. Clean it regularly with compressed air.
Taking these simple precautions can extend the life of your PS5 HDMI port significantly. Prevention is always better than repair.
Final Thoughts on Replacing the HDMI Port on Your PS5 Yourself
So, can you replace the HDMI port on your PS5 by yourself? The answer is yes, but with important caveats. This is a repair that requires technical skill, patience, and the right tools. If you have soldering experience and feel confident, go ahead and give it a try. Just be aware of the risks involved.
If you are a casual gamer with no soldering background, we strongly recommend seeking professional help. The PS5 is an expensive console, and one mistake during a DIY repair could turn a simple fix into a costly disaster.
Whatever route you choose, we hope this guide has given you the information you need to make a smart decision. The HDMI port on your PS5 is a small component, but it plays a huge role in your gaming experience. Take care of it, and it will take care of you.
Frequently Asked Questions
Can I use a different HDMI port model for my PS5?
No, you must use the exact HDMI port designed for your specific PS5 model. The disc edition and digital edition have different internal layouts, and using the wrong port can cause compatibility issues or permanent damage to your console.
Is it safe to open my PS5 if it is still under warranty?
No, opening your PS5 will void the manufacturer warranty in most cases. If your console is still under warranty, contact Sony support directly. They may offer a free repair or replacement depending on your situation.
How long does it take to replace the HDMI port on a PS5?
For someone with soldering experience, the repair takes about 2 to 3 hours. For beginners, it can take much longer, and there is a higher risk of mistakes. Factor in extra time for learning and troubleshooting.
What should I do if my PS5 HDMI port is loose but not broken?
A loose HDMI port might be fixable without replacement. Try using a different HDMI cable first. If the cable is not the issue, you can try carefully adjusting the port with tweezers. But if the port is visibly damaged, replacement is the best solution.
Can a bad HDMI cable cause the same symptoms as a broken HDMI port?
Yes, absolutely. A damaged or low-quality HDMI cable can cause no signal, flickering, or intermittent connections. Before assuming the port is broken, always test with a different known-good HDMI cable and a different TV or monitor input.
Where can I buy a replacement HDMI port for PS5?
You can find replacement HDMI ports on online marketplaces like Amazon, eBay, and AliExpress. Make sure to buy from a reputable seller and verify the part is compatible with your specific PS5 model before purchasing.
=== CONCLUSION ===
Replacing the HDMI port on your PS5 yourself is doable, but it is not a simple task. You need the right tools, soldering skills, and a lot of patience. We covered the common causes of HDMI port failure, the tools you need, the step-by-step process, and when to call a professional instead.
We also looked at the costs, the risks, and how to prevent future problems with your PS5 HDMI port. The key takeaway is to be honest about your skill level. If you are experienced with electronics repair, DIY can save you money. If not, professional repair is the safer bet.
We hope this guide helps you make the best decision for your situation. Take care of your PS5, and it will keep you gaming for years to come.