Can You Replace Keys On A Hp Laptop Without Stress
You can absolutely replace keys on a HP laptop at home with the right tools and a little patience. Whether you have a broken key, a stuck key, or a completely missing keycap, this guide shows you exactly how to handle the job. We’ll walk you through every step so keyboard key replacement becomes a simple DIY task.
Key Takeaways
- It’s very doable: You can replace keys on a HP laptop without professional help in most cases.
- Right tools matter: A key removal tool, tweezers, and a replacement keycap make the job much easier.
- Know your model: Key compatibility varies across HP Pavilion, EliteBook, and Spectre models.
- Patience is key: Rushing the process can damage the key clip or the keyboard itself.
- Check the switch: Before replacing a key, always inspect the keyboard switch underneath for damage.
- Professional help helps: Complex setups or scissor-switch keyboards may need expert repair.
📑 Table of Contents
- Can You Replace Keys On A HP Laptop? Yes, You Can!
- Why You Might Need to Replace Keys on Your HP Laptop
- Tools and Supplies You’ll Need for Key Replacement
- Step-by-Step Guide: How to Replace Keys on a HP Laptop
- HP Laptop Models and Key Compatibility
- Common Mistakes to Avoid When Replacing Keys
- When to Get Professional Help Instead
- Tips for Keeping Your HP Keyboard in Great Shape
- Conclusion
Can You Replace Keys On A HP Laptop? Yes, You Can!
So you’re wondering whether you can replace keys on a HP laptop. The short answer is yes. You absolutely can. Whether one of your keys got crushed under a soda can, a key keeps sticking, or you’re missing a keycap entirely, you don’t need to rush to a repair shop every single time.
HP laptops use different keyboard designs depending on the model. Some use simple snap-on keycaps. Others use scissor mechanisms that need more careful handling. The good news is that most of these repairs are totally manageable at home. You just need the right approach and a steady hand.
In this guide, we’ll show you everything. You’ll learn how to identify your keyboard type, what tools you need, and how to swap out keys like a pro. We’ll also cover common mistakes and when it’s better to call in a professional. Let’s get into it.
Why You Might Need to Replace Keys on Your HP Laptop
Keys don’t just fall off for no reason. Something usually causes the problem. Understanding why helps you fix it right and prevent future issues. Here are the most common reasons people need keyboard key replacement on their HP laptops.
Broken or Cracked Keycaps
Accidents happen. A glass of water, a drop, or just general wear and tear can crack a keycap. Once a keycap is cracked, it often doesn’t sit properly on the switch. This leads to a mushy or unresponsive typing experience. A cracked keycap usually can’t be repaired. It needs a full replacement.
Stuck or Jammed Keys
Sometimes keys get stuck because of crumbs, dust, or sticky spills. Food particles love hiding under keycaps. They make keys jam or keep them pressed down. In many cases, cleaning solves the problem. But sometimes the keycap itself gets damaged from being forced. Then you need a replacement.
Missing Keycaps
Keycaps pop off more often than you’d think. A strong press, a pet walking across the keyboard, or just an old clip can cause a keycap to fly off. When that happens, you’re left with a bare key switch. The laptop still works, but typing without that key feels weird and uncomfortable.
Worn-Out Key Clips
The small plastic clips that hold keycaps in place can wear out over time. They lose their grip. The key feels loose or wobbly. You might need to replace both the clip and the keycap to get a solid typing experience again.
Tools and Supplies You’ll Need for Key Replacement
Before you start trying to replace keys on a HP laptop, gather your supplies. Having everything ready makes the process smoother and keeps you from accidentally damaging parts.
Essential Tools
- Key removal tool: This is a small plastic wedge that slides under keycaps. It pops them off safely without scratching the keyboard surface. You can buy one online for just a few dollars.
- Tweezers: Small, anti-static tweezers help you handle tiny clips and screws. They give you better control than your fingers.
- Replacement keycap: You need the actual replacement key. Make sure it matches your keyboard layout and laptop model exactly.
- Soft cloth or microfiber towel: Use this to clean the area around the key switch before installing the new keycap.
- Compressed air can: Great for blowing out dust and debris from under the keys before you start.
Nice-to-Have Tools
These aren’t strictly necessary, but they make the job easier.
- Magnetic mat: Keeps tiny screws and clips from getting lost on your desk.
- Flashlight: Helps you see under the keys and inspect the switch mechanism clearly.
- Isopropyl alcohol: Use this with a cotton swab to clean sticky residue around the key area.
Quick Tip: Never use metal tools directly on the keycap or switch. Metal can scratch surfaces and cause short circuits. Always go with plastic tools when possible.
Step-by-Step Guide: How to Replace Keys on a HP Laptop
Now let’s get to the actual process. Follow these steps carefully to replace keys on a HP laptop without any stress. Take your time and work on a flat, clean surface.
Step 1: Power Down and Prepare Your Laptop
First things first. Shut down your laptop completely. Don’t just sleep it. Turn it all the way off. Unplug the charger and remove the battery if your HP model allows it. This protects your laptop from any electrical issues while you work on the keyboard.
Place your laptop on a clean, flat surface. A large desk or table works best. Lay down a soft cloth to protect the laptop screen from scratches if you’re working at an angle.
Step 2: Clean the Area Around the Key
Before removing anything, clean the area. Use compressed air to blow out loose dust and crumbs around the key you’re replacing. If there’s sticky residue from a spill, dab it gently with isopropyl alcohol using a cotton swab. Let it dry completely before moving on.
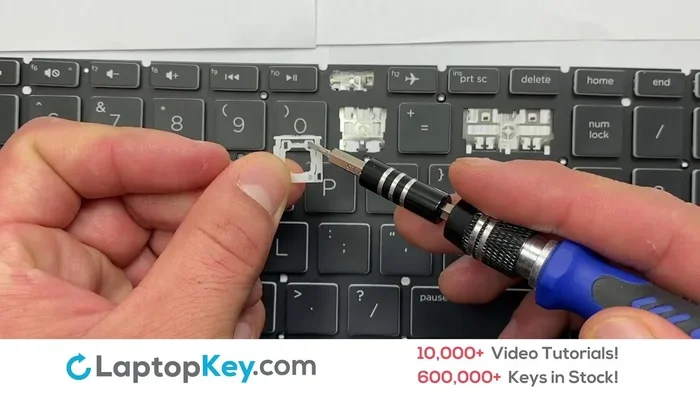
Step 3: Remove the Damaged Keycap
This is the part that requires the most care. The method depends on your HP laptop model.
For laptops with snap-on keycaps: Slide your key removal tool under one edge of the keycap. Gently pry upward. The keycap should pop right off. Work slowly. Don’t force it. If it doesn’t budge, try the opposite edge.
For laptops with scissor-switch keys: These need more careful handling. Start by gently prying up one corner of the keycap. Then work your way around the edges. Lift straight up. Never twist or rock the keycap side to side. Scissor mechanisms are delicate and can break if you’re rough.
Step 4: Inspect the Switch and Clip
With the keycap removed, look at the key switch underneath. This is the small plastic piece that the keycap presses down on. Check for any visible damage.
- Is the switch intact and firmly attached to the keyboard plate?
- Are there any cracks or broken pieces?
- Is there debris stuck to the switch?
- Are the metal scissor arms (if present) bent or broken?
If the switch itself is damaged, replacing just the keycap won’t fix the problem. You may need to replace the entire keyboard or seek professional repair. This is an important step many people skip, and it makes a big difference in the outcome.
Step 5: Clean the Switch
If the switch looks fine, give it a quick cleaning. Blow out any dust with compressed air. Wipe gently with a dry cotton swab. You want a clean surface for the new keycap to attach to properly.
Step 6: Install the New Keycap
Now for the satisfying part. Take your replacement keycap and carefully align it over the switch. Make sure the clips or mounting points match up correctly.
Press the keycap straight down. Apply even pressure across the surface. You should hear or feel a soft click when the keycap seats properly. Give it a gentle test press. It should feel firm and spring back smoothly.
Expert Insight: According to keyboard repair specialists, about 80% of keycap replacements go smoothly when people take their time with alignment. The most common issue is installing the keycap at a slight angle, which causes the key to feel uneven or wobbly.
Step 7: Test Your New Key
Power your laptop back on. Open a text editor or word processor. Test the replaced key thoroughly. Type it multiple times. Check that it registers correctly and feels consistent with the surrounding keys. Also test nearby keys to make sure you didn’t accidentally disturb anything during the repair.
HP Laptop Models and Key Compatibility
Not all HP laptops use the same keyboard design. Knowing your model helps you find the right replacement parts and use the correct removal technique. Here’s a quick look at some popular HP lines.
HP Pavilion Series
HP Pavilion laptops typically use membrane keyboards with snap-on keycaps. These are among the easiest to replace. Keycaps pop off with gentle prying and snap right back on. Replacement keycaps are widely available and usually affordable. You can often find them for under $10 each.
HP EliteBook Series
EliteBook models often feature scissor-switch keyboards with a more premium feel. These keys are flatter and require more careful removal. The clips are smaller and more fragile. Take extra care when prying these keycaps off. A quality key removal tool is almost essential here.
HP Spectre Series
Spectre laptops use backlit keyboards with low-profile keys. The keycaps are thinner and the mechanisms are precision-engineered. Replacement parts need to match exactly. Using a slightly wrong keycap can cause typing issues or look mismatched. Always verify part numbers before purchasing.
HP Stream and Entry-Level Models
These budget-friendly laptops use simpler keyboard constructions. Key replacement is usually straightforward. Keycaps are basic and widely compatible. You might even find generic replacements that work fine.
| HP Laptop Series | Keyboard Type | Replacement Difficulty | Part Availability |
|---|---|---|---|
| HP Pavilion | Snap-on membrane | Easy | High |
| HP EliteBook | Scissor switch | Moderate | Moderate |
| HP Spectre | Low-profile scissor | Moderate to Hard | Specific |
| HP Stream | Basic membrane | Easy | High |
Finding the Right Replacement Keycap
Getting the correct replacement part is crucial. Here’s how to find the right one:
- Check your laptop’s model number. It’s usually on a sticker on the bottom of the laptop.
- Search for replacement keycaps using that exact model number.
- Look at keycap sets on sites like Amazon, eBay, or specialty keyboard shops.
- Contact HP support directly. They sometimes sell individual keycaps or can point you to the right source.
- Consider buying a full keycap set if you need multiple keys replaced. This often saves money.
Common Mistakes to Avoid When Replacing Keys
Even with a simple task like keyboard key replacement, people make mistakes. Here are the most common ones to watch out for.
Forcing the Keycap Off
This is the number one mistake. Keycaps don’t need a lot of force to remove. If you’re pushing hard, you’re probably going at it wrong. Stop. Reassess. Look for the correct prying point. Forcing things can break clips, damage the switch, or crack the keyboard plate.
Ignoring the Switch Condition
We mentioned this earlier, but it’s worth repeating. Always check the switch before installing a new keycap. If the switch is broken, no new keycap will fix the problem. Replacing a keycap on a damaged switch just wastes your time and money.
Using the Wrong Replacement Keycap
Not all keycaps are created equal. Keycaps from different laptop brands don’t always fit HP keyboards. Even within HP’s lineup, keycap sizes and clip designs can differ between models. Always verify compatibility before purchasing. A keycap that looks like it should fit might not seat properly on the switch.
Skipping the Cleaning Step
Dust and debris under the switch can prevent the new keycap from seating correctly. It can also cause the key to feel gritty or unresponsive. Take 30 seconds to clean the area. It makes a noticeable difference.
Not Testing After Installation
Some people install the keycap and call it done. Always test the key thoroughly. Type on it, press from different angles, and compare its feel to neighboring keys. Catching a problem early means you can fix it before it becomes a bigger issue.
Quick Tip: Take a photo of the keyboard before you start. This gives you a reference for key positions and helps with reassembly if anything gets moved around.
When to Get Professional Help Instead
Replacing keys on a HP laptop is usually a DIY-friendly task. But sometimes, professional help is the smarter choice. Here’s when to consider taking your laptop to an expert.
Multiple Keys Need Replacement
If more than three or four keys are damaged or missing, it might make more sense to replace the entire keyboard assembly. Individual keycap replacements start to add up in time and cost. A full keyboard replacement often gives better results in these situations.
Damaged Keyboard Switches
Remember, if the switches themselves are broken, keycap replacement won’t help. Replacing individual switches requires specialized tools and knowledge. This is especially true for laptop keyboards where switches are soldered onto small circuit boards. Leave this to trained technicians.
Liquid Damage
If you spilled a drink on your keyboard, don’t just replace the keycaps. Liquid can damage the keyboard membrane, the circuit board, or other internal components. Power off the laptop immediately, flip it upside down, and let it dry for at least 48 hours. Then take it to a professional for a full inspection.
Warranty Considerations
If your HP laptop is still under warranty, check the terms before doing any repairs yourself. DIY repairs can sometimes void your warranty. HP or your insurance might cover keyboard repairs or replacements at no cost to you. It’s always worth checking first.
Backlit or Specialty Keyboards
Some HP laptops have backlit keyboards with RGB lighting or special key functions. These systems are more complex. Replacing a single keycap might interfere with the lighting or function row operations. A professional technician knows how to handle these delicate setups.
Tips for Keeping Your HP Keyboard in Great Shape
Once you’ve successfully replaced keys on a HP laptop, you want to keep everything working well. Here are some simple habits that extend your keyboard’s life.
- Clean regularly: Use compressed air weekly to blow out crumbs and dust. A quick wipe with a dry cloth keeps keys looking and feeling fresh.
- Eat away from the laptop: This one’s obvious but people still skip it. Food particles are the enemy of laptop keyboards.
- Use a keyboard cover: Silicone keyboard covers add a layer of protection against spills. They’re inexpensive and easy to clean.
- Type gently: You don’t need to hammer the keys. Light, steady typing reduces wear on key clips and switches.
- Keep drinks off the desk: Or at least, keep them far from the laptop. One accidental knock can cause serious damage.
Expert Insight: Keyboard technicians recommend cleaning your laptop keyboard at least once a week. Regular maintenance prevents most key issues from ever happening. It also keeps your typing experience feeling smooth and responsive for years longer than neglected keyboards typically last.
Conclusion
So yes, you can replace keys on a HP laptop without stress. It’s a practical DIY skill that saves you time and money. With the right tools, a little patience, and the information in this guide, you can handle most key replacement tasks on your own.
Remember the key steps: power down first, clean the area, remove the old keycap carefully, inspect the switch, and install the replacement with proper alignment. Avoid common mistakes like forcing things or using incompatible parts. And know when it’s better to seek professional help.
Your HP laptop’s keyboard is built to last, but accidents happen. Now you’re ready to handle them. Grab your tools, find your replacement keycap, and get back to comfortable, frustration-free typing. You’ve got this.
Frequently Asked Questions
Can I replace a key on my HP laptop without a key removal tool?
Yes, you can. You can use a small flat plastic object like a guitar pick or a plastic spudger. However, a proper key removal tool is designed for this exact purpose and reduces the risk of damaging the keycap or keyboard surface. It’s the safer and more reliable option overall.
How much does it cost to replace a key on a HP laptop?
A single replacement keycap usually costs between $3 and $10 online. If you need the entire keyboard assembly replaced professionally, expect to pay between $50 and $150 depending on the HP model and repair shop. Warranty coverage may reduce or eliminate these costs entirely.
Are HP laptop keycaps universal across all models?
No, they are not. HP uses different keycap designs across its laptop lines. Keycaps from an HP Pavilion won’t necessarily fit an HP EliteBook or Spectre. Always check your specific laptop model number and find keycaps designed for that exact model to ensure proper fit and function.
What should I do if my key switch is broken but the keycap is fine?
If the key switch underneath is damaged, replacing the keycap alone won’t fix the problem. You’ll likely need to replace the entire keyboard assembly or have a professional repair the switch. Attempting to fix individual switches on laptop keyboards is difficult and often not cost-effective for DIY repairs.
Is it safe to replace keys on a HP laptop while it’s still under warranty?
It depends on the warranty terms. Some warranties allow DIY repairs without voiding coverage. Others require all repairs to be done by authorized HP service centers. Check your warranty documentation or contact HP support before attempting any repairs to avoid accidentally voiding your warranty coverage.
How long does it take to replace a key on a HP laptop?
For most people, replacing a single key takes about 10 to 20 minutes. This includes cleaning, removal, inspection, and installation. If you’re replacing multiple keys, budget about 30 to 45 minutes for the entire job. The process gets faster once you get comfortable with the technique.