Can You Do Projection Mapping At Home With These Tips
Yes, you can absolutely do projection mapping at home with the right setup and a bit of creativity. This guide covers everything from choosing a projector and projection mapping software to creating stunning wall projections. You’ll learn how to transform any room into an immersive experience without breaking the bank.
Have you ever watched a concert or a movie and thought, “I want that magic in my own living room?” Projection mapping at home makes that dream real. You can turn any blank wall into a dynamic, colorful display. With just a few tools, you can create immersive experiences that wow your friends and family. This article shows you exactly how to do it.
Can you do projection mapping at home? The short answer is yes. You don’t need a fancy studio or a huge budget. A basic projector, a laptop, and free software are all you need to get started. Whether you want to build a home theater, create interactive wall art, or host a themed party, home projection mapping is within reach. Let’s dive into the tips that make it possible.
Many people think projection mapping is only for big events or tech experts. That’s not true. DIY projection mapping has become incredibly accessible. You can learn the basics in an afternoon. The key is knowing what gear to buy, how to set it up, and what software to use. I’ll walk you through each step in simple terms. By the end, you’ll feel confident to try your first projection mapping at home project.
Key Takeaways
- Projection mapping at home is totally doable: You just need a projector, a blank wall, and free software.
- Start with a cheap setup: A basic home projector and a laptop can create amazing effects.
- Surface matters: A smooth, light-colored wall gives the best results for home projection mapping.
- Software is the secret sauce: Tools like MapMap or TouchDesigner let you warp and blend images easily.
- Ambient light is your enemy: Dim the room or use a high-lumen projector for vivid colors.
- Get creative with content: Use videos, animations, or interactive elements to make your walls come alive.
- Practice alignment first: Spend time tweaking keystone and edge blending before your big reveal.
📑 Table of Contents
- What Is Projection Mapping and Why Would You Do It at Home?
- The Gear You Need to Get Started with Projection Mapping at Home
- Setting Up Your Home Projection Mapping Space
- Software and Content Creation for Home Projection Mapping
- Creative Ideas and Projections for Your Home
- Common Mistakes and How to Avoid Them
- Expert Tips for Stunning Home Projection Mapping
- Budget-Friendly Ways to Build Your Home Projection Mapping Setup
- Conclusion
What Is Projection Mapping and Why Would You Do It at Home?
Projection mapping is a technique that projects images onto surfaces to create the illusion of movement, depth, or transformation. Instead of a flat screen, you use walls, furniture, or even objects as your canvas. The projector sends light and color onto the surface, and special software adjusts the image to fit the shape perfectly. This technology is used in concerts, museums, and advertising. But it’s now a popular hobby for people who want to do projection mapping at home.
At home, you can use projection mapping to create a cinema-like experience, display animated art, or build an interactive game wall. The beauty of home projection mapping is that it adapts to any space. You can project onto a living room wall, a bedroom ceiling, or even a staircase. The possibilities are endless. You don’t need to be a tech wizard to start. With the right projection mapping tutorial, anyone can learn to set up a home projection setup that looks professional.
How Home Projection Mapping Differs from Commercial Setups
Commercial 3D projection mapping often uses multiple high-powered projectors and complex calibration systems. It might cover entire buildings or stages. Home setups are much simpler. You usually use one projector and a single wall. The goal is to create a fun, personal experience rather than a massive spectacle. DIY projection mapping focuses on ease of use and affordability. You can achieve stunning results with a single projector for walls and a laptop. The learning curve is gentle, and the cost is low.
Quick Tips: Start small. Pick one wall in your home. Use a white or light-colored surface for the best image quality. Avoid textured or dark walls, as they absorb light and dull the projection. A smooth, matte wall gives you the sharpest picture for your home projection mapping adventures.
The Gear You Need to Get Started with Projection Mapping at Home
To start projection mapping at home, you need a few key pieces of equipment. Don’t worry about spending a fortune. You can build a great setup without breaking the bank. The most important item is a projector. Other items like a laptop, cables, and software complete the picture. Here’s what you’ll need to create your first home projection mapping experience.
Projectors: The Heart of Your Setup
The projector is the star of your projection mapping at home setup. It throws the image onto your wall. You don’t need an expensive cinema-grade projector. A standard home projector works well for most DIY projection mapping projects. Look for a model with at least 2,000 lumens. Lumens measure brightness. More lumens mean a brighter image, which is helpful if you can’t fully darken the room. A projector with a short throw distance is also handy. It can project a large image from a short distance, giving you flexibility in room layout.
Here’s a quick comparison of three popular projectors for home projection mapping:
| Projector | Brightness (Lumens) | Resolution | Best For | Price Range |
|---|---|---|---|---|
| Epson Home Cinema 1060 | 3,100 | 1080p Full HD | Bright rooms, crisp detail | $500-$650 |
| BenQ TH585 | 3,500 | 1080p Full HD | Gaming and movies | $400-$500 |
| ViewSonic M2e | 1,000 | 720p HD | Budget-friendly, portable | $200-$300 |
All three can handle projection mapping at home. The Epson and BenQ offer high brightness for a vivid picture even with some ambient light. The ViewSonic is a great entry-level option if you’re just testing the waters. Any of these will serve you well for a home theater projection mapping setup or a creative art wall.
Other Essential Equipment
Beyond the projector, a few more items make your projection mapping at home journey smoother:
- A laptop or PC: This runs the projection mapping software. Any modern laptop will do. A dedicated graphics card helps with complex animations, but it’s not required for basic DIY projection mapping.
- HDMI cable: Connects your laptop to the projector. Use a high-speed HDMI cable for the best signal quality.
- A tripod or projector mount: Keeps the projector steady and at the right angle. A stable setup reduces the need for constant adjustments.
- A blank wall or projection screen: A smooth, white wall is perfect. If you want a more professional look, a portable projection screen works too.
- A dark room: Ambient light washes out the projection. Blackout curtains or simply turning off lights make a big difference for projection mapping with a laptop.
Quick Tips: Before buying, measure your wall. Know the distance from the projector to the wall. This helps you choose a projector with the right throw ratio. A short-throw projector can sit close to the wall and still produce a large image. That’s perfect for smaller rooms where you want to do projection mapping at home without a long cable run.
Setting Up Your Home Projection Mapping Space
Setting up your space is a fun part of the process. You don’t need a dedicated room. A corner of your living room can become a projection mapping at home studio. The key is to control light and find the right surface. Follow these steps to create a solid foundation for your home projection mapping projects.
Choosing the Right Room and Surface
Pick a room where you can control the light. A bedroom or a basement with few windows works best. If you must use a bright room, choose a projector with high lumens. The wall surface matters a lot. A flat, light-colored, matte wall gives the clearest image. Avoid walls with textured wallpaper or dark paint. Textures distort the projected image and dark colors absorb light. If you don’t have a suitable wall, a white bedsheet stretched tightly can work as a makeshift screen. Just make sure it’s wrinkle-free for the best results with your projection mapping at home setup.
Common Mistakes: Many beginners project onto a glossy or shiny wall. This causes glare and hotspots. The light bounces unevenly, making the image look washed out. Always use a matte surface for home projection mapping. Another mistake is ignoring the wall color. A colored wall tints the projection. Stick to white or light gray for accurate colors.
Calibrating Your Projector for Perfect Alignment
Once your projector is mounted or placed on a table, you need to align the image. Most projectors have keystone correction. This adjusts the trapezoid shape when the projector is tilted. Use the keystone settings to make the image rectangular. Then, use the focus ring to sharpen the picture. For projection mapping at home, you might also need to adjust the zoom to fit your wall size perfectly. A well-aligned image is the foundation of a great home projection mapping experience.
Expert Insights: “The biggest secret to a great setup is distance,” says a projection mapping tutorial expert. “Place your projector at the exact distance recommended by the manufacturer. Too close or too far ruins the image size and sharpness. Use a projector calculator app to find the perfect placement for your wall.”
Quick Tips: If you’re using a single projector, start with a flat wall. As you get more comfortable, you can try projecting onto angled surfaces or multiple walls. This adds depth to your home projection setup and makes your projection mapping ideas more dynamic.
Software and Content Creation for Home Projection Mapping
Software is what turns a plain image into a projection mapping at home masterpiece. The software maps the image to the wall’s shape, blends edges, and adds animations. You don’t need to write code. Many tools are drag-and-drop and beginner-friendly. Here’s a look at the best options for DIY projection mapping.
Free and Affordable Projection Mapping Software
You can start projection mapping at home without spending a dime on software. Several free tools offer powerful features:
- MapMap: A free, open-source tool perfect for beginners. It lets you load images and videos and warp them to fit your wall shape. It’s simple and works great for basic home projection mapping.
- TouchDesigner: A more advanced node-based software. It’s free for non-commercial use. TouchDesigner lets you create interactive projection mapping with real-time visuals. It has a steeper learning curve but offers amazing creative freedom.
- MadMapper: A popular choice for projection mapping at home. It has a free trial and is very intuitive. MadMapper handles multi-projector setups and complex geometries. It’s great for those who want to explore 3D projection mapping on objects.
For a projection mapping tutorial, MapMap is the best starting point. It teaches you the core concepts of warping and blending. Once you master that, you can move to TouchDesigner for more advanced interactive projection mapping. All these tools work with a standard laptop and a projector. You can create projection mapping ideas that transform your room into an art gallery or a game space.
Quick Tips: Watch a few beginner videos on YouTube before you start. Most free software has a learning curve, but the basics take only an hour to grasp. You’ll be warping images onto your wall in no time.
Creating Your Own Content: Images, Videos, and 3D Models
Content is the soul of your projection mapping at home project. You can use stock videos, create your own animations, or even project 3D models. For simple setups, a looping video of flowing water or starry skies works beautifully. You can find free stock footage online. For a more personal touch, create slideshows of family photos with Ken Burns effects. This makes projection mapping with a laptop a heartfelt way to decorate your home.
If you want to try 3D projection mapping, you’ll need 3D models. Many free 3D models are available online. Software like Blender lets you design custom objects. You then import the model into your mapping software and project onto it. This is how professionals create projection mapping at home installations that look like the object is alive. Start simple with a cube or a pyramid shape. As you practice, you can map onto furniture, sculptures, or even a person. The key is to match the projection angle perfectly with the object’s surface.
Expert Insights: “Don’t underestimate the power of simple content,” advises a home projection mapping creator. “A single, high-quality image with soft animation can be more impactful than a chaotic video. Focus on contrast and color harmony. Your projection mapping software can adjust brightness and hue to match your wall’s tone.”
Quick Tips: Test your content on the actual wall before the big event. Colors look different on a wall than on a screen. Adjust the saturation and brightness in your software to compensate. This ensures your home theater projection mapping looks vibrant and true to life.
Creative Ideas and Projections for Your Home
Now for the fun part: what to project. Projection mapping at home is all about creativity. You can turn any room into a magical space. Here are some popular projection mapping ideas that work well in a home setting.
Interactive Wall Projections for Kids
Kids love interactive walls. You can project a virtual aquarium where fish swim away when touched. Use a webcam and simple software to track movement. The kids become part of the projection mapping at home experience. You can also project a giant coloring book on the wall. Children use real crayons to color in the digital outlines, and the wall lights up with their creations. This kind of interactive projection mapping turns playtime into an unforgettable adventure.
Transforming Your Living Room into a Cinema
A living room home theater projection mapping setup creates a cinematic feel without a big TV. Project a movie onto a wide wall for a truly immersive experience. You can even add ambient effects like a slowly moving starfield on the ceiling. This makes movie night feel like a private theater. Combine a good sound system with your projection mapping at home cinema, and you have a setup that rivals commercial theaters. Use a projector with high contrast for deep blacks and vivid colors.
Seasonal Decor and Themed Parties
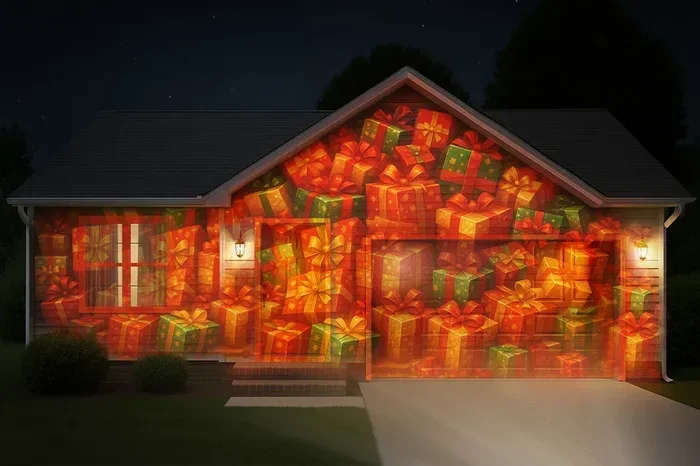
Projection mapping at home shines during holidays and parties. For Halloween, project spooky animations on your facade or a window. Ghosts, falling leaves, and flickering candles create a haunting atmosphere. During Christmas, project snowflakes or a cozy fireplace on the wall. For a birthday party, project animated confetti and the guest of honor’s name. These projection mapping ideas are easy to set up and create a huge impact. Guests will love the unique decorations. You can change the content in minutes for different occasions. That’s the beauty of DIY projection mapping for your home projection setup.
Quick Tips: Keep a library of content ready. Save seasonal videos and animations on your laptop. This way, you can switch themes in seconds. A USB drive with pre-loaded projection mapping at home content makes party setup a breeze.
Common Mistakes and How to Avoid Them
Even with the best gear, mistakes happen. Knowing what to avoid saves you time and frustration. Here are the most common pitfalls in projection mapping at home and how to fix them.
Ignoring Ambient Light
Ambient light is the number one enemy of a clear projection. Sunlight or bright lamps wash out the image. The colors become dull and the picture loses contrast. To avoid this, close all blinds and curtains. Turn off overhead lights. Use only dim, indirect lighting if needed. If you must have some light, invest in a projector with 3,000+ lumens. A bright projector fights ambient light and keeps your home projection mapping vivid. Remember, a dark room is the secret to a stunning image.
Using the Wrong Surface
As mentioned, a glossy or dark surface ruins the projection. But there’s another mistake: projecting onto a wall with a pattern. Bold wallpaper or busy paint designs interfere with the projected image. The pattern shows through and distracts from your content. Always choose a plain, smooth, light-colored wall. If you can’t repaint, hang a white sheet or a portable projection screen. This simple trick makes a huge difference for your projection mapping at home results.
Skipping the Test Run
Many people set up their gear and immediately start the event. This leads to panic if something goes wrong. Always do a full test run the day before. Check the image alignment, focus, and color accuracy. Ensure your laptop doesn’t go to sleep or trigger a screensaver. A test run reveals issues early. It gives you time to adjust the keystone, tweak the software settings, or move the projector. A smooth projection mapping at home experience comes from thorough preparation.
Expert Insights: “The best projection mapping tutorial advice I give is to practice, practice, practice,” says a seasoned home projection mapping expert. “Set up your system a week before the big day. Play with different content and angles. You’ll discover the sweet spot for your room. Confidence comes from familiarity.”
Expert Tips for Stunning Home Projection Mapping
Take your projection mapping at home to the next level with these pro tips. These insights come from experienced DIY projection mapping enthusiasts and professionals.
- Use edge blending for wider images. If you have two projectors, overlap their images slightly and blend them in the software. This creates a seamless, ultra-wide display. It’s perfect for a cinematic home projection setup that spans an entire wall.
- Add music or sound effects. Sync your visuals with audio. A projection mapping at home show feels complete when the sound matches the action. Use a Bluetooth speaker connected to your laptop for easy control.
- Experiment with different surfaces. Try projecting onto a piece of furniture, a plant, or a sculpture. 3D projection mapping on objects adds a layer of magic. It makes the object appear to change or come alive. Start with simple shapes and progress to complex items.
- Keep your content resolution high. Use high-definition videos and images. Low-resolution content looks pixelated when stretched across a large wall. Crisp content makes your home projection mapping look professional and polished.
- Invest in a short-throw projector. These projectors sit close to the wall and throw a large image. They reduce shadow interference because people can walk in front of the projector without blocking the beam. This is ideal for interactive projection mapping setups in smaller rooms.
Quick Tips: Join online communities for projection mapping at home enthusiasts. Forums and social media groups share free content, tips, and troubleshooting advice. Learning from others accelerates your skills and sparks new projection mapping ideas you might never have thought of.
Budget-Friendly Ways to Build Your Home Projection Mapping Setup
You don’t need to spend thousands to enjoy projection mapping at home. A thoughtful approach keeps costs low while delivering impressive results. Start by borrowing or renting a projector if you’re not ready to buy. Many libraries and electronics stores offer short-term rentals. This lets you test the waters without commitment. Once you’re hooked, you can invest in a reliable model. For software, stick with free options like MapMap or TouchDesigner. They offer everything you need for a stunning home projection mapping experience. You can also find royalty-free videos and images online to use as content. This keeps your projection mapping at home project completely free or very low cost.
Another budget trick is to use items you already own. A white bedsheet, a sturdy table, and your existing laptop can form the core of your DIY projection mapping rig. Get creative with mounting. A stack of books or a simple shelf can hold your projector steady. The goal is to start small and grow your home projection setup over time. As your skills improve, you can add a better projector or a dedicated graphics card. But the magic begins with a simple, affordable first step.
Expert Insights: “The best projection mapping at home setups I’ve seen started with zero budget,” shares a projection mapping tutorial creator. “People used a borrowed projector and free software. The content and the story behind it made it special. Don’t wait for perfect gear. Start with what you have and let your creativity lead the way.”
Conclusion
Can you do projection mapping at home? Absolutely yes. You now have all the building blocks to create your own immersive experiences. From choosing the right projector and projection mapping software to crafting stunning content, the process is simpler than you think. Projection mapping at home opens a door to endless creativity. You can transform your living room into a cinema, your wall into a canvas, or your party into a magical event. The gear is affordable, the software is accessible, and the results are breathtaking. Start small, experiment often, and let your imagination guide you. Your home projection mapping journey begins with a single step. Grab a projector, pick a wall, and bring your walls to life. The magic of projection mapping at home is waiting for you.
Key Takeaways: Remember that projection mapping at home is all about play and experimentation. Don’t fear mistakes; they teach you the most. With a little patience and the tips in this guide, you’ll be creating jaw-dropping displays in no time. Share your creations with friends and inspire others to try DIY projection mapping. The best part is that your home projection setup can evolve with you. Start today and see how fun and rewarding projection mapping at home can be.
Frequently Asked Questions
What equipment do I need for projection mapping at home?
You need a projector with at least 2,000 lumens, a laptop, an HDMI cable, and free projection mapping software. A tripod or mount helps keep the projector steady. A smooth, white wall serves as the perfect canvas for your projection mapping at home setup.
Is projection mapping at home expensive?
Not at all. You can start with a budget projector under $300 and free software. Many people build their first home projection mapping rig with items they already own. The biggest costs are optional upgrades like a short-throw projector or a dedicated graphics card.
Can I use a regular projector for projection mapping at home?
Yes, a standard home projector works great for projection mapping at home. The key is to use keystone correction and warping features in your software. Any projector that can connect to a laptop via HDMI is suitable for DIY projection mapping.
What is the best software for DIY projection mapping?
MapMap is the best free starting point for beginners. It teaches you the basics of warping and blending. For more advanced interactive projection mapping, TouchDesigner offers powerful real-time capabilities. MadMapper is also a great choice if you want to explore 3D projection mapping on objects.
How do I align the projection with walls and objects?
Start by using keystone correction to make the image rectangular. Then use the software’s warping tools to fit the image to your wall’s shape. For 3D projection mapping on objects, you’ll need to adjust the perspective and edge blending carefully. Practice on a flat wall first before moving to complex surfaces.
Can kids participate in projection mapping at home projects?
Absolutely. Interactive projection mapping is a fantastic family activity. Kids can help choose colors, draw animations, or even track their movements to control the projection. It’s a wonderful way to introduce them to creative technology in a fun, hands-on way.