Can I Install an SSD in My Laptop Myself Right Now
Yes, you can absolutely install an SSD in your laptop yourself if you have the right tools and a little patience. This guide walks you through every step, from choosing the right drive to cloning your old data and getting your laptop running faster than ever. You will save money, gain valuable tech skills, and breathe new life into an aging machine.
Have you been watching your laptop take forever to boot up? Every click feels like it takes an eternity. You have probably wondered if you can install an SSD in your laptop yourself and skip the expensive repair shop visit.
The good news is that installing an SSD in your laptop is one of the most rewarding DIY projects you can tackle. It does not require advanced technical skills or expensive tools. With a basic screwdriver and a little patience, you can transform a sluggish computer into a speed machine. This guide will show you exactly how to do it, step by step, right now.
Thousands of people upgrade their laptop storage every month without professional help. You can join them. Whether you want faster boot times, more storage space, or a smoother overall experience, a DIY SSD upgrade delivers real results. Let us dive into everything you need to know.
Key Takeaways
- DIY SSD Installation Is Possible: Most laptops allow you to install an SSD yourself with basic tools and online guides.
- Check Compatibility First: Confirm your laptop supports M.2 or 2.5-inch SSDs before purchasing a drive.
- Data Cloning Saves Time: Using cloning software lets you transfer your entire operating system and files to the new SSD seamlessly.
- You Will Need Minimal Tools: A Phillips screwdriver, an anti-static wrist strap, and your laptop manual are all you need to start.
- Warranty Matters: Opening your laptop may void the manufacturer warranty, so check before you begin.
- Performance Gains Are Significant: An SSD upgrade dramatically improves boot times, app loading, and overall responsiveness.
- Safety First: Always power down, disconnect the battery, and ground yourself to prevent static damage.
📑 Table of Contents
- Why Install an SSD in Your Laptop Yourself?
- Choosing the Right SSD for Your Laptop
- Gathering Your Tools and Preparing
- Step-by-Step SSD Installation Guide
- Cloning Your Old Drive to the New SSD
- Common Mistakes to Avoid
- What to Expect After the Upgrade
- When to Call a Professional Instead
- Final Thoughts
Why Install an SSD in Your Laptop Yourself?
Before we get into the how-to, let us talk about why this upgrade matters so much. A traditional hard drive uses spinning disks to read and write data. An SSD has no moving parts. It uses flash memory instead. This means dramatically faster performance across the board.
Here is why people choose to upgrade laptop storage with an SSD:
- Blazing Fast Boot Times: Your laptop can go from powered off to ready in seconds, not minutes.
- Faster App Launches: Programs open almost instantly compared to old hard drives.
- Better Overall Responsiveness: Everything from file transfers to web browsing feels snappier.
- Durability: With no moving parts, SSDs are more resistant to drops and bumps.
- Lower Power Consumption: SSDs use less energy, which can slightly improve battery life.
- Quiet Operation: No more hearing your laptop grind away during heavy tasks.
- Cost Savings: A DIY installation costs a fraction of what a technician charges.
When you compare a traditional hard drive vs SSD, the difference is night and day. You will wonder why you did not upgrade sooner. And the fact that you can do it yourself makes it even better.
Who Should Try This Upgrade?
This guide is perfect for beginners who have never opened a laptop before. It is also great for intermediate users who want a refresher. As long as you can follow simple instructions and handle small screws carefully, you are good to go. You do not need to be a tech expert to install SSD in laptop successfully.
Choosing the Right SSD for Your Laptop
Not all SSDs are the same. Before you buy anything, you need to know what type of drive your laptop supports. Picking the wrong SSD means wasting money and effort. Let us break down your options so you make the right choice.
Understanding SSD Form Factors
Laptops typically use one of two SSD types. The first is the 2.5-inch SATA SSD. This looks like a small, flat rectangle. It replaces a traditional hard drive in the same bay. Most older laptops use this format.
The second type is the M.2 SSD. This is a tiny stick-shaped drive that plugs directly into the motherboard. Newer laptops almost always use M.2 drives. Some laptops even support both types, giving you flexibility.
Here is a quick comparison of the two main SSD form factors:
SATA SSD vs M.2 SSD
Let us look at the key differences between these two popular options.
- 2.5-Inch SATA SSD: These drives connect through a SATA cable and power connector. They offer speeds up to about 550 MB per second. They are widely compatible with older laptops. Installation is straightforward since they fit into a standard drive bay.
- M.2 SSD: These drives connect directly to the motherboard. They are much smaller and more compact. NVMe M.2 SSDs can reach speeds over 3,000 MB per second. They are ideal for modern laptops with M.2 slots.
If you want the fastest possible performance, go with an NVMe M.2 SSD. If your laptop is older, a 2.5-inch SATA SSD will still give you a massive speed boost over a traditional hard drive.
Storage Capacity Options
SSD storage comes in several sizes. Common options include 256 GB, 512 GB, 1 TB, and 2 TB. Your choice depends on how much data you need to store.
- 256 GB: Good for basic tasks and light users. Enough for an operating system and a few applications.
- 512 GB: A sweet spot for most users. Handles documents, photos, and moderate gaming.
- 1 TB: Ideal for heavy users, gamers, and anyone storing large media files.
- 2 TB: Best for professionals who need lots of fast storage space.
Think about what you currently store on your laptop. If you are close to filling up your old drive, err on the side of more storage. You can always use cloud storage or an external drive for files you do not access often.
Popular SSD Brands to Consider
Some brands stand out in the SSD market for reliability and performance. Samsung, Crucial, Kingston, and Western Digital are all excellent choices. Samsung is especially popular for NVMe drives. Crucial offers great value for budget-conscious upgraders. Look for drives with solid warranty coverage and positive user reviews.
Gathering Your Tools and Preparing
Now that you have your new SSD, it is time to prepare. Proper preparation makes the actual installation smooth and stress-free. Skipping this step is the most common mistake beginners make.
Tools You Will Need
You do not need a lot of tools for this job. Here is what you should gather before starting:
- Phillips Head Screwdriver: A small one, usually size #1 or #0. This is the most important tool.
- Anti-Static Wrist Strap: This protects your laptop components from static electricity. You can find them for just a few dollars online.
- Soft Work Surface: A clean, flat table with a soft cloth or towel works great.
- Small Container: Use this to keep track of screws so they do not get lost.
- Your Laptop Manual: Check the manufacturer website if you do not have the physical manual.
- USB Flash Drive: You will need this for creating a recovery drive, just in case.
Backing Up Your Data
Before you open your laptop, back up everything important. This is a safety net. If anything goes wrong during the installation, your files stay safe.
You can back up to an external hard drive, a USB flash drive, or a cloud service like Google Drive or OneDrive. Make sure all your important documents, photos, and files are copied. It only takes a little time and saves you from potential headaches later.
Checking Your Laptop Warranty
Some laptop manufacturers consider opening the back panel as voiding the warranty. Check your warranty terms before you start. If your laptop is still under warranty, contact the manufacturer first. They may offer affordable SSD upgrade services or let you know if DIY is acceptable.
If the warranty does not cover self-repairs, weigh the cost of the warranty against the price of professional installation. In most cases, doing it yourself still saves you a lot of money.
Step-by-Step SSD Installation Guide
This is the heart of the guide. Follow these steps carefully and you will have your new SSD installed in no time. Take your time and do not rush. Patience is your best friend during a DIY upgrade.
Step 1: Power Down and Unplug
Shut down your laptop completely. Do not just put it to sleep. Turn it off fully. Then unplug the power adapter and disconnect any external devices. Remove USB drives, headphones, and anything else plugged in.
If your laptop has a removable battery, take it out. For laptops with built-in batteries, disconnect the internal battery connector after you open the back panel. This is a critical safety step that prevents electrical damage.
Step 2: Ground Yourself
Static electricity can damage sensitive laptop components. Put on your anti-static wrist strap and clip it to a metal part of the laptop chassis. If you do not have a wrist strap, touch a metal surface before handling any internal parts. This simple step protects your investment.
Step 3: Open the Laptop Back Panel
Flip your laptop over and locate the screws on the bottom panel. They are usually along the edges. Use your Phillips screwdriver to remove them carefully. Place each screw in your small container and remember where it came from.
Some laptops have clips instead of screws along the edges. Gently pry the panel open with a plastic spudger or a guitar pick. Never use metal tools to pry, as they can scratch or damage the chassis.
Step 4: Locate the Storage Bay
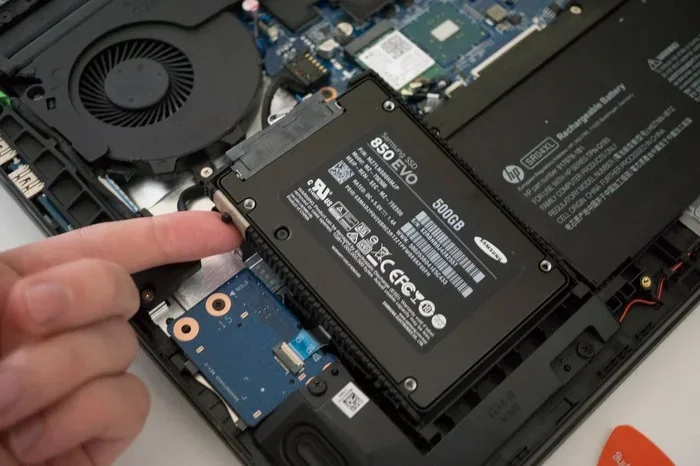
Once the back panel is off, look for the current hard drive or SSD. It is usually in a dedicated bay on one side of the laptop. You may see a metal bracket holding it in place. Refer to your laptop manual if you have trouble finding it.
In some laptops, the storage bay is under a metal shield or a small panel. Remove any additional screws or covers to access it.
Step 5: Remove the Old Drive
Carefully disconnect the cables attached to the old drive. There is usually a SATA data cable and a power connector. Squeeze any tabs or latches holding the drive in place. Gently slide the old drive out of its bay.
Set the old drive aside safely. You can keep it as a backup or repurpose it in an external hard drive enclosure. This turns your old drive into portable storage for very little money.
Step 6: Install the New SSD
Take your new SSD out of its packaging carefully. Hold it by the edges to avoid touching the gold connectors on the bottom.
If you are installing a 2.5-inch SATA SSD, slide it into the same bay where the old drive was. Secure it with the bracket and screws you removed earlier. Reconnect the SATA data and power cables firmly.
If you are installing an M.2 SSD, locate the M.2 slot on the motherboard. Insert the drive at a 30-degree angle. Gently press it down and secure it with the small screw that holds the M.2 drive in place. Do not overtighten this screw.
Step 7: Close Everything Up
Replace the back panel and secure it with all the screws you removed. Make sure every screw is in its correct spot. Reconnect the battery if you disconnected it. Plug in the power adapter and any external devices you removed earlier.
Step 8: Power On and Test
Press the power button and see what happens. If your laptop boots up and recognizes the new drive, congratulations. You did it. If it does not boot, do not panic. This happens sometimes, and it is usually an easy fix.
Check that all cables are connected properly. Make sure the M.2 drive is seated correctly. Sometimes a simple reseating solves the problem. If you are still stuck, consult your laptop manual or search online for your specific model.
Cloning Your Old Drive to the New SSD
If you want to keep everything exactly as it is on your old drive, cloning is the way to go. Cloning your hard drive to SSD copies your entire operating system, applications, settings, and files to the new drive. You boot up and everything feels exactly the same, just much faster.
What Is Disk Cloning?
Disk cloning creates an exact copy of your old drive on the new SSD. It is like taking a snapshot of your entire system and transferring it over. This method is much easier than reinstalling everything from scratch.
Best Free Cloning Software
Several free tools make data migration to SSD simple and straightforward:
- Macrium Reflect Free: A reliable option with a user-friendly interface. Great for beginners.
- Clonezilla: A powerful open-source tool. It has a steeper learning curve but works well.
- Samsung Data Migration: Specifically designed for Samsung SSDs. Very easy to use.
- EaseUS Todo Backup: Offers a free tier with solid cloning features for most users.
How to Clone Your Drive
Here is a simplified overview of the cloning process:
- Connect your new SSD to your laptop using a USB adapter or external enclosure.
- Install your chosen cloning software on your laptop.
- Open the software and select the clone or disk copy option.
- Choose your old drive as the source and the new SSD as the destination.
- Start the cloning process and wait for it to finish. This can take anywhere from 30 minutes to a few hours depending on the amount of data.
- Once cloning is complete, shut down the laptop.
- Swap the drives physically if you cloned externally, or boot from the new SSD directly.
After cloning, your new SSD should boot up with everything intact. You will notice the speed difference immediately. The SSD cloning process is one of the best parts of a DIY upgrade because it saves you from reinstalling your entire operating system and all your programs.
Common Mistakes to Avoid
Even with a great guide, mistakes can happen. Learning from other people’s errors helps you avoid them. Here are the most common pitfalls when installing an SSD yourself.
Forgetting to Back Up Data
This is the number one mistake. Always back up your important files before opening your laptop. If something goes wrong during the installation, you will be glad you did.
Buying the Wrong SSD Type
Not every laptop accepts every type of SSD. Check your laptop specifications before purchasing. Buying a 2.5-inch SATA SSD when your laptop only has an M.2 slot will not work. Double-check the form factor and interface.
Overlooking BIOS Settings
After installing a new SSD, you may need to adjust your BIOS settings. The boot order might need to change so your laptop boots from the new drive. Access your BIOS by pressing a specific key during startup, usually F2, F12, Del, or Esc depending on your laptop brand.
Overtightening Screws
Screws in laptops are small and delicate. Overtightening can strip the threads or crack the motherboard. Hand-tighten screws firmly but gently. Stop as soon as you feel resistance.
Skipping the Grounding Step
Static electricity is a real threat to laptop components. Skipping the grounding step might not cause a problem every time, but the risk is not worth taking. Always ground yourself before touching internal parts.
What to Expect After the Upgrade
Once you have your new SSD installed and running, the difference is remarkable. Here is what you can expect from your upgraded laptop.
- Boot Time: Your laptop should boot in 10 to 20 seconds instead of a minute or more.
- App Loading: Applications open almost instantly. No more waiting for programs to start.
- File Transfers: Copying and moving files happens much faster.
- Overall Feel: Your laptop will feel like a new machine. The responsiveness improvement is hard to describe until you experience it.
The read and write speeds of an SSD are dramatically higher than a traditional hard drive. Sequential read speeds for a modern NVMe SSD can exceed 3,000 MB per second. That is compared to about 100 to 150 MB per second for a standard hard drive. The difference is transformative.
You might also notice cooler operation. SSDs generate less heat than spinning hard drives. Your laptop may run quieter and the fans may not kick in as often. This is a nice bonus that extends the life of your machine.
When to Call a Professional Instead
DIY SSD installation works for most laptops, but there are situations where professional help makes sense. If your laptop has a sealed battery or a design that is difficult to open, a technician might be the better choice. Some ultrabooks and thin laptops have components that are tightly integrated and hard to access.
If you feel uncomfortable opening your laptop, that is completely valid. There is no shame in paying a professional for a laptop SSD upgrade service. It typically costs between 50 and 150 dollars, which is still much less than buying a new laptop. The important thing is that your data stays safe and your laptop gets the upgrade it deserves.
Final Thoughts
Installing an SSD in your laptop yourself is one of the best upgrades you can make. It is affordable, rewarding, and delivers immediate performance improvements. You do not need to be a tech wizard to pull it off. With the right SSD, basic tools, and this guide, you can upgrade your laptop storage and speed in an afternoon.
Can I install an SSD in my laptop myself? Absolutely. Thousands of people do it every single day. The process is straightforward once you understand the steps and prepare properly. Start by confirming compatibility, gather your tools, back up your data, and follow the installation steps carefully.
Do not let fear hold you back. The satisfaction of upgrading your own laptop is unmatched. You will save money, learn a valuable skill, and enjoy a significantly faster computer. So go ahead, grab that new SSD, and give your laptop the speed boost it has been waiting for.
Frequently Asked Questions
Do I need any special tools to install an SSD in my laptop?
No, you really do not need anything special. A basic Phillips head screwdriver is the main tool you will use. An anti-static wrist strap is helpful but not required. Most people already have a screwdriver at home. That is all you need to get started with your DIY SSD upgrade.
Will installing an SSD void my laptop warranty?
This depends on your laptop manufacturer and warranty terms. Some brands consider opening the back panel as voiding the warranty. Others allow self-repairs. Check your warranty documentation or contact the manufacturer directly before you begin. If your laptop is still under warranty, you might want to explore their official upgrade options first.
Can I keep my old hard drive and use it alongside the new SSD?
Yes, you can in many cases. If your laptop has two storage bays or an available M.2 slot, you can keep the old drive and add the new SSD. You can then use the old drive for extra storage and the SSD as your boot drive. This gives you the best of both worlds, combining speed with plenty of storage space.
How long does it take to install an SSD in a laptop?
The actual installation usually takes about 15 to 30 minutes if you have done it before. For a first-timer, plan for about an hour to be safe. This includes opening the laptop, swapping the drive, closing it back up, and setting everything up. If you also need to clone your old drive, add another one to three hours for the data transfer process.
Is cloning my old drive to the new SSD necessary?
Cloning is not strictly necessary, but it is highly recommended. It saves you the hassle of reinstalling your operating system, drivers, and all your applications. With cloning, you boot up your new SSD and everything is exactly where you left it. If you prefer a clean install instead, you can do that too, but you will need to reinstall everything manually.
What if my laptop does not recognize the new SSD after installation?
Do not panic. This happens sometimes and is usually easy to fix. First, check that all cables and connectors are seated properly. If you are using an M.2 SSD, make sure it is inserted at the correct angle and screwed in securely. You may also need to enter your BIOS and enable the SATA port or change the boot priority. Searching online for your specific laptop model and SSD combination often provides a quick solution.
=== CONCLUSION ===
Installing an SSD in your laptop yourself is a smart, satisfying, and budget-friendly upgrade that anyone can do. You have everything you need to know right here, from picking the right drive to completing the installation and enjoying the speed boost. The process might seem intimidating at first, but once you see how straightforward it is, you will wonder why you did not do it sooner.
Remember to back up your data, check your laptop compatibility, ground yourself before handling components, and take your time with each step. These simple precautions make all the difference. Whether you choose a 2.5-inch SATA SSD or a blazing fast NVMe M.2 drive, your laptop will thank you with faster boot times, snappier performance, and a renewed sense of speed.
So go ahead and give it a try. Your laptop is waiting for a second life, and all it takes is a little courage and this guide. Install that SSD yourself today and experience the difference firsthand. You will be glad you did.