Can I Use My Projector As A Golf Simulator Setup Guide
Yes, you can absolutely use your projector as a golf simulator and transform any room into your personal indoor driving range. A projector golf simulator setup lets you practice swings, play virtual courses, and analyze your technique from the comfort of home. This guide covers everything from equipment needs to step-by-step installation, so you can start simulating golf like a pro. Whether you are a beginner or seasoned golfer, this setup brings the course to your living room.
Have you ever wondered if your backyard projector could double as a golf simulator? The idea of turning your living room into a virtual golf course sounds exciting. But is it really possible? The short answer is yes. You can use your projector as a golf simulator and enjoy realistic gameplay without leaving home.
Golf simulators have become hugely popular in recent years. They let golfers practice swings, play full rounds, and track performance data. But professional simulator setups can cost thousands of dollars. That is where a projector comes in. It offers an affordable way to bring the golf course indoors. Whether you own a budget-friendly model or a high-end home theater projector, it can serve as the centerpiece of your indoor golf setup.
This guide walks you through everything you need to know. From choosing the right equipment to setting up your software, we cover it all. You will learn about projector specs, room requirements, and common pitfalls to avoid. By the end, you will feel confident building your own projector golf simulator at home.
Key Takeaways
- Projectors work great for golf simulators: You can repurpose an existing projector to create a realistic indoor golf experience with the right setup.
- You need a few key components: A projector, hitting screen, launch monitor, simulator software, and a hitting mat are the essentials.
- Room size and lighting matter: A space with controlled lighting and enough throw distance will give you the best simulation quality.
- Setup is simpler than you think: With clear steps and basic equipment, most people can build a functional simulator in a weekend.
- Common mistakes are easy to avoid: Issues like wrong projector placement or poor screen choice can be fixed with the right guidance.
- It saves money over simulator centers: A home setup pays for itself quickly if you practice regularly or play virtual rounds.
- Bonus features add real value: Swing analysis, shot tracking, and course replay make practice more engaging and productive.
📑 Table of Contents
- Understanding How a Projector Works for Golf Simulation
- What You Need to Build a Projector Golf Simulator
- Step-by-Step Projector Golf Simulator Setup
- Best Projector Settings for Golf Simulation
- Common Mistakes and How to Avoid Them
- Is a Projector Golf Simulator Worth It?
- Tips to Get the Most Out of Your Simulator
- Conclusion
Understanding How a Projector Works for Golf Simulation
A projector displays images on a large screen, creating an immersive viewing experience. For golf simulation, the projector shows the virtual golf course. You see the fairway, the green, and even the hazards. Your job is to swing, hit the ball, and let the system track your shot. The projector then displays the result on screen.
How Projector Technology Applies to Golf
Projectors use light to cast images onto a surface. In a golf simulator, the image comes from simulation software running on a computer or console. The software generates a realistic golf course environment. The projector displays this environment on your screen or wall. You stand at the hitting position, swing, and sensors track your ball flight.
The quality of your experience depends on several factors. Projector resolution affects how sharp the image looks. A 1080p or 4K projector delivers clear visuals. Projector brightness matters too. You need enough lumens to overcome ambient light in the room. Most simulators work best with at least 2,500 to 3,000 lumens.
Key Specs to Look For
Not all projectors are equal for golf simulation. Here are the specs that matter most:
- Resolution: 1080p is the minimum. 4K provides a sharper, more immersive image.
- Brightness: Look for 2,500 to 3,500 ANSI lumens. Higher is better if your room has windows.
- Throw ratio: This determines how far the projector sits from the screen. Short-throw projectors work in smaller rooms.
- Contrast ratio: Higher contrast makes the image pop. It helps you see details on the virtual course.
- Input lag: Low input lag ensures smooth visuals. This matters when tracking fast-moving balls.
- Connectivity: HDMI ports are essential. Some projectors also offer wireless connectivity for convenience.
Keep these specs in mind when choosing or evaluating your projector. A good projector makes a huge difference in your golf simulation experience.
What You Need to Build a Projector Golf Simulator
Setting up a golf simulator with a projector requires a few key pieces of equipment. You might already own some of them. Others you may need to purchase. Let us break down what you need.
Essential Equipment List
Here is a straightforward list of everything you need to get started:
- A projector: This is the star of the show. Any projector with decent resolution and brightness will work.
- A hitting screen: You need a screen to display the image and absorb ball impacts. Indoor golf screens are designed for this purpose.
- A launch monitor: This device tracks your ball flight and swing data. It is essential for realistic simulation and analysis.
- Simulator software: Programs like Sky Golf, The Golf Club, or E6 Connect provide the virtual courses and gameplay.
- A hitting mat: You need a surface to stand on and strike balls from. Mats mimic real turf feel.
- A computer or console: This runs the simulator software. A laptop or gaming PC works well.
- A projector mount: A ceiling or wall mount keeps the projector steady and aligned with the screen.
You can find many of these items in starter bundles online. These bundles often include a screen, mat, and launch monitor at a discounted price. They are a great option if you want a simple indoor golf setup without shopping for each piece separately.
Optional Upgrades for Better Performance
Once you have the basics, you can enhance your setup with optional extras. These upgrades improve realism and accuracy.
- Enclosure netting: Netting around the screen catches stray shots. It protects your walls and furniture.
- Better hitting mat: Premium mats offer a more realistic feel underfoot and with your clubs.
- Speakers or sound system: Good audio adds immersion. You hear crowd noise and ball impacts.
- Camera-based swing analysis: Some systems use cameras to record your swing for review.
- Ambient lighting control: LED strips or blackout curtains improve image quality on the screen.
These upgrades are not required. But they can make your projector golf simulator feel more professional and enjoyable.
Step-by-Step Projector Golf Simulator Setup
Now comes the fun part. Building your simulator. The process is simpler than most people think. You do not need technical expertise. Just follow these steps and you will be swinging in no time.
Choosing the Right Room
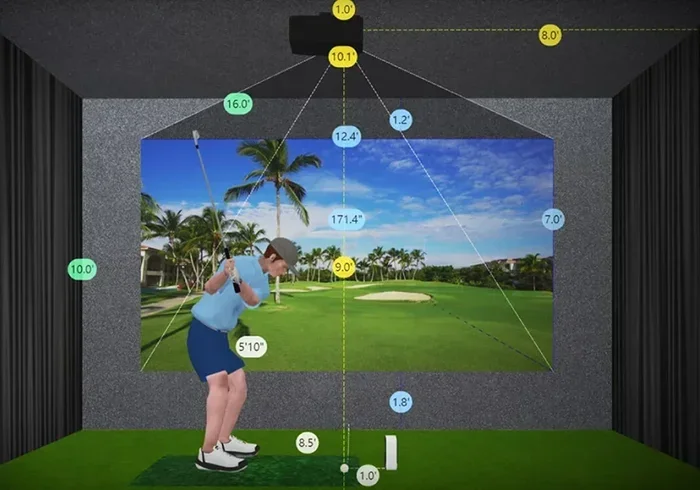
The room you choose makes a big difference. You need enough space to swing comfortably. A minimum of 10 feet deep is ideal. This gives you room to stand at the hitting position and have the screen set back.
Consider the ceiling height too. Standard 8-foot ceilings work fine for most setups. If you are tall or use a driver, you may want a higher ceiling. Also, think about flooring. Carpet is fine, but a dedicated hitting mat works better for practice.
Lighting control is important. Rooms with windows let in ambient light. This can wash out the projected image. A room with blackout curtains or blinds gives you the best results. A basement or garage often works perfectly for a home golf simulator.
Setting Up the Screen and Projector
Position your screen on the wall opposite your hitting area. The screen should be taut and wrinkle-free. Any wrinkles will distort the image. Most golf screens come with a frame that keeps them stretched tight.
Next, mount your projector. The throw distance depends on your projector model and screen size. Check your projector manual for the recommended distance. A short-throw projector works well in smaller rooms because it sits closer to the screen.
Align the projector so the image fills the screen evenly. Most projectors have keystone correction. This adjusts the image shape if the projector is not perfectly perpendicular. Use a level to ensure the projector is straight. A properly aligned image looks sharper and more realistic.
Quick Tip: Test your setup with a simple image first. Make sure the picture is centered and focused before connecting your golf software. Adjust the projector position until the image looks perfect.
Connecting the Software and Launch Monitor
With the screen and projector in place, it is time to connect your equipment. Start by placing your launch monitor at the designated spot. Most launch monitors sit beside or behind the hitting area. Follow the manufacturer instructions for placement.
Connect the launch monitor to your computer or console. Most systems use USB or Bluetooth for this connection. Then, open your simulator software. The software receives data from the launch monitor and displays your shot on screen.
Calibrate your system before your first session. This ensures the sensors read your shots accurately. Most software includes a calibration wizard. Follow the on-screen steps carefully. Proper calibration makes a huge difference in shot accuracy and swing analysis.
Once everything is connected, hit a few practice shots. Watch the ball flight on the projected screen. If the shot appears correctly, you are good to go. If something looks off, check your connections and recalibrate.
Best Projector Settings for Golf Simulation
Getting the right settings on your projector improves your experience significantly. Small adjustments can make the image brighter, clearer, and more realistic.
Brightness and Resolution Settings
Start with brightness. Set your projector to its brightest mode for daytime use. This mode is sometimes called “Dynamic” or “Bright.” For evening sessions, you can lower the brightness to reduce eye strain and improve contrast.
For resolution, set your projector to its native resolution. If your projector is 1080p, make sure the output from your computer matches. A mismatch can cause blurry images. Most simulation software runs best at 1080p or 4K resolution.
Adjusting for Different Lighting Conditions
Lighting in your room affects how the projected image looks. Here are some tips for different conditions:
- Dark room: Use normal or cinema mode. This gives the best contrast and color accuracy.
- Dim room with some light: Increase brightness slightly. Use a gray screen if available. Gray screens boost contrast.
- Bright room with windows: Use the brightest mode. Consider blackout curtains. A high-lumen projector is essential here.
Take a few minutes to test different settings. Find what works best for your room. Once you dial in the settings, your golf course simulation will look amazing every time.
Common Mistakes and How to Avoid Them
Even with the best equipment, mistakes can happen. Here are common errors people make when building a projector golf simulator and how to fix them.
Setup Errors That Ruin the Experience
Mistake 1: Placing the projector too close or too far. This creates an image that is too small or blurry. Always check the throw distance for your specific projector model. Measure your room before purchasing.
Mistake 2: Using a wrinkled or low-quality screen. A wrinkled screen distorts the image. A cheap screen may not handle ball impacts well. Invest in a proper indoor golf screen designed for simulation.
Mistake 3: Ignoring room lighting. Even the best projector struggles in bright rooms. Control ambient light with curtains or blinds. Consider painting walls dark colors to reduce glare.
Mistake 4: Skipping calibration. An uncalibrated launch monitor gives inaccurate readings. Always run the calibration process before each session. This takes only a few minutes and improves accuracy significantly.
Mistake 5: Not enough space to swing. Cramped rooms lead to restricted swings and potential damage. Measure your space carefully. Make sure you have full range of motion for every club.
Maintenance Tips for Longevity
Taking care of your equipment keeps your simulator running smoothly. Here are simple maintenance tips:
- Clean the projector lens regularly: Use a microfiber cloth. Dust reduces image quality over time.
- Store the projector properly: Keep it in a cool, dry place when not in use.
- Check cables and connections: Loose cables cause signal drops. Inspect them monthly.
- Replace projector bulbs on schedule: Most bulbs last 2,000 to 5,000 hours. Track usage and replace before they burn out.
- Keep software updated: Updates fix bugs and improve performance. Check for updates regularly.
Following these simple steps extends the life of your projector golf simulator setup and keeps everything running smoothly.
Is a Projector Golf Simulator Worth It?
This is the question many golfers ask before investing time and money. The answer depends on your goals, budget, and how often you plan to use the setup.
Cost vs. Value Analysis
A basic projector golf simulator can cost anywhere from 500 to 2,000 dollars. This includes a projector, screen, launch monitor, mat, and software. Compare that to paying 50 to 100 dollars per hour at a commercial simulator center. If you practice even once a week, a home setup pays for itself within a few months.
Beyond cost savings, a home simulator offers unmatched convenience. You can practice any time of day. No need to drive to a facility. No waiting for a bay to open. You also get access to thousands of virtual courses from around the world. This level of access is hard to find at any single location.
Who Benefits Most from This Setup
Several types of golfers benefit from a projector-based simulator:
- Practicing golfers: If you want to improve your game, consistent practice is key. A simulator lets you hit balls daily.
- Seasoned golfers in cold climates: Winter months limit outdoor play. A simulator keeps you sharp year-round.
- Busy professionals: A home setup fits into a tight schedule. A 30-minute session after work is easy.
- Golf enthusiasts who love technology: The data and feedback from a launch monitor and software are fascinating to explore.
- Families and friends: A simulator is a fun group activity. Everyone can take turns and enjoy friendly competition.
No matter who you are, a projector golf simulator adds value to your golf journey. It combines practice, entertainment, and data analysis in one convenient package.
Tips to Get the Most Out of Your Simulator
Once your setup is complete, a few tips help you get the most from every session.
- Practice with purpose: Set a goal for each session. Work on your driver, short game, or putting. Focused practice improves faster than random swings.
- Review your data: Use the software to analyze your shot patterns. Look for trends in distance, accuracy, and dispersion.
- Play full rounds: Do not just hit range balls. Play full 18-hole rounds to simulate real course conditions.
- Track your progress: Keep a log of your scores and stats. This helps you see improvement over time.
- Make it fun: Invite friends over for a simulator night. Competition keeps you motivated and engaged.
These habits turn your setup into a powerful tool for improvement. Your golf simulator becomes more than a toy. It becomes a training aid that helps you lower your scores.
Conclusion
Using your projector as a golf simulator is not only possible. It is a smart, affordable, and fun way to enjoy golf indoors. With the right equipment, a little space, and this guide, you can build a setup that rivals expensive commercial simulators. The key is to start with the essentials, set everything up carefully, and avoid common mistakes.
Your projector golf simulator setup opens the door to year-round practice, virtual rounds on famous courses, and detailed swing analysis. It brings the golf course to your home in a way that was not possible just a few years ago. So go ahead, set up your simulator, and start enjoying the game you love every single day.
Whether you are a beginner learning the basics or a seasoned golfer refining your technique, a projector-based simulator delivers real value. It saves money, builds skills, and adds excitement to your golf routine. The only thing left to do is take the first step and build your setup today.
Frequently Asked Questions
Do I need a special projector for a golf simulator?
No, you do not need a special projector. Any projector with good resolution and brightness can work for a golf simulator setup. Look for at least 1080p resolution and 2,500 lumens of brightness for the best results.
How much space do I need for a projector golf simulator?
A room that is at least 10 feet deep and 10 feet wide works well for most setups. You need enough space to swing comfortably and place the screen and launch monitor at proper distances. A garage or basement often makes an ideal location.
Can I use a regular projector screen for golf simulation?
You can, but a dedicated indoor golf screen works much better. Golf screens are designed to absorb ball impacts and display high-quality images. A regular movie screen may tear or show wrinkles that distort the projected image.
What software works best with a projector golf simulator?
Popular options include Sky Golf, The Golf Club, E6 Connect, and TGC 2019. Each offers different courses, features, and price points. Choose software that matches your budget and the type of simulation experience you want.
Is a launch monitor necessary for a projector golf simulator?
Yes, a launch monitor is essential for realistic simulation. It tracks your ball flight and swing data, allowing the software to display accurate shot results on screen. Without one, you cannot get meaningful feedback on your performance.
How much does it cost to build a projector golf simulator?
A basic setup can cost between 500 and 2,000 dollars depending on equipment quality. Higher-end launch monitors and projectors increase the cost. However, the investment pays off quickly compared to frequent visits to commercial simulator facilities.
=== CONCLUSION ===
Setting up a projector golf simulator is one of the best decisions any golfer can make. It brings the course home, saves money on range fees, and gives you the tools to improve your game. You do not need a massive budget or a technical background. With a projector, a screen, a launch monitor, and the right software, you have everything you need to start simulating golf today.
Follow the steps in this guide. Avoid the common mistakes. And most importantly, enjoy the process. Your home simulator is more than just a practice tool. It is a gateway to better golf, more fun, and countless hours of enjoyment. So grab your clubs, fire up the projector, and let the games begin.