Can You Put A Projector On A Table Best Setup Tips Guide
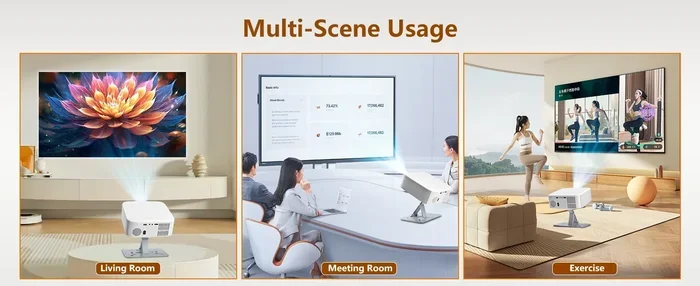
Yes, you can put a projector on a table, and it is one of the easiest ways to set up a home theater. A table setup offers flexibility, quick installation, and great image quality when done right. This guide covers everything you need to know about putting a projector on a table, from choosing the right surface to avoiding common mistakes.
Key Takeaways
- Table placement works great: A sturdy, level table is one of the simplest and most effective ways to set up a projector.
- Height and distance matter: Getting the right projector height and throw distance ensures a sharp, properly sized image.
- Watch out for ambient light: Table placement can cause shadows and glare, so choosing the right room and screen makes a big difference.
- Use a stable surface: Any vibration or wobble on the table will show up on your projected image, so stability is key.
- Short throw projectors are ideal: They work perfectly on tables and save floor space in any room.
- Keep cables managed: Tidy cable routing keeps your setup clean and safe from accidental bumps.
📑 Table of Contents
- Can You Put A Projector On A Table?
- Why Choose a Table for Your Projector?
- Best Tables for Projector Placement
- How to Set Up a Projector on a Table
- Dealing with Ambient Light and Shadows
- Common Mistakes When Putting a Projector on a Table
- Best Projectors for Table Setup
- Can You Use Any Table for a Projector?
- Final Thoughts
Can You Put A Projector On A Table?
The short answer is yes. You absolutely can put a projector on a table. In fact, table placement is one of the most popular ways people set up projectors at home. It is simple, fast, and does not require any permanent changes to your room.
Whether you want to watch movies, play games, or give a presentation, a table setup gets you up and running in minutes. You do not need a ceiling mount or a fancy projector stand. A regular household table often works perfectly fine.
But there are a few things you need to know to get the best results. Not every table is ideal. The height, surface, and position of the table all affect your image quality. This guide walks you through everything step by step.
If you have ever wondered about putting a projector on a table, you are in the right place. Let us dive into the details and help you get the perfect setup.
Why Choose a Table for Your Projector?
There are many reasons why a table is a great spot for your projector. Here are the biggest advantages:
- Easy setup: You just place the projector on the table and point it at your screen. No drilling, no mounting brackets, no tools needed.
- Portability: You can move the projector to a different room or even outside. A table setup is not permanent, which gives you flexibility.
- Cost savings: You do not need to buy a special projector mount or ceiling bracket. Your existing table does the job.
- Quick adjustments: Want to change the angle or position? Just slide the projector a few inches. It is much easier than adjusting a wall or ceiling mount.
- Safe storage: When you are done, you can simply store the projector in a closet. It stays protected and out of the way.
Many people also prefer a table setup because it keeps the projector at a comfortable working height. You can easily access the ports, change the lens, or adjust the keystone settings without climbing on anything.
Table vs. Ceiling Mount
Both table and ceiling mount setups have their strengths. A ceiling mount keeps the projector out of the way and saves floor space. But it requires permanent installation and is harder to adjust. A table setup is temporary, flexible, and perfect for renters or anyone who wants a quick setup.
If you are comparing options, you might also want to check our guide on using a projector on a wall for more ideas on wall-based setups.
Best Tables for Projector Placement
Not all tables work equally well. The wrong table can cause image distortion, shadows, or even damage to your projector. Here is what to look for.
Sturdy and Level Surface
The most important thing is a stable, flat surface. Any wobble or unevenness will show up on your projected image. You will notice blurry edges or slight tilting in the picture.
Avoid tables that shake easily. Dining tables with solid legs work great. Small folding tables can work too, but make sure they do not vibrate when someone walks nearby.
Right Height for Your Setup
The height of the table determines where the projector beam hits your screen. If the table is too low, the image might get cut off at the bottom. If it is too high, you might get a distorted picture or shine the projector directly into someone’s eyes.
As a general rule, the projector lens should be at or slightly below the center of the screen. This gives you the most even and straight image. A standard dining table height of about 30 inches works well for most setups.
Dark or Matte Surface
Try to use a table with a dark or matte finish. Shiny tables can reflect light back into the projector lens, which reduces image contrast and creates glare. A matte black or dark wood table is ideal.
How to Set Up a Projector on a Table
Setting up a projector on a table is straightforward. Follow these steps for the best results.
- Choose the right table. Pick a sturdy, level surface at the right height for your screen.
- Place the projector near the back of the table. This gives you more throw distance and keeps the projector from sticking out too far.
- Point the projector at the screen. Make sure the lens is centered on the screen for the best image quality.
- Adjust the keystone settings. Most projectors have keystone correction. Use it to fix any trapezoid distortion from the angle.
- Connect your source. Plug in your laptop, streaming device, or gaming console with an HDMI cable.
- Test the image. Turn on the projector and check for sharpness, focus, and alignment. Make small adjustments as needed.
Quick Tips for a Perfect Table Setup
- Use a projector table stand if your table is too high or too low. These adjustable stands give you precise height control.
- Place a cloth or mat under the projector to absorb vibrations and prevent scratches on the table surface.
- Keep the projector away from the table edge. This prevents accidental bumps and keeps the air vents unobstructed.
- Use a remote control or app to adjust settings without touching the projector and causing vibrations.
Dealing with Ambient Light and Shadows
One challenge of putting a projector on a table is managing light. Since the projector sits at table height, it is closer to the floor and more likely to interact with room lighting. Here is how to handle it.
Choose the Right Time of Day
If you can control the lighting, set up your viewing session when natural light is low. Evening or nighttime viewing works best for table projector setups. Close the curtains to block any stray light from windows.
If you want to block out light effectively, consider using blackout curtains as a projector screen. They double as a light-blocking solution and a projection surface in a pinch.
Use a High-Gain Screen
A high-gain projector screen reflects more light back to the viewer. This helps maintain bright, vivid images even in rooms with some ambient light. It is especially helpful when your projector is at table level and the light path is more exposed.
Position the Table Carefully
Place the table so the projector beam does not cross any light sources. If a lamp or window is in the path, the light will wash out the image. Think about the projector’s throw angle and keep it clear of competing light.
Common Mistakes When Putting a Projector on a Table
Even a simple setup can go wrong if you are not careful. Here are the most common mistakes people make and how to avoid them.
Using an Unstable Table
A wobbly table ruins the image. Every tiny vibration from footsteps, music, or even the projector fan shows up on the screen. Always test the table for stability before you set up.
Ignoring Throw Distance
Every projector has a specific throw ratio. This tells you how far the projector needs to be from the screen to produce a properly sized image. If you place the table too close or too far, the image will be too small, too blurry, or cut off.
Check your projector manual for the recommended throw distance. Measure from the lens to the screen and position the table accordingly.
Forgetting About Ventilation
Projectors generate heat. If you place yours on a table and block the air vents with a tablecloth or other items, it can overheat. Always keep the vents clear and allow airflow around the projector.
Not Managing Cables
Loose cables on the floor or table are a tripping hazard and can pull the projector off the table. Use cable ties or a cable management box to keep everything tidy and secure.
Best Projectors for Table Setup
Some projectors are better suited for table placement than others. Here is what to look for when choosing one.
| Feature | Why It Matters for Table Setup |
|---|---|
| Short throw lens | Projects a large image from a short distance, perfect for tables in smaller rooms |
| Adjustable feet | Lets you level the projector on uneven table surfaces |
| Keystone correction | Fixes image distortion when the projector is not perfectly aligned |
| Quiet fan | Reduces noise that could distract from your viewing experience |
| HDMI and USB ports | Makes it easy to connect multiple devices on or near the table |
Short throw projectors are especially popular for table setups. They sit close to the screen and produce a large image, which means you do not need a deep table or a long room. If you are interested in learning more about projector types, check out our guide on projecting Netflix from your laptop for tips on getting the most from your setup.
Can You Use Any Table for a Projector?
Technically yes, but not every table gives you good results. A flimsy card table might work in a pinch, but it will not give you a stable, vibration-free image. A solid wood dining table or a dedicated projector table is much better.
If you only have a lightweight table, try these tricks:
- Place a heavy book or weight on the table leg to reduce wobble.
- Put a thick felt pad under each table leg to absorb vibrations.
- Use a projector with adjustable rubber feet for extra grip.
Remember, the more stable the surface, the sharper and cleaner your image will be. A little effort in choosing the right table goes a long way.
Final Thoughts
Putting a projector on a table is one of the simplest and most effective ways to enjoy a big screen at home. It works for movie nights, gaming sessions, and business presentations alike. The key is choosing the right table, getting the height and distance correct, and managing light and shadows in the room.
With the tips in this guide, you can set up your projector on a table and enjoy a crisp, bright image every time. Start with a stable, level surface, follow the setup steps, and avoid the common mistakes we covered.
Do not be afraid to experiment with placement. Move the table around, test different angles, and find what works best for your room. The beauty of a table setup is that it is flexible and easy to adjust. So grab your projector, find a good table, and enjoy the show.
For more projector tips and ideas, explore our other guides on projector setup and home entertainment gear.
Frequently Asked Questions
Can any projector be placed on a table?
Most projectors can be placed on a table. However, short throw projectors work best because they produce a large image from a short distance. Check your projector’s throw ratio to make sure your table distance will give you the right image size.
What is the best height for a projector on a table?
The projector lens should be at or slightly below the center of your screen. A standard dining table at about 30 inches high usually works well. Adjust based on your screen size and throw distance for the best results.
Do I need a special table for a projector?
No special table is needed. A sturdy, level surface with a dark or matte finish works great. Avoid shaky or lightweight tables that can vibrate and blur the image.
Will a table projector setup work in a bright room?
It can work, but ambient light will reduce image quality. Use a high-gain screen, close curtains, and position the table so the projector beam avoids light sources for the best results in brighter rooms.
How do I prevent my projector from overheating on a table?
Keep all air vents uncovered and allow space around the projector for airflow. Never place a tablecloth or other items over the projector. A small fan nearby can also help with ventilation.
Can I use a folding table for my projector?
Yes, but make sure the folding table is sturdy and does not wobble. Place a heavy object on the table to add stability and use vibration-absorbing pads under the legs for a sharper image.