Image Compression Disadvantages And Advantages Explained
Image compression helps reduce file sizes and boost website speed, but it can also lower image quality and cause visual artifacts. Understanding both sides lets you make smarter choices for your digital photos and online content. This guide breaks down every major benefit and drawback in plain, simple terms.
Every day, millions of images get uploaded to websites, shared on social media, and sent through email. But here is the thing. These images take up a lot of space. They slow down pages. They eat up bandwidth. That is where image compression comes in. It is the process of reducing the file size of a digital photo or graphic without (ideally) ruining its appearance. Some people love it. Some people fear it. And a lot of folks simply do not understand what it really does.
In this guide, we are going to explore both sides of the coin. You will learn about the advantages of image compression and the disadvantages of image compression in real, practical terms. Whether you run a blog, manage an online store, or just share photos with friends, this guide will help you make better decisions. No fluff. No jargon. Just clear, useful information you can put to work right away.
Key Takeaways
- Faster websites: Compression shrinks file sizes, which improves page load speed and user experience.
- Quality trade-offs: Lossy compression can reduce image resolution and introduce visual artifacts.
- SEO benefits: Compressed images help search engines rank your pages higher.
- Storage savings: You save significant server storage and bandwidth costs with compressed files.
- Lossless options exist: Lossless compression keeps quality intact but offers smaller size reductions.
- Format matters: Choosing the right format like JPEG, PNG, or WebP affects both pros and cons.
- Balance is key: The best approach is finding the right compression level for your specific needs.
📑 Table of Contents
- What Is Image Compression and Why Does It Matter?
- The Advantages of Image Compression
- The Disadvantages of Image Compression
- Lossy vs. Lossless Compression: A Comparison
- Popular Image Formats and Their Compression
- Best Practices for Balancing Compression and Quality
- Common Mistakes People Make with Image Compression
- Expert Insights on Image Compression
- How Image Compression Affects SEO and User Experience
- Conclusion
What Is Image Compression and Why Does It Matter?
Before we dive into the pros and cons, let us quickly cover the basics. Image compression is a technique that shrinks the size of an image file. It does this by removing or reorganizing data inside the file. There are two main types: lossy compression and lossless compression. Lossy compression throws away some data permanently to make the file smaller. Lossless compression packs the data more efficiently but keeps every single pixel intact.
Why does this matter so much? Because images are the heaviest part of most web pages. Studies show that images take up over 50 percent of a typical webpage’s total weight. When your images are too large, your site slows down. Visitors leave. Search engines notice. And your SEO ranking drops. So understanding file size reduction and how it works is absolutely essential for anyone with an online presence.
How Compression Affects Digital Photos
When you compress a digital photo, you change its data structure. A raw image from a camera might be 20 megabytes or more. After compression, that same image could be 2 megabytes or even smaller. The compression ratio tells you how much smaller the file became. A 10:1 ratio means the file is one-tenth of its original size. But that shrinking comes with trade-offs, which we will explore in detail below.
The Advantages of Image Compression
Let us start with the good news. There are many real benefits to compressing your images. These advantages affect everything from your website speed to your wallet.
1. Faster Page Load Speed
This is the biggest advantage. When your images are smaller, your web pages load faster. Users do not like waiting. In fact, research shows that 53 percent of visitors leave a site if it takes more than three seconds to load. Compressed images cut down load time significantly. This leads to a better user experience and keeps people on your site longer.
2. Improved SEO Rankings
Search engines like Google care about page speed. They use it as a ranking factor. When your site loads quickly thanks to compressed images, Google notices. Your SEO ranking improves. Your pages get more visibility. More visibility means more traffic. It is a cycle that starts with file size reduction.
3. Reduced Bandwidth Usage
Every time someone views an image on your site, data travels from your server to their browser. Large images use more bandwidth. Compressed images use less. This matters a lot if you have a lot of visitors or if your hosting plan has data limits. Lower bandwidth usage means lower hosting costs over time.
4. Better Storage Efficiency
Storing thousands of high-resolution images takes up serious space. Whether you use cloud storage or a physical server, server storage costs money. Compression helps you fit more images into the same space. It also makes backups faster and easier. For businesses with huge image libraries, this is a game changer.
5. Enhanced Mobile Experience
More people browse the web on phones than ever before. Mobile connections can be slow or unstable. Compressed images load quicker on mobile devices. They use less data, which saves your visitors’ data plans. A fast mobile experience keeps people engaged and reduces bounce rates.
6. Easier Sharing and Uploading
Have you ever tried to email a 15-megabyte photo? It is painful. Compression makes sharing easier. Smaller files upload faster to social media, cloud services, and messaging apps. For casual users and professionals alike, this is a huge quality-of-life improvement.
The Disadvantages of Image Compression
Now let us look at the other side. Compression is not perfect. There are real drawbacks you need to understand before you start shrinking your images.
1. Loss of Image Quality
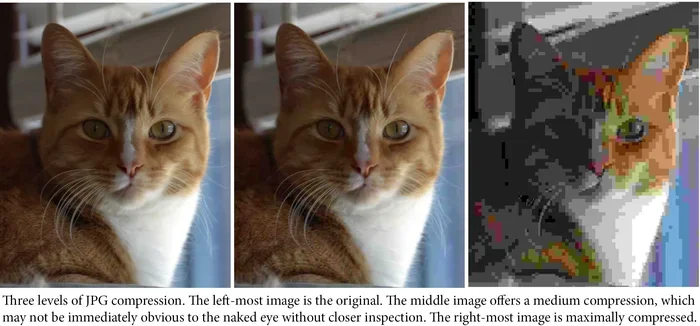
This is the most common complaint. When you use lossy compression, you lose data forever. The image might look fine at first glance. But zoom in and you will see problems. Details get blurry. Colors shift. Fine textures disappear. For professional photographers or designers, this quality loss can be unacceptable.
2. Visual Artifacts and Distortion
Lossy compression often creates visual artifacts. These are strange-looking patches or blocks in the image. You might see pixelation around edges. There could be banding in gradients. Some images get a “blocky” look, especially in dark areas. These artifacts hurt the professional appearance of your photos and graphics.
3. Reduced Image Resolution
Compression can lower the effective image resolution. A high-resolution photo might look fine on a small screen. But print it or view it on a large monitor, and it falls apart. Details that were crisp become muddy. For any use case that requires sharp, detailed images, heavy compression is a problem.
4. Color Accuracy Issues
Some compression methods alter the colors in your photos. Reds might look more orange. Blues might look more purple. This happens because compression reduces the amount of color data stored in the file. For product photos or brand images where color accuracy matters, this is a serious disadvantage.
5. Repeated Compression Degrades Quality Further
Here is a problem many people do not know about. Every time you compress an already-compressed image, quality drops again. This is called “generation loss.” If you save a compressed JPEG, then re-save it as a compressed JPEG, the image gets worse each time. This makes file management tricky and can ruin photos over time.
6. Not All Compression Works for All Images
Different images need different approaches. A photograph works well with lossy compression. But a line drawing or a logo with sharp edges does not. Compression algorithms designed for photos can make graphics look terrible. You need to understand your image type before choosing a method. Otherwise, you might make things worse instead of better.
7. Time and Processing Costs
Compressing images takes time and computing power. If you have thousands of images to process, it adds up. You might need special software or plugins. Some compression tools require powerful hardware. For small teams or solo creators, this data transfer and processing overhead can be a real burden.
Lossy vs. Lossless Compression: A Comparison
Understanding the difference between these two types is key to making smart choices. Here is a simple breakdown.
| Feature | Lossy Compression | Lossless Compression |
|---|---|---|
| File Size Reduction | Very high (up to 90%) | Moderate (10-30%) |
| Image Quality | Reduced | Fully preserved |
| Visual Artifacts | Common | None |
| Best For | Web photos, thumbnails | Logos, graphics, medical images |
| Reversible? | No | Yes |
| Compression Speed | Faster | Slower |
The table above shows that neither method is perfect. Lossy compression gives you the biggest size savings but costs you quality. Lossless compression keeps your images perfect but does not shrink them as much. Your choice depends entirely on what you need the image for.
Popular Image Formats and Their Compression
Different image formats use different compression algorithms. Each format has its own strengths and weaknesses.
JPEG is the most common format for photographs. It uses lossy compression by default. You can adjust the quality level to find a balance between file size and visual fidelity. It is widely supported and works great for web photos.
PNG uses lossless compression. It is ideal for graphics, logos, and images that need transparency. PNG files are larger than JPEGs, but they keep every detail sharp. This makes PNG a favorite for designers and developers.
WebP is a newer format developed by Google. It supports both lossy and lossless compression. WebP files are often smaller than JPEGs and PNGs while maintaining good quality. More and more websites are switching to WebP for better performance.
GIF is best for simple animations and graphics with limited colors. It uses lossless compression but is not suitable for complex photos. The format is outdated for most photo use cases but still popular for memes and short animations.
Best Practices for Balancing Compression and Quality
The goal is not to compress as much as possible. The goal is to find the sweet spot. Here are some practical tips to help you get there.
- Start with the right format. Use JPEG for photos, PNG for graphics, and WebP for modern web use.
- Test different compression levels. Save the same image at multiple quality settings. Compare them side by side.
- Use responsive images. Serve smaller images to mobile devices and larger ones to desktops.
- Avoid re-compressing. Once you compress an image, keep the original. Never compress an already-compressed file.
- Use compression tools wisely. Tools like TinyPNG, ImageOptim, and ShortPixel can help you find the best balance.
- Consider your audience. If your visitors are on slow connections, lean toward more compression. If they are on fast connections, you can afford less.
Quick Tips for Better Compression Results
Here are some fast tips you can use right now. First, always keep a copy of your original image before compressing. Second, use progressive JPEG loading for web photos. It displays a low-quality version first and then sharpens as it loads. Third, resize your images before compressing. A 4000-pixel-wide photo does not need to be served at full size on a website. Fourth, automate your workflow with plugins or scripts so you do not have to compress images manually every time.
Common Mistakes People Make with Image Compression
Even well-meaning people make mistakes when compressing images. Here are the ones to avoid.
- Compressing everything the same way. Not all images are the same. Photos and graphics need different treatment.
- Over-compressing photos. Pushing the quality slider too low creates ugly artifacts. Stay in the 70-85 percent range for most photos.
- Ignoring the target use. An image for a thumbnail does not need the same quality as a hero banner.
- Forgetting about alt text. Compression does not replace descriptive alt text. Both matter for accessibility and SEO.
- Using the wrong tool. Not all compression tools are equal. Some are better for photos, others for graphics.
Expert Insights on Image Compression
Web performance experts agree that image compression is one of the single most effective ways to improve site speed. According to Google’s PageSpeed Insights team, images often account for the largest portion of page weight. Compressing them properly can cut load times in half or more. The key is to use modern formats like WebP, implement lazy loading, and serve responsive image sizes.
Designers and photographers often worry about quality loss. The solution is to test different compression settings and find what works for each specific image. There is no one-size-fits-all setting. The best approach is always to compare compressed versions against the original and decide case by case.
For e-commerce sites, the stakes are even higher. Product images need to look great because they directly affect buying decisions. But they also need to load fast because slow pages cost sales. Finding the right compression ratio for product photos is a critical part of online store optimization.
How Image Compression Affects SEO and User Experience
The connection between image compression and SEO is strong and well-documented. Google has confirmed that page speed is a ranking factor. Images are the biggest contributor to page weight on most sites. When you compress your images, you directly improve your speed score. This sends positive signals to search engines.
But SEO is not the only factor. User experience matters just as much. Visitors who have a fast, smooth experience stay longer. They browse more pages. They buy more products. They come back again. Slow sites with heavy images lose visitors at every step. Compression helps you keep them.
Core Web Vitals, Google’s set of user experience metrics, include metrics like Largest Contentful Paint (LCP). Images are often the largest element on a page. Compressing them helps your LCP score. A good LCP score can boost your rankings and keep visitors happy at the same time.
Conclusion
Image compression is a powerful tool, but it is not a magic fix. It comes with clear advantages like faster load times, better SEO, lower bandwidth costs, and improved user experience. At the same time, it has real disadvantages including quality loss, visual artifacts, and resolution reduction. The key is to understand your needs and choose the right approach for each situation.
Use lossy compression for web photos where speed matters most. Use lossless compression when quality cannot be compromised. Choose the right format for each image type. And always keep your originals safe. When you balance these factors thoughtfully, you get the best of both worlds. Fast, efficient websites with images that still look great.
Take what you have learned here and apply it to your own images today. Try different compression settings. Test the results. And build a workflow that works for you. The right image compression strategy can transform your website performance and your visitors’ experience.
Frequently Asked Questions
What is the main disadvantage of image compression?
The main disadvantage is the loss of image quality. Lossy compression permanently removes data from your image. This can cause blurriness, color shifts, and visual artifacts. The more you compress, the worse the quality becomes.
Does image compression affect SEO?
Yes, it does. Compressed images load faster, and page speed is a Google ranking factor. Faster sites get better SEO rankings. They also provide a better user experience, which reduces bounce rates and keeps visitors engaged longer.
Is lossless compression better than lossy compression?
It depends on your needs. Lossless compression preserves every detail but offers smaller size reductions. Lossy compression gives you much smaller files but reduces quality. For web photos, lossy is usually the better choice. For graphics and logos, lossless works best.
Can I compress images without losing quality?
You can use lossless compression to reduce file size without any quality loss. However, the size reduction is much smaller than with lossy methods. You can also resize images before compressing them to achieve smaller files with minimal quality impact.
What is the best image format for compression?
WebP is currently one of the best formats for compression. It supports both lossy and lossless modes and produces smaller files than JPEG and PNG. JPEG is still the most widely supported format for photographs on the web.
How much should I compress my images?
A good starting point is to compress photos to 70-85 percent quality. This gives you significant file size reduction while keeping the image looking natural. Always compare the compressed version to the original before publishing it on your site.
=== CONCLUSION ===
Image compression disadvantages and advantages both play an important role in how you manage and share digital images. The advantages of faster load times, better SEO, and lower costs are hard to ignore. But the disadvantages of quality loss, artifacts, and resolution reduction are equally real. The best approach is always balanced and informed. Test different methods, keep your originals, and choose the right settings for each image. With the right strategy, you get speed without sacrificing the quality your audience deserves.