How Do I Use Apple Pay On My Iphone Full Step Tutorial
Learning how do I use Apple Pay on my iPhone is easier than you think. This complete tutorial walks you through every step, from setting up your cards to making secure payments in stores and online. You will also learn tips for managing settings, fixing common issues, and keeping your data safe.
Have you ever stood in a checkout line and wished you could just tap your phone to pay? That is exactly what Apple Pay lets you do. If you own an iPhone, you already have one of the most convenient payment tools right in your pocket. Many people want to learn how do I use Apple Pay on my iPhone, and the good news is that it is simpler than you might think.
This full step-by-step tutorial will guide you through everything you need to know. We will cover setting up Apple Pay, adding your cards, making payments, and keeping your account safe. Whether you are a complete beginner or just need a refresher, this guide has you covered. By the end, you will feel confident using Apple Pay on your iPhone every single day.
Let us be honest. Paying with your phone feels a little futuristic at first. But once you try it a couple of times, you will wonder how you ever lived without it. No more fumbling for your wallet. No more typing in card numbers on websites. Just a quick tap, and you are done. That is the power of using Apple Pay on iPhone, and we are about to show you how to get started.
Key Takeaways
- Simple Setup: Adding a card to Apple Pay takes just a few minutes right from your iPhone.
- Secure Payments: Apple Pay uses tokenization and Face ID to keep your transactions safe.
- Works Everywhere: You can use Apple Pay in stores, apps, and on websites with just a tap.
- Easy Card Management: You can add, remove, and set default cards anytime in the Wallet app.
- Common Issues Have Fixes: Most Apple Pay problems can be solved with a few simple steps.
- Great for Beginners: This tutorial covers everything from setup to advanced tips for new users.
📑 Table of Contents
- What Is Apple Pay and Why Should You Use It?
- How to Set Up Apple Pay on Your iPhone
- How to Make a Payment Using Apple Pay
- Managing Your Cards and Settings
- Apple Pay Security and Privacy
- Troubleshooting Common Apple Pay Issues
- Expert Tips for Getting the Most Out of Apple Pay
- Key Takeaways
- Conclusion
What Is Apple Pay and Why Should You Use It?
Apple Pay is a digital wallet service built right into your iPhone. It lets you pay for things without pulling out a physical card. Instead, you hold your phone near a payment terminal and use Face ID or Touch ID to confirm the purchase. It works in stores, inside apps, and on websites. Think of it as your digital wallet that lives on your phone.
There are many reasons why people love Apple Pay for iPhone users. First, it is incredibly fast. A transaction takes just seconds. Second, it is very secure. Apple does not store your actual card number on your phone or on their servers. Instead, they use something called tokenization, which creates a unique code for each transaction. Third, it is widely accepted. Millions of stores around the world support contactless payment through Apple Pay.
What Makes Apple Pay Different From Other Payment Apps?
You might be wondering how Apple Pay compares to other mobile payment apps. The main difference is the ecosystem. Apple Pay is designed specifically for Apple devices. This means it works seamlessly with your iPhone, Apple Watch, iPad, and Mac. Other apps might work across different platforms, but Apple Pay is optimized for the Apple experience. The integration is smooth, the interface is clean, and the security features are top-notch.
Another big advantage is that Apple Pay does not charge you extra. Most banks and credit card companies do not add any fees for using Apple Pay. You pay the same amount as you would with a physical card. That makes it a great choice for everyday spending.
Benefits of Using Apple Pay on Your iPhone
Here are some of the top benefits of adding Apple Pay to your daily routine:
- Speed: Payments take just a second or two. No need to swipe or insert a card.
- Convenience: You always have your phone with you. You never need to carry a physical wallet for small purchases.
- Security: Your real card number is never shared with merchants. Each transaction uses a unique code.
- Privacy: Apple does not track what you buy or where you shop.
- Rewards: You can still earn points, cash back, and miles from your credit card when you use Apple Pay.
- Easy Returns: Many stores let you return Apple Pay purchases just like any other card payment.
How to Set Up Apple Pay on Your iPhone
Now let us get into the details. If you have been asking how do I use Apple Pay on my iPhone, this is where the magic happens. Setting up Apple Pay is quick and straightforward. You just need a few minutes and your iPhone.
Adding a Card to Apple Pay
Before you can make any payment, you need to add a card to your Apple Pay wallet. Here is exactly how to do it:
- Open the Wallet app. Look for the purple icon with three cards stacked on your home screen. If you cannot find it, swipe down on your screen and search for “Wallet.”
- Tap the plus sign (+). This button is in the top-right corner of the screen. It will start the card addition process.
- Choose your card type. You can add a debit card, a credit card, or a store card. Tap the option that matches what you want to use.
- Follow the on-screen prompts. You can either scan your card using the camera or type the details manually. Scanning is faster and less error-prone.
- Agree to the terms. Your bank or card issuer will need to verify your identity. You might receive a text message or a call to confirm.
- Tap “Done.” Once your bank approves the card, it will appear in your Wallet app and be ready to use.
That is it! You have just added your first card to Apple Pay on iPhone. You can repeat this process to add multiple cards. Most people add one or two cards and keep it simple. But you are free to add as many as you like.
Setting Up Apple Pay Cash
Apple Pay also includes a feature called Apple Pay Cash. This lets you send and receive money directly through the Messages app. It is like Venmo or Cash App, but built right into your iPhone. To set it up, go to Settings, tap Wallet & Apple Pay, and follow the prompts to add a funding source. You can then use Apple Pay Cash to split bills, pay friends, or send money to family.
Checking if Your Card Is Compatible
Not all cards work with Apple Pay, though most major banks do. Before you try to add a card, check with your bank or card issuer. Popular banks like Chase, Bank of America, and Wells Fargo all support Apple Pay. If your bank does not currently support it, they may add it in the future. You can also check Apple’s official website for a full list of compatible banks and cards.
How to Make a Payment Using Apple Pay
Once your card is set up, you are ready to pay. There are two main ways to use Apple Pay: in-store and online. Both are simple and fast.
Making In-Store Payments
Paying in a physical store with Apple Pay is one of the best feelings ever. Here is what to do:
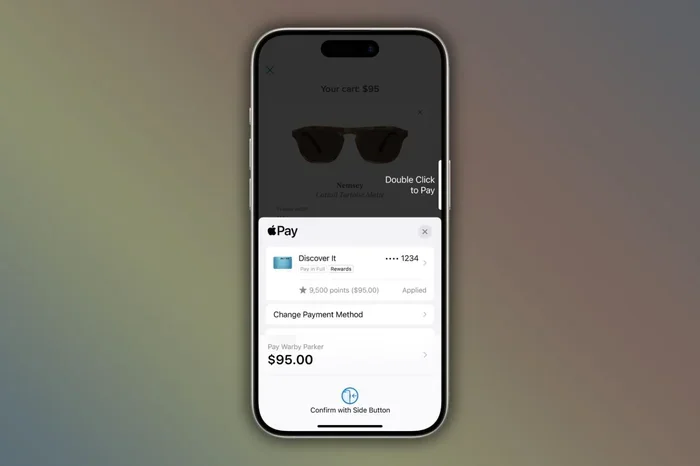
- Double-click the side button. On iPhone models with Face ID, quickly press the side button twice. On older models with Touch ID, double-click the Home button.
- Authenticate yourself. Look at your iPhone to confirm with Face ID, or place your finger on the Home button.
- Hold your phone near the reader. Position the top of your iPhone near the contactless payment symbol on the terminal.
- Wait for the beep or checkmark. You will feel a gentle vibration or hear a sound confirming the payment went through.
That is all there is to it. No unlocking your phone, no opening an app, and no handing over your card. Just a quick tap and you are on your way. This is why so many people love contactless payment with Apple Pay.
Making Online and App Payments
You can also use Apple Pay when shopping online or inside apps. The process is just as easy:
- Look for the Apple Pay button. During checkout, you will see the Apple Pay logo or a “Pay with Apple Pay” option.
- Tap the button. This will bring up your saved cards.
- Select the card you want to use. You can choose from any card you have added to Wallet.
- Confirm the payment. Use Face ID, Touch ID, or your passcode to complete the transaction.
One of the best things about Apple Pay for online shopping is that you do not have to type in your card number. This saves time and adds an extra layer of security because the merchant never sees your real card details.
Using Apple Pay in Safari
If you shop using the Safari browser on your iPhone, Apple Pay works there too. When you reach the checkout page, look for the Apple Pay button at the bottom of the screen. Tap it, confirm your card, and the payment is processed. It is one of the fastest ways to complete an online purchase.
Managing Your Cards and Settings
After you start using Apple Pay, you will want to know how to manage your cards and adjust your settings. This is where you can customize your experience and keep everything running smoothly.
Adding and Removing Cards
You can add new cards anytime by opening the Wallet app and tapping the plus sign. To remove a card, simply tap on it in the Wallet app, scroll down, and select “Remove Card.” Removing a card does not cancel the physical card with your bank. It only removes it from your digital wallet.
Setting a Default Card
If you use multiple cards, you can set a default card so it is always the first one shown when you pay. To do this, open the Wallet app, tap your card, scroll down, and select “Default Card.” This small trick can save you a lot of time when you are in a hurry.
Updating Expired or Changed Cards
When a card expires or you get a replacement card, you will need to update it in Apple Pay. Sometimes the update happens automatically. Other times, you will need to remove the old card and add the new one. Check your Wallet app regularly to make sure all your information is current.
Apple Pay Limits and Transaction Rules
Every bank sets its own limits for Apple Pay transactions. Some banks limit contactless payments to a certain amount, like $100 or $200. After that, you may need to enter a PIN or sign. These limits vary by bank and card type. If you are unsure about your limits, check with your bank or card issuer.
Apple Pay Security and Privacy
One of the biggest concerns people have about digital payments is security. The good news is that Apple Pay is one of the safest payment methods available. Apple has built multiple layers of protection into the system.
How Apple Pay Protects Your Data
When you add a card to Apple Pay, your actual card number is never stored on your phone or on Apple’s servers. Instead, Apple creates a unique Device Account Number for each card. This number is encrypted and stored in a secure chip on your iPhone called the Secure Element. When you make a payment, Apple Pay uses this unique number along with a one-time transaction code. This means that even if a merchant’s system is hacked, your real card number is never exposed.
This process is called tokenization, and it is a big reason why Apple Pay security is so strong. Your payment data stays private and protected at every step.
What Happens If You Lose Your Phone?
If your iPhone is lost or stolen, you can use the Find My app to put your phone in Lost Mode. This suspends all payment capabilities, including Apple Pay. You can also erase your device remotely. No one will be able to use Apple Pay on your phone without your passcode, Face ID, or Touch ID. This gives you peace of mind even if your phone is not in your hands.
Privacy Features of Apple Pay
Apple takes your privacy seriously. When you use Apple Pay for transactions, Apple does not track what you buy or where you shop. The transaction details are only shared with your bank or card issuer, and only for processing the payment. Apple does not sell your purchase data to advertisers or third parties.
Troubleshooting Common Apple Pay Issues
Even though Apple Pay is reliable, you might run into issues from time to time. Here are some common problems and how to fix them.
Apple Pay Not Working
If Apple Pay is not responding, try these steps:
- Restart your iPhone. A simple reboot can often fix temporary glitches.
- Check your card balance. Make sure you have enough funds or credit available.
- Update your iPhone. Go to Settings, tap General, then Software Update, and install any available updates.
- Remove and re-add the card. Sometimes removing the card and adding it back again resolves the issue.
- Contact your bank. Your card issuer may need to refresh the card on their end.
Card Declined During Payment
If your card is declined when you try to pay with Apple Pay, it is usually not an Apple Pay issue. It is a problem with the card itself. Check that the card is active, not expired, and has sufficient funds. You should also make sure your bank has not flagged the transaction for review. Contacting your bank directly is the best next step.
Apple Pay Not Showing in Apps or Websites
If the Apple Pay button does not appear during online checkout, make sure you have at least one card added to Wallet. Also, check that your card is supported for online payments. Some cards are set up for in-store use only. If you are still having trouble, try updating your iOS to the latest version.
Touch ID or Face ID Not Working for Apple Pay
If your biometric authentication is not working, you can still pay using your passcode. Simply hold your phone near the reader and enter your passcode when prompted. You should also check your Face ID or Touch ID settings to make sure they are set up correctly.
Expert Tips for Getting the Most Out of Apple Pay
Here are some practical tips to help you get the best experience with Apple Pay on iPhone:
- Use Apple Watch for faster payments. If you have an Apple Watch, you can pay with a simple double-click of the side button. It is even faster than using your phone.
- Enable transaction notifications. Turn on alerts in the Wallet app so you get a notification every time you use Apple Pay. This helps you track your spending and catch any unauthorized transactions quickly.
- Add your loyalty cards to Wallet. Many stores let you save loyalty cards and rewards cards in the Wallet app. You can use them right alongside your payment cards.
- Use Express Mode for transit cards. If you use Apple Pay for transit, you can set Express Mode so you do not need to authenticate every time. Just hold your phone to the reader and go.
- Keep your Wallet organized. Put your most-used card first in the Wallet app. This makes it the default and saves you time at checkout.
Key Takeaways
- Easy Setup: Adding a card to Apple Pay takes just a few minutes right from your iPhone.
- Secure Payments: Apple Pay uses tokenization and Face ID to keep your transactions safe.
- Works Everywhere: You can use Apple Pay in stores, apps, and on websites with just a tap.
- Easy Card Management: You can add, remove, and set default cards anytime in the Wallet app.
- Great for Beginners: This tutorial covers everything from setup to advanced tips for new users.
- Strong Privacy: Apple does not track your purchases or share your data with merchants.
Conclusion
Learning how do I use Apple Pay on my iPhone is one of the best things you can do to simplify your daily life. From the moment you set up your first card to the hundreds of tap-and-pay transactions that follow, Apple Pay makes everything faster and easier. You get the convenience of a digital wallet, the security of advanced encryption, and the peace of mind that comes from knowing your data is protected.
We have covered everything in this tutorial. You now know how to set up Apple Pay, add cards, make in-store and online payments, manage your settings, and troubleshoot common issues. You also understand the security features that make Apple Pay one of the safest payment methods available today.
The best part is that you do not need to be a tech expert to use it. If you can open an app and tap a button, you can use Apple Pay. Give it a try on your next purchase. You will be amazed at how quickly it becomes a habit. Once you start using Apple Pay on iPhone, you will wonder why you ever waited so long to make the switch.
So go ahead. Open your Wallet app, add a card, and start tapping your way to a smoother, faster, and more secure payment experience. Apple Pay is ready whenever you are.
Frequently Asked Questions
Do I need an internet connection to use Apple Pay?
No, you do not need Wi-Fi or cellular data to make an Apple Pay payment in stores. Your iPhone uses NFC technology to communicate with the payment terminal. However, you do need an internet connection when you first add a card or when making online payments through apps and websites.
Can I use Apple Pay on more than one iPhone?
Yes, you can add Apple Pay to multiple iPhones. However, each device needs to be set up separately with your own cards. You can also add cards to other Apple devices like your Apple Watch, iPad, and Mac using the same Apple ID.
Is Apple Pay free to use?
Apple does not charge any fees for using Apple Pay. However, your bank or card issuer may have their own fees for certain types of transactions. Most people use Apple Pay without paying any extra fees at all. It is a completely free way to pay with your iPhone.
What should I do if my Apple Pay card is declined?
First, check that your card has enough funds or credit available. Make sure the card is active and not expired. If everything looks fine, try removing the card from Apple Pay and adding it again. If the problem continues, contact your bank or card issuer directly for help.
Can I add a debit card to Apple Pay?
Yes, you can add both debit cards and credit cards to Apple Pay. Most major banks support debit cards on Apple Pay. Simply open the Wallet app, tap the plus sign, and follow the prompts to add your debit card. You can use it for in-store and online purchases just like a credit card.
How do I know if a store accepts Apple Pay?
Look for the contactless payment symbol at the checkout terminal. It looks like a sideways Wi-Fi signal or a hand holding a card. Many stores also display the Apple Pay logo near the register. You can also ask the cashier if they accept contactless payments before you start shopping.