Can You Mount Projector On Drywall Without Any Damage
Yes, you can mount a projector on drywall without damage if you use the right anchors, brackets, and techniques. This guide walks you through every step, from choosing the right mounting hardware to protecting your walls and getting the perfect projector screen height. You will learn how to set up a stunning home theater on drywall safely and confidently.
Have you ever dreamed of turning your living room into a home theater? A wall-mounted projector creates a cinematic experience right in your own home. But if your walls are drywall, you might worry about causing damage. The good news is that mounting a projector on drywall is totally doable without ruining your walls.
In this guide, we will walk you through everything you need to know. From picking the right projector bracket to choosing the best drywall anchors, we have you covered. You will learn how to mount your projector safely, protect your walls, and enjoy a big screen without any headaches. Let us get started.
Key Takeaways
- Drywall mounting is possible: You can safely mount a projector on drywall using the right anchors and brackets without damaging your walls.
- Choose the right hardware: Toggle bolts and drywall anchors rated for your projector weight are essential for a secure hold.
- Protect your walls: Using wall plates, cable covers, and proper installation techniques keeps your drywall looking clean and undamaged.
- Height matters: Mounting at the correct projector screen height ensures the best viewing experience and reduces strain on the wall.
- Cable management is key: Hiding cables properly prevents damage and gives your setup a professional, clean look.
📑 Table of Contents
- Can You Mount a Projector on Drywall?
- What You Need to Mount a Projector on Drywall
- Step-by-Step Guide to Mounting Your Projector
- Protecting Your Drywall from Damage
- Best Practices for Projector Screen Height on Drywall
- Projector Mounting Options for Drywall Walls
- Common Mistakes to Avoid When Mounting a Projector on Drywall
- Expert Tips for a Professional-Looking Setup
- How to Remove a Projector Mount Without Damaging Drywall
- Final Thoughts
Can You Mount a Projector on Drywall?
The short answer is yes. You absolutely can mount a projector on drywall. Many people do it every day without any problems. The key is using the right mounting hardware and following proper installation steps. Drywall is strong enough to hold a projector when you use the correct anchors and distribute the weight properly.
However, drywall alone is not very strong. It is a thin layer of gypsum board over paper. If you just screw into it without anchors, the projector will pull out of the wall over time. This is why choosing the right projector mounting solution matters so much.
Understanding Drywall Weight Limits
Drywall can hold a surprising amount of weight when you use the right hardware. A single drywall anchor can hold between 10 and 50 pounds depending on the type. Most projectors weigh between 5 and 15 pounds. So with the right drywall anchors, your projector will stay put safely.
Here are some quick weight guidelines for common anchor types:
- Plastic expansion anchors: Hold up to 10 pounds each. Best for light projectors.
- Toggle bolts: Hold up to 50 pounds each. Great for heavier projectors.
- Self-drilling anchors: Hold up to 25 pounds each. Easy to install and very reliable.
- Molly bolts: Hold up to 25 pounds each. A solid choice for most setups.
Always check your projector weight before buying anchors. If your projector is heavy, use multiple anchors to spread the load. This keeps your wall mount projector secure and your walls intact.
What You Need to Mount a Projector on Drywall
Before you start drilling, gather all your tools and materials. Having everything ready makes the process smooth and fast. Here is a complete list of what you need for a successful projector installation on drywall.
Essential Tools and Materials
- Projector wall mount bracket: Choose one that fits your projector model and weight.
- Drywall anchors: Toggle bolts or self-drilling anchors work best for most projectors.
- Stud finder: Helps you locate studs behind the drywall for extra support.
- Drill with appropriate bits: A cordless drill makes the job much easier.
- Level: Ensures your projector sits perfectly straight on the wall.
- Measuring tape: For finding the right mounting height.
- Pencil: For marking drill holes.
- Screwdriver: To tighten screws and secure the bracket.
- Cable management clips: Keeps wires neat and off the floor.
You might also want a projector ceiling mount if you prefer mounting from above. Some people find ceiling mounting easier on drywall because it spreads the weight over a larger area. But wall mounting works great too when done right.
Step-by-Step Guide to Mounting Your Projector
Now let us get into the fun part. Follow these steps carefully and your projector wall mount will look professional and stay secure for years.
Step 1: Choose the Right Location
Pick a spot on your wall that faces your seating area. Think about the projector screen size you want and how far the projector needs to be from the wall. A good rule of thumb is to place the projector about 8 to 12 feet from the screen for a 100-inch image.
Also consider the ambient light in the room. Mounting the projector on a wall that faces away from windows gives you the best picture quality. Less light hitting the screen means sharper, more vibrant images.
Step 2: Find the Studs
Use a stud finder to locate the wooden studs behind your drywall. Studs are the strongest points in your wall. If you can hit at least one stud with your bracket, that is ideal. The stud will carry most of the weight.
But what if you cannot find a stud in the right spot? No worries. You can still mount safely using heavy-duty drywall anchors. Toggle bolts are the best option here because they distribute the weight across a large area of drywall.
Step 3: Mark Your Drill Points
Hold the bracket against the wall and use a level to make sure it is straight. Mark the drill holes with a pencil. Double-check your measurements before you start drilling. A small mistake can mean extra holes in your wall.
If you are using a projector bracket with a built-in level, this step becomes much easier. Just place the bracket on the wall, adjust until the bubble is centered, and mark your points.
Step 4: Drill the Holes
Drill into the marked spots carefully. Use the right size drill bit for your anchors. The hole should be just slightly smaller than the anchor. Go slow and steady to avoid cracking the drywall.
If you hit a stud, you can screw directly into it. If not, install your toggle bolts or self-drilling anchors into the holes. Make sure each anchor is snug and secure before moving on.
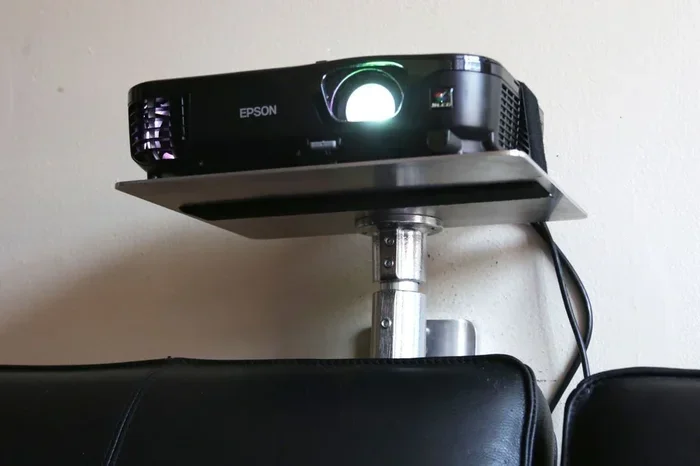
Step 5: Attach the Bracket
Screw the mounting bracket into the anchors or studs. Tighten all screws firmly but do not over-tighten. Over-tightening can crack the drywall around the anchor. Once the bracket is secure, give it a gentle tug to make sure it does not move.
Step 6: Mount the Projector
Now attach your projector to the bracket. Most projectors have standard mounting holes on the bottom. Line up the projector with the bracket and secure it with the provided screws. Make sure everything is tight and the projector is level.
Step back and admire your work. Your wall mount projector is now ready to go. But wait, there are a few more things to consider for the best setup.
Protecting Your Drywall from Damage
One of the biggest concerns people have is damaging their drywall during installation. The good news is that you can prevent almost all damage with a few smart choices.
First, always use a wall plate around the mounting bracket. A wall plate covers the screw heads and gives the installation a clean, finished look. It also protects the drywall surface from scratches during installation.
Second, avoid over-tightening screws. Tighten just enough to hold the projector securely. If you crank down too hard, you will crack the drywall surface. A snug fit is all you need.
Third, consider using cable management clips to route wires along the wall. Exposed cables can snag on furniture or curtains and pull on the mount. Hidden cables keep everything safe and looking clean.
When you are ready to remove the projector, fill the holes with spackle and sand them smooth. Your drywall will look as good as new. This makes projector mounting a completely reversible process.
Best Practices for Projector Screen Height on Drywall
The height of your projector screen makes a huge difference in your viewing experience. Mounting the projector at the wrong height can cause neck strain and poor image quality.
For the best results, mount the projector so the center of the lens is at seated eye level. This is usually about 4 to 5 feet from the floor. If you mount the projector too high, the image will tilt downward and look distorted. Too low and you will be looking up at the screen uncomfortably.
Here are some quick tips for finding the perfect height:
- Sit in your main viewing position and have someone help you measure.
- Use a laser pointer from the projector to mark where the image hits the screen.
- Consider a projector lift if you want to hide the projector when not in use.
- Mount the projector slightly below center for a keystone-free image.
Getting the height right means less image correction and a sharper picture. Your home theater setup will feel much more professional when everything is aligned properly.
Projector Mounting Options for Drywall Walls
Not all projector mounts are the same. Different types work better for different situations and wall types. Here is a quick comparison of the most popular projector mounting options for drywall.
| Mount Type | Best For | Drywall Support | Ease of Installation |
|---|---|---|---|
| Fixed Wall Mount | Ceiling-height placement | Good with toggle bolts | Very Easy |
| Tilting Wall Mount | Adjustable angle | Good with multiple anchors | Easy |
| Full-Motion Mount | Flexible positioning | Requires strong anchors | Moderate |
| Ceiling Mount | In-ceiling installation | Excellent with joist support | Moderate |
| Projector Lift | Hidden projector setup | Needs reinforced ceiling | Difficult |
For most drywall setups, a fixed wall mount or tilting wall mount works best. They are simple, secure, and easy to install. Full-motion mounts offer more flexibility but need stronger anchors because they extend further from the wall.
If you want to explore more about projector placement, check out our guide on using a projector on your wall. It covers great tips for getting the best image quality in any room.
Common Mistakes to Avoid When Mounting a Projector on Drywall
Even with the best intentions, mistakes happen. Here are the most common errors people make when setting up a wall mount projector and how to avoid them.
- Using the wrong anchors: Cheap plastic anchors will not hold a projector securely. Always use toggle bolts or heavy-duty self-drilling anchors rated for your projector weight.
- Skipping the level: A crooked projector ruins the viewing experience. Always use a level during installation. This small step makes a huge difference.
- Mounting too high: High mounts cause neck strain and distorted images. Keep the projector at seated eye level for the best comfort.
- Ignoring cable management: Exposed cables look messy and can pull on the mount over time. Use clips and covers to keep wires hidden.
- Not checking weight limits: Every anchor and bracket has a weight limit. Exceeding it can cause the projector to fall. Always double-check before you start.
- Drilling too many holes: Each extra hole weakens the drywall. Plan your layout carefully and mark everything before drilling.
Avoiding these mistakes will save you time, money, and frustration. A little planning goes a long way toward a clean, damage-free installation.
Expert Tips for a Professional-Looking Setup
Want your projector installation to look like it was done by a pro? Here are some expert tips that make all the difference.
First, paint your wall plate before mounting it. This way, any small gaps between the plate and the wall blend in perfectly. Your setup will look seamless and integrated into the wall.
Second, use a projector screen that matches the room size. A screen that is too large or too small for the room will make the setup feel off. Measure your seating distance and choose a screen size accordingly.
Third, consider the ambient light in your room. If you have large windows, use blackout curtains to improve picture quality. Less light on the screen means deeper blacks and more vivid colors.
Fourth, label your cables at both ends. When you need to troubleshoot or adjust something later, you will know exactly which cable does what. This simple step saves a lot of frustration.
Fifth, if you are planning a permanent setup, consider running cables inside the wall. This gives you the cleanest possible look. Just make sure you use rated in-wall cables and follow local electrical codes.
For more ideas on projector setup, check out our article on pairing your phone to a projector. It covers wireless connectivity tips that complement any wall-mounted setup.
How to Remove a Projector Mount Without Damaging Drywall
One of the best things about modern projector mounting is that it is reversible. When you want to move your projector or change the setup, you can remove it cleanly.
Start by unscrewing the projector from the bracket. Then remove the bracket screws from the wall. You will be left with a few holes where the anchors were. Fill these holes with spackle or drywall compound. Let it dry completely, then sand it smooth.
For a perfect finish, apply a thin layer of primer and paint to match your wall. The repair will be virtually invisible. Your drywall will look brand new, and you can mount a projector in a different spot whenever you want.
This reversibility is one of the biggest advantages of mounting a projector on drywall. You are not locked into one setup forever. You can always adjust and improve as your needs change.
Final Thoughts
Mounting a projector on drywall without damage is easier than you might think. With the right drywall anchors, a quality projector bracket, and careful installation, you can enjoy a big screen home theater without any worries about your walls. The key is to take your time, measure carefully, and use hardware rated for your projector weight.
Remember to protect your walls with wall plates and cable management. Choose the right mounting height for the best viewing experience. And when you are ready to move or remove the projector, the repair is simple and nearly invisible.
Your dream home theater is just a few steps away. Grab your tools, follow this guide, and enjoy the big screen on your drywall wall mount. Happy viewing.
Frequently Asked Questions
Can I mount a projector on drywall without a stud?
Yes, you can mount a projector on drywall without hitting a stud. Use heavy-duty toggle bolts or self-drilling drywall anchors rated for the weight of your projector. Multiple anchors spread the load and keep the mount secure. Always double-check the weight rating of your chosen anchors before installation.
What type of projector mount is best for drywall?
A fixed wall mount or tilting wall mount works best for drywall. These mounts are simple, secure, and distribute weight evenly. Toggle bolts paired with these mounts provide excellent hold. Avoid full-motion mounts unless you use extra-strong anchors rated for the load.
Will mounting a projector on drywall leave permanent damage?
No, mounting a projector on drywall does not have to cause permanent damage. Use wall plates and proper anchors, and when you remove the mount, fill the holes with spackle. A little primer and paint makes the repair nearly invisible. The process is fully reversible.
How far should I mount the projector from the wall?
Most fixed wall mounts mount the projector directly against the wall. However, some mounts have a small offset for cable clearance. Check your projector’s throw distance specifications to ensure the image size works for your room. A distance of 8 to 12 feet from the screen is typical for a 100-inch image.
Can I use a ceiling mount on drywall?
Yes, a ceiling mount can work on drywall if you hit a ceiling joist or use heavy-duty anchors. Ceiling mounts spread the projector weight over a larger area, which is helpful. Make sure your ceiling can support the weight and use appropriate hardware for the installation.
What is the best projector screen height for drywall mounting?
The best projector screen height places the center of the image at seated eye level, usually about 4 to 5 feet from the floor. This height reduces neck strain and provides the most comfortable viewing angle. Use a level and have someone help you mark the perfect spot before drilling.
=== CONCLUSION ===
Mounting a projector on drywall without damage is completely achievable with the right approach and the right tools. You have learned how to choose the best drywall anchors, pick the perfect projector bracket, and protect your walls throughout the process. From finding the ideal mounting height to managing cables like a pro, every step brings you closer to an incredible home theater experience. Follow the tips in this guide, avoid common mistakes, and enjoy a stunning big-screen setup that keeps your drywall looking perfect. Your next movie night is going to be unforgettable.