Can You Use Any Antenna For Motherboard Wifi Upgrade
Can you use any antenna for motherboard WiFi? The short answer is no — not every antenna will work with your motherboard’s wireless adapter. Motherboard WiFi antenna compatibility depends on the connector type, antenna gain, frequency band, and your board’s internal design. In this guide, we break down everything you need to know about upgrading your motherboard WiFi antenna to get better signal strength, faster WiFi speeds, and improved network performance.
Upgrading your wireless connection starts with understanding your hardware. Many users wonder whether they can swap out their existing antenna for something better. The truth is, the answer depends on several factors, including connector type, antenna gain, and your motherboard’s wireless capabilities. Can you use any antenna for motherboard WiFi upgrades? Not exactly, but the right upgrade can make a huge difference.
When your WiFi signal strength is weak or your internet speeds are slower than expected, the antenna on your motherboard WiFi module might be the culprit. A better antenna can improve your signal, extend your WiFi range, and boost overall network performance. But before you rush out to buy a replacement, you need to understand compatibility, connector types, and what makes an antenna right for your setup.
In this guide, we walk you through everything you need to know. We cover how motherboard WiFi antennas work, the different types available, how to choose the right one, and how to install it. Whether you are a casual user or a networking enthusiast, this guide will help you make the right decision for your WiFi upgrade.
Key Takeaways
- Not all antennas are compatible: Your motherboard WiFi antenna must match the connector type and form factor of your wireless adapter.
- Internal and external antennas serve different purposes: Internal antennas offer a clean look, while external antennas provide better WiFi signal strength and range.
- Antenna gain matters: Higher gain antennas can improve WiFi range but may reduce coverage width.
- Check your motherboard specs before buying: Always verify the WiFi standard, frequency band, and connector type your board supports.
- Upgrading your antenna can boost WiFi speed: A better antenna can significantly improve your wireless router connection and overall network performance.
- Installation is usually simple: Most motherboard WiFi antenna upgrades involve removing a cover and swapping out the existing antenna or connector.
📑 Table of Contents
- What Is a Motherboard WiFi Antenna?
- Can You Use Any Antenna for Motherboard WiFi?
- Types of WiFi Antennas for Motherboard Upgrades
- How to Choose the Right Antenna for Your Motherboard WiFi
- Step-by-Step Guide to Upgrading Your Motherboard WiFi Antenna
- Benefits of Upgrading Your Motherboard WiFi Antenna
- Conclusion
What Is a Motherboard WiFi Antenna?
A motherboard WiFi antenna is a small radio antenna built into or attached to your computer’s motherboard. It works with the WiFi adapter chip on your board to send and receive wireless signals. Think of it as the mouth and ears of your wireless connection — it picks up signals from your wireless router and sends data back and forth.
Most modern motherboards come with either an internal antenna or an external antenna connected via a cable. These antennas are designed to work with the specific WiFi standard and frequency band supported by your motherboard. The antenna connects to the WiFi module through an antenna connector, which is usually a U.FL, IPEX, or RP-SMA type.
How Do Internal and External Antennas Differ?
Internal antennas are hidden inside the computer case. They are flat, compact, and often built directly into the motherboard or attached to a small white plastic tab. They are great for a clean, clutter-free setup. However, they may not offer the best WiFi signal strength because they are surrounded by metal and other components.
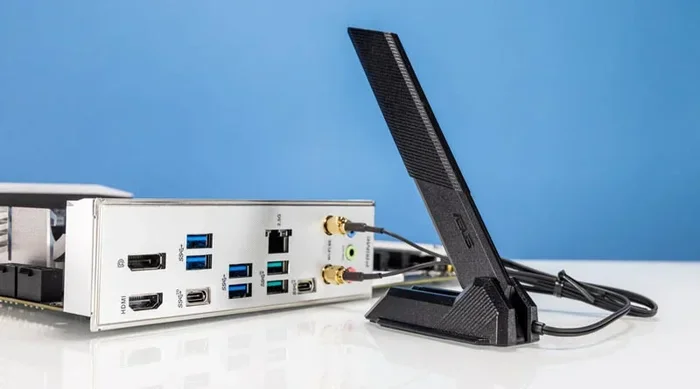
External antennas stick out from the back of your computer case. They are usually connected by a thin cable to the WiFi module on the motherboard. Because they are outside the case, they can pick up signals more effectively. This often results in better WiFi range and stronger network performance.
Quick Tip: If you are building a new PC or upgrading an existing one, consider whether a clean look (internal) or better signal (external) matters more to you. Both options have their place, and choosing the right one depends on your workspace and needs.
Can You Use Any Antenna for Motherboard WiFi?
The short answer is no. Can you use any antenna for motherboard WiFi upgrades? Not every antenna will work with every motherboard. The reason comes down to compatibility. Your motherboard WiFi module uses a specific connector, supports specific frequency bands, and is designed for a particular antenna type. Swapping in the wrong antenna can lead to poor performance or no connection at all.
Connector Types You Need to Know
The antenna connector is the most important factor in compatibility. Different motherboards use different connector types. Here are the most common ones:
- U.FL Connector: Also known as IPEX, this is a tiny connector commonly found on laptops and compact motherboards. It is delicate and not meant for frequent swapping.
- RP-SMA Connector: This is a larger, threaded connector often found on desktop motherboards and PCIe WiFi cards. It is easy to attach and detach.
- SMA Connector: Similar to RP-SMA but with a different pin configuration. Make sure you match the exact type to avoid damage to your RF connector points.
Before buying any replacement antenna, check your motherboard manual or look up the WiFi module model. The manual will tell you exactly which connector type you need. Using the wrong connector can damage your WiFi module and void your warranty.
Frequency Band Compatibility
WiFi antennas are designed for specific WiFi frequency band ranges. Most modern WiFi supports two main bands: 2.4 GHz and 5 GHz. Some antennas are single-band, meaning they only work on one frequency. Others are dual-band WiFi antennas that handle both bands.
If your motherboard supports dual-band WiFi, you should use a dual-band antenna. Using a single-band antenna will limit your connection to one frequency, which can reduce your WiFi speed and overall network performance. Always match your antenna to the frequency bands your motherboard supports.
Key Takeaway: Always match your antenna to your motherboard’s supported frequency bands. A dual-band antenna gives you the most flexibility and the best WiFi signal strength across both bands, making it the safest choice for most users.
Types of WiFi Antennas for Motherboard Upgrades
When it comes to upgrading your motherboard WiFi antenna, you have several options. Each type has its own advantages and trade-offs. Let us explore the most common choices so you can make an informed decision.
Internal Antennas
Internal antennas are built into the motherboard or attached as a small flat patch. They are popular in compact PCs, laptops, and office setups where aesthetics matter. These antennas are hidden from view, which keeps your desk clean and your cable management simple. However, they are limited by their size and placement, which can restrict WiFi signal strength.
External Antennas
External antennas are the go-to choice for users who want better WiFi range and stronger signals. They connect to the motherboard via a cable and protrude from the computer case. Because they are outside the metal enclosure, they can receive signals more clearly. External antennas come in different shapes and sizes, from simple dipole designs to high-gain directional models. The right choice depends on your environment and what you need from your WiFi adapter.
High-Gain Antennas
Antenna gain is measured in dBi (decibels isotropic). A higher gain number means the antenna can focus the signal in a specific direction. High-gain antennas can significantly improve WiFi range and WiFi signal strength, especially if your wireless router is far away. However, they have a trade-off: they focus the signal in one direction, which means they cover a narrower area. If you need coverage in all directions, a medium-gain omnidirectional antenna is a better choice.
| Antenna Type | Best For | Signal Strength | Coverage Area | Ease of Install |
|---|---|---|---|---|
| Internal Antenna | Clean look, compact builds | Moderate | Wide but limited | Very Easy |
| External Antenna | Better signal and range | Good | Wide and extended | Easy |
| High-Gain Antenna | Long-distance connections | Excellent | Narrow, focused | Moderate |
| Dual-Band Antenna | Maximum flexibility | Very Good | Wide on both bands | Easy |
Key Takeaway: Choose your antenna type based on your needs. If you want a clean setup, go with an internal antenna. If you need better signal strength and range, an external or high-gain antenna is the way to go. Always cross-reference with your motherboard specs before purchasing.
How to Choose the Right Antenna for Your Motherboard WiFi
Choosing the right antenna for your motherboard WiFi upgrade requires a bit of research. Here are the key factors to consider before making your purchase.
Check Your Motherboard Specs
Start by checking your motherboard manual or the manufacturer’s website. Look for the WiFi module model, supported WiFi standards (like WiFi 5, WiFi 6, or WiFi 6E), and the antenna connector type. This information tells you exactly what kind of antenna you can use.
Also check if your motherboard supports MIMO technology (Multiple Input Multiple Output). MIMO allows multiple antennas to work together for better WiFi speed and reliability. If your board supports MIMO, make sure your replacement antenna setup matches the number of supported streams for the best results.
Consider Your Environment
Your physical environment plays a big role in antenna performance. If you are in a large home with thick walls, a high-gain external antenna will help your WiFi signal strength reach farther. If you are in a small apartment close to your router, even a basic antenna may work fine.
Think about where your PC sits relative to your wireless router. The farther away you are, the more you benefit from a better antenna. Also consider interference from other electronics, microwaves, and Bluetooth devices, which can all affect your WiFi range and connection stability.
Match the WiFi Standard
WiFi standards have evolved over the years. The most common ones today are:
- WiFi 5 (802.11ac): Fast and reliable for most users. Works on the 5 GHz band and is still widely supported.
- WiFi 6 (802.11ax): Faster and more efficient, especially in crowded areas with many connected devices. Supports both 2.4 GHz and 5 GHz bands.
- WiFi 6E: The newest standard, adding the 6 GHz band for even less congestion and faster speeds. Best for advanced users and future-proofing.
Make sure your replacement antenna supports the same WiFi standard as your motherboard. Using an antenna designed for an older standard may limit your WiFi speed and network performance. When in doubt, choose a universal dual-band antenna that works across multiple standards.
Quick Tips:
- Always buy antennas from reputable brands to ensure quality and long-term reliability.
- Check if your WiFi driver is up to date before blaming the antenna — outdated drivers can cause the same issues as a bad antenna.
- If you are using a PCIe WiFi card instead of built-in WiFi, the antenna options are often more flexible and easier to swap.
- Consider a Bluetooth antenna if you also need to improve your Bluetooth connectivity alongside your WiFi connection.
Step-by-Step Guide to Upgrading Your Motherboard WiFi Antenna
Upgrading your motherboard WiFi antenna is easier than most people think. Follow this step-by-step guide to get the job done safely and correctly.
Step 1: Gather Your Tools
You will need a small Phillips-head screwdriver, an anti-static wrist strap (optional but recommended), and your new antenna. Make sure the new antenna matches the connector type and frequency band of your current setup. Having everything ready before you start makes the process smooth and stress-free.
Step 2: Power Down and Open Your Case
Shut down your computer completely and unplug it from the power outlet. Open the side panel of your PC case. Ground yourself by touching a metal part of the case to prevent static damage to your components. Static electricity can damage sensitive electronics, so this step is important even if it seems minor.
Step 3: Locate the Existing Antenna
Find the antenna connected to your WiFi module on the motherboard. It is usually a small cable with a U.FL or RP-SMA connector on one end and the antenna on the other. Some motherboards have the antenna built in and attached directly to the board. Take a photo before disconnecting anything so you can reference it later.
Step 4: Disconnect the Old Antenna
Gently disconnect the old antenna from the WiFi module. For U.FL connectors, pull straight up — do not yank the cable. For RP-SMA connectors, twist counterclockwise to unscrew. Be careful not to damage the connector or the WiFi module. If the connector feels stuck, check that you are pulling in the right direction.
Step 5: Connect the New Antenna
Attach your new antenna to the WiFi module. For U.FL connectors, press the connector firmly into place until it clicks. For RP-SMA connectors, twist clockwise until snug. Do not overtighten, as this can strip the threads or damage the connector. A secure but gentle fit is all you need.
Step 6: Close Up and Test
Replace the side panel, plug in your computer, and power it on. Check your WiFi settings to see if the new antenna is detected. Run a speed test and walk around your home to check for improved WiFi signal strength and WiFi range. Compare the results to your previous setup to see the real difference.
Common Mistakes to Avoid
- Forcing a connector: If an antenna does not fit, do not force it. You may be using the wrong connector type, which can damage your WiFi module permanently.
- Ignoring driver updates: After any hardware change, always update your WiFi driver to ensure the best performance and compatibility with the new antenna.
- Buying an incompatible antenna: Always double-check the connector type and frequency band before purchasing. A mismatch can lead to no signal at all or degraded performance.
- Placing the antenna poorly: Even the best antenna will underperform if it is placed near metal objects or other electronics that cause interference. Position it carefully for the best results.
Expert Insight: According to networking professionals, the biggest mistake users make when upgrading their motherboard WiFi antenna is not checking compatibility first. Always verify the connector type, WiFi standard, and frequency band before making a purchase. A five-minute check can save you from buying the wrong part and wasting money.
Key Takeaway: Follow the steps carefully, take your time, and double-check compatibility. A successful antenna upgrade can dramatically improve your WiFi signal strength, WiFi range, and overall network performance. It is one of the simplest and most affordable upgrades you can make to your PC.
Benefits of Upgrading Your Motherboard WiFi Antenna
Upgrading your motherboard WiFi antenna is one of the most cost-effective ways to improve your wireless connection. Here are the main benefits you can expect from making the switch.
Better WiFi Signal Strength: A higher-quality antenna picks up weaker signals more effectively. This means fewer dropped connections and a more stable internet experience, especially in areas with weak coverage. You will notice the difference when you are at the edge of your router’s range.
Extended WiFi Range: With a better antenna, your computer can connect to your wireless router from farther away. This is especially helpful if your PC is in a different room or on a different floor from your router. No more sitting next to the router just to get a decent connection.
Faster WiFi Speeds: A stronger, clearer signal means faster data transfer rates. You will notice improvements in streaming, online gaming, and large file downloads. Buffering becomes a thing of the past, and video calls stay smooth and clear.
Improved Network Performance: Better antennas reduce interference and packet loss. This leads to smoother video calls, faster browsing, and a more reliable overall connection. Your entire online experience feels snappier and more responsive.
Future-Proofing Your Setup: Upgrading to a WiFi 6 or WiFi 6E compatible antenna ensures your system is ready for the latest wireless standards. This can extend the useful life of your motherboard and WiFi setup, saving you money in the long run.
Key Takeaway: A motherboard WiFi antenna upgrade is a simple, affordable way to get better signal strength, faster speeds, and more reliable connectivity. It is one of the easiest WiFi upgrades you can make, and the results are noticeable from day one.
Conclusion
So, can you use any antenna for motherboard WiFi? The answer is no, not any antenna. But with the right knowledge, you can find the perfect antenna to match your motherboard and get the most out of your wireless connection. The key is understanding connector types, frequency bands, antenna gain, and your motherboard’s WiFi specifications.
Upgrading your motherboard WiFi antenna does not have to be complicated. Whether you choose an internal antenna for a clean look or an external antenna for better signal strength, the right choice can transform your WiFi experience. From improved WiFi range to faster WiFi speeds, the benefits are clear and immediate.
Take the time to check your motherboard specs, choose a compatible antenna, and follow the installation steps carefully. Your wireless router will thank you, and your internet experience will be better for it. A small change like this can make a big difference in your daily use, whether you are working from home, streaming your favorite shows, or gaming online.
Start your WiFi upgrade today. Your better signal is just one antenna away.
Frequently Asked Questions
Can I use a router antenna on my motherboard WiFi?
In most cases, no. Router antennas and motherboard WiFi antennas use different connectors and are designed for different purposes. Router antennas are typically larger and have different gain ratings. Always check the connector type and compatibility before attempting any swap. Using the wrong antenna can damage your WiFi module or provide poor performance.
What is the best antenna gain for a motherboard WiFi upgrade?
For most users, an antenna with 3 to 5 dBi gain offers the best balance between range and coverage area. Higher gain antennas (7 dBi or more) are great for long-distance connections but focus the signal in a narrower beam. Choose based on whether you need wider coverage or longer reach in a specific direction.
Do I need to update my WiFi driver after replacing the antenna?
Yes, it is a good practice to update your WiFi driver after any hardware change. Updated drivers ensure your motherboard WiFi module communicates properly with the new antenna. They can also fix bugs and improve overall network performance. Visit your motherboard manufacturer’s website to download the latest driver.
Can I upgrade my motherboard WiFi antenna to support WiFi 6?
Not exactly. The antenna alone does not determine the WiFi standard — your WiFi adapter chip does. However, a dual-band antenna with proper MIMO support can help you get the most out of a WiFi 6 connection. To fully upgrade to WiFi 6, you may also need a WiFi 6 compatible PCIe card or a motherboard with built-in WiFi 6 support.
How much does a motherboard WiFi antenna upgrade cost?
A quality replacement antenna typically costs between $10 and $30. High-gain antennas or premium models may cost a bit more. Compared to replacing an entire WiFi card or motherboard, an antenna upgrade is one of the most affordable ways to boost your wireless connection and improve WiFi signal strength.
Will a better antenna improve my WiFi speed?
Yes, a better antenna can improve your WiFi speed by providing a stronger, more stable connection to your wireless router. However, the actual speed improvement depends on many factors, including your internet plan, your router’s capabilities, and the distance between your PC and the router. A better antenna helps, but it is not the only factor in WiFi speed.