Can You Add A USB To A Lamp And Power Your Devices
Adding a USB port to a lamp is a simple upgrade that lets you charge phones, tablets, and other devices while illuminating your space. Whether you DIY the modification or buy a ready-made USB lamp, this guide covers everything you need to know.
Have you ever wished your lamp could do more than just light up a room? What if that same lamp could also charge your phone, power a small fan, or run a USB light strip? The good news is that adding a USB to a lamp is simpler than most people think. Whether you are a DIY enthusiast or just looking for a convenient charging spot, a USB-powered lamp can transform any ordinary fixture into a multi-functional hub. In this guide, we will walk you through every step of the process, from choosing the right lamp to making the modification yourself.
Many homeowners are looking for ways to cut down on clutter and simplify their setups. A USB lamp with charging capability eliminates the need for extra power strips and adapters. You get lighting and device charging in one sleek unit. We will also explore ready-made options if you do not want to modify an existing lamp. By the end of this article, you will know exactly how to add USB functionality to your lamp and power your devices safely and efficiently.
If you are also exploring ways to simplify your home entertainment setup and reduce cable clutter, you might want to check out Alternatives To Dish Network And Directtv for cutting the cord on traditional TV services. A cleaner, more connected home starts with smart upgrades like USB-powered lighting.
Key Takeaways
- Easy DIY Option: You can add a USB port to most existing lamps with basic tools and a USB adapter.
- Multiple Lamp Types: USB lamps come in desk, bedside, floor, and wall-mounted styles for every room.
- Power Matters: Choose the right wattage and amperage to safely charge devices while lighting your space.
- Smart Features Available: Many modern USB lamps offer dimming, color temperature control, and wireless charging.
- Safety First: Always match voltage requirements and use quality adapters to prevent damage.
📑 Table of Contents
What Is a USB Lamp and Why Add USB to a Lamp?
A USB lamp is a lighting fixture that draws power through a USB connection instead of a traditional wall plug. These lamps can run directly from a USB wall adapter, a computer port, a power bank, or even a solar panel. The concept is straightforward. You replace or supplement the standard power input with a USB-compatible option.
There are several reasons why people choose to add USB to a lamp:
- Convenience: Charge your phone right next to your bed or desk without hunting for an outlet.
- Reduced Clutter: Fewer power cords and adapters mean a cleaner workspace or bedroom.
- Portability: USB lamps can run on portable battery packs, making them great for camping or power outages.
- Energy Efficiency: USB devices typically use less power, which can lower your electricity bill slightly.
- Multi-Functionality: One fixture serves two purposes: lighting and device charging.
The beauty of a USB lamp modification is that you do not need advanced electrical skills. Most projects take less than 30 minutes and require only basic tools. Whether you are upgrading a bedside table lamp or a desk lamp, the process is similar across most lamp types.
How USB Power Works in Lamps
USB power delivers 5 volts of direct current. Most standard USB ports provide up to 2.4 amps, which equals 12 watts of power. This is enough to charge most smartphones and small tablets. Some newer USB ports, like USB-C with Power Delivery, can deliver up to 100 watts. That is more than enough for a lamp and multiple devices at once.
When you wire USB to a lamp, you are essentially creating a parallel circuit. The lamp gets its power from the USB source, and a separate USB port or adapter provides power to your charging devices. The key is to make sure the USB power source can handle the combined wattage of the lamp and any connected devices.
Types of USB-Compatible Lamps
Not all lamps are created equal when it comes to USB compatibility. Some come with built-in USB ports right out of the box. Others need a simple modification. Here is a breakdown of the most popular types.
| Lamp Type | Built-in USB? | Easy to Modify? | Best For |
|---|---|---|---|
| Desk Lamp | Sometimes | Yes | Home office, study area |
| Bedside Lamp | Rarely | Yes | Bedroom charging station |
| Floor Lamp | Sometimes | Moderate | Living room, corner lighting |
| Clip-On Lamp | No | Easy | Temporary setups, camping |
| Wall-Mounted Lamp | Rarely | Moderate | Hallways, bathrooms |
For most people, a USB desk lamp is the easiest starting point. These lamps already have the internal wiring to handle low-voltage USB power. Adding a second USB port or replacing the existing power adapter with a USB-powered one is a quick job.
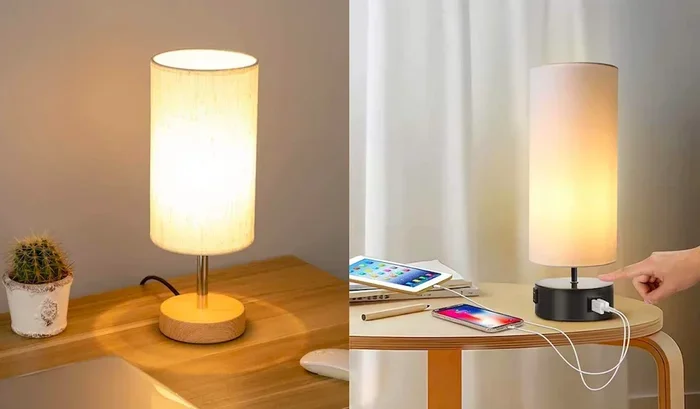
If you prefer a ready-made solution, many USB rechargeable lamps on the market today come with built-in batteries and USB ports. You charge the lamp itself via USB, and it runs for hours on battery power. These are perfect for bedside use or for people who like a clutter-free nightstand.
How to Add USB to Your Existing Lamp
Do you have a favorite lamp that you do not want to replace? You can still add USB functionality. Here is a step-by-step guide to modifying your existing lamp.
Step 1: Gather Your Tools and Materials
Before you start, make sure you have everything you need:
- A USB power adapter (5V, at least 2A recommended)
- A USB port or USB splitters
- Wire strippers
- Electrical tape or heat shrink tubing
- A small screwdriver set
- A multimeter (optional but helpful)
Step 2: Disassemble the Lamp Safely
Unplug the lamp from the wall. Remove the bulb and the lampshade. Carefully take apart the base of the lamp. Most lamp bases have a few screws or clips holding them together. Keep track of every screw and part. Take a photo before you disassemble anything so you can remember how it goes back together.
Step 3: Wire the USB Adapter
Locate the power wires inside the lamp base. You will see the positive and negative wires coming from the plug. Strip the ends of these wires carefully. Connect the positive wire to the USB adapter’s positive terminal and the negative wire to the negative terminal. Use electrical tape or heat shrink tubing to secure each connection. Make sure there are no exposed wires.
Once you have wired everything, test the connection before reassembling the lamp. Plug it in briefly and check that the lamp turns on and the USB port provides power. If everything works, go ahead and reassemble the lamp base.
Step 4: Mount the USB Port
Drill a small hole in the lamp base or shade to route the USB port through. Secure the USB port in place with hot glue or a small bracket. Make sure the port is easily accessible but does not interfere with the lamp’s stability.
If this process sounds intimidating, do not worry. You can also buy a USB lamp adapter kit that simplifies the wiring. These kits come with pre-made connectors and clear instructions. They are available online for under $15 and make the entire process much easier for beginners.
Benefits of USB-Powered Lamps
Switching to a USB-powered lamp offers several advantages that go beyond just charging your phone.
1. Cleaner, More Organized Spaces
Traditional lamps take up one outlet. A USB lamp with charging ports takes up the same space but gives you an extra outlet for your devices. This is a game-changer for nightstands, desks, and small apartments where outlet space is limited.
2. Lower Energy Consumption
LED USB lamps use very little power. A typical LED USB lamp draws about 5 to 10 watts. Compare that to a traditional incandescent bulb that uses 40 to 60 watts. Over time, this adds up to real savings on your electricity bill.
3. Greater Flexibility
Because USB lamps run on low-voltage power, you can power them from many sources. Use a wall adapter, a computer, a car charger, or a portable power bank. This flexibility makes USB lamps ideal for travel, camping, or emergency backup power.
4. Safer Low-Voltage Operation
USB power operates at 5 volts, which is much safer than the 120 volts from a standard wall outlet. This makes USB lamps a great choice for homes with children or pets. The risk of electrical shock is minimal compared to traditional lamps.
Setting up a smart, connected home also means thinking about your entire entertainment and workspace ecosystem. For tips on streamlining your home setup, consider exploring Alternatives To Dish Network And Directtv to see how cutting cable can free up space and reduce clutter in your living area.
Best USB Lamps for Charging Devices
If you do not want to modify an existing lamp, there are plenty of great options on the market. Here are some of the best USB lamps with built-in charging ports that we recommend.
BenQ ScreenBar Lite
This USB desk lamp clips onto your monitor and provides focused task lighting. It draws power directly from a USB port on your computer or a USB wall adapter. The built-in ambient light sensor automatically adjusts brightness. It is one of the best options for home office setups.
Lumiy Lightblade 1500S
The Lumiy Lightblade is a premium USB-C powered lamp with adjustable color temperature and brightness. It delivers excellent light quality and charges devices through its integrated USB port. It is perfect for anyone who wants a high-end lighting solution with charging capability.
Anker Solar Lantern
For outdoor use, the Anker Solar Lantern is a fantastic portable USB lamp. It charges via solar panel or USB and can double as a power bank for your phone. It is lightweight, durable, and perfect for camping trips or emergency preparedness kits.
TaoTronics TT-DL16
This budget-friendly USB desk lamp offers multiple lighting modes, a built-in USB charging port, and a sleek design. It is one of the most popular options for students and remote workers who need a reliable light source and a convenient charging spot all in one.
When choosing a USB lamp for your home, consider the lamp’s purpose, the rooms where you will use it, and how many devices you need to charge. A bedside lamp with USB is very different from a desk lamp that needs to power a monitor and charge a phone simultaneously.
Creating a fully connected and streamlined home setup also involves thinking about how you access media and entertainment. A clean, USB-powered workspace pairs well with a simplified home entertainment system. To learn more about reducing cable dependency in your home, check out Alternatives To Dish Network And Directtv for practical ideas on going wireless.
Common Mistakes and Quick Tips
Adding USB to a lamp is a fun project, but there are a few pitfalls to avoid. Here are the most common mistakes and how to prevent them.
Common Mistakes to Avoid
- Using the wrong voltage: Always match the USB power source to the lamp’s voltage requirements. Using 12 volts on a 5-volt lamp will burn out the LEDs.
- Overloading the circuit: Do not connect too many devices to a single USB port. Check the amperage rating and stay within limits.
- Skipping the fuse: Always include a small fuse or circuit breaker in your wiring. It protects both the lamp and your devices from power surges.
- Loose connections: Make sure all wire connections are secure and insulated. Loose wires can cause short circuits or fire hazards.
- Ignoring heat buildup: USB adapters can get warm. Keep them in ventilated areas and never cover them with fabric or paper.
Quick Tips for Success
- Use a USB power meter to check voltage and amperage before connecting your devices.
- Label your wires with colored tape so you always know which is positive and which is negative.
- Test your modification with a low-power device first before connecting expensive electronics.
- Keep a spare USB adapter on hand. If one fails, you can swap it out quickly without redoing the wiring.
- Choose LED bulbs for your modified lamp. They use less power and last much longer than incandescent bulbs.
Expert Insights on USB Lamp Modifications
We spoke with a few electricians and DIY experts to get their take on adding USB to lamps. The consensus is clear: it is a safe and rewarding project as long as you follow basic electrical safety guidelines.
Maria Chen, a licensed electrician in Austin, Texas, says, “Adding USB to a lamp is one of the simplest electrical modifications you can do. The key is to use a quality USB adapter and make sure all connections are properly insulated. If you are unsure about any step, consult a professional.”
Jake Morrison, a DIY home tech blogger, adds, “I have modified over 50 lamps with USB ports in the past two years. My biggest tip is to invest in a good USB hub adapter. It gives you multiple charging ports and protects your devices from power fluctuations.”
These experts agree that USB lamp modifications are a great way to upgrade your home without hiring an electrician or spending a lot of money. The key is to take your time, follow the instructions carefully, and never rush the wiring process.
If you are also thinking about upgrading your entire home entertainment and connectivity setup, now is a great time to explore Alternatives To Dish Network And Directtv alongside your USB lamp projects. A smarter home combines better lighting, cleaner connectivity, and fewer unnecessary subscriptions.
Conclusion
Adding a USB port to a lamp is one of the most practical and satisfying home upgrades you can make. It gives you a dedicated charging station, reduces cable clutter, and adds real value to any room in your house. Whether you choose to modify an existing lamp or buy a ready-made USB-powered lamp, the process is straightforward and affordable.
Start with a simple USB adapter kit if you are new to DIY projects. Graduate to more advanced modifications as you gain confidence. And always prioritize safety by using quality components and following proper wiring procedures.
The world of USB lamps and smart home accessories is growing fast. New products with wireless charging, app control, and voice assistant compatibility are hitting the market every year. By adding USB to your lamp today, you are investing in a more connected, organized, and efficient home.
Take the first step this weekend. Pick a lamp, gather your tools, and give your old fixture a new lease on life. Your devices and your living space will thank you.
Frequently Asked Questions
Can I add a USB port to any lamp?
Most lamps can be modified to include a USB port, especially those with standard incandescent or LED bulbs. The process is easiest with desk lamps and bedside lamps that have accessible bases. Just make sure the lamp’s wiring can handle the low-voltage USB power safely.
What kind of USB adapter do I need for a lamp?
You need a 5-volt USB power adapter with at least 2 amps of output. This provides enough power to run the lamp and charge a smartphone simultaneously. For higher-powered lamps or multiple devices, look for a 3-amp or USB-C Power Delivery adapter.
Is it safe to modify a lamp with USB power?
Yes, it is safe as long as you follow basic electrical safety guidelines. Use insulated wires, secure all connections, and include a fuse or circuit breaker. If you are uncomfortable with any part of the process, consult a licensed electrician for help.
Can a USB lamp run on a battery or power bank?
Absolutely. Many USB rechargeable lamps come with built-in batteries, and you can also power any USB lamp with a portable power bank. This makes them great for camping, travel, or emergency backup power during outages.
How much does it cost to add USB to a lamp?
A basic USB adapter kit costs between $10 and $20. If you buy a ready-made USB desk lamp with built-in charging ports, expect to pay between $25 and $100 depending on the brand and features. The DIY modification is the most affordable option by far.
Can I add multiple USB ports to one lamp?
Yes, you can use a USB hub adapter to add multiple ports to a single lamp. This lets you charge several devices at once. Just make sure your USB power source can handle the combined amperage of all connected devices to avoid overloading the circuit.