How Can I Connect My Android Phone To My Camera Via Wi Fi
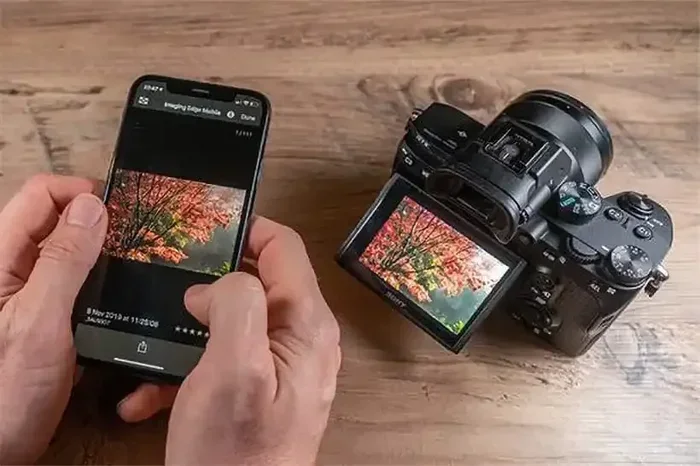
Connecting your Android phone to your camera via Wi Fi lets you control your camera remotely, transfer photos wirelessly, and stream live previews right to your smartphone screen. This guide walks you through every method, app, and setting needed to establish a fast and reliable wireless connection between your devices. Whether you own a Canon, Sony, Nikon, or any WiFi enabled camera, you will find clear steps to get started quickly.
Have you ever wanted to use your Android phone as a remote control for your camera? Maybe you are shooting a group photo and need to be in the picture. Or perhaps you want to review and transfer images without pulling out a memory card. Whatever your reason, connecting your Android phone to your camera via Wi Fi opens up a world of convenience. This guide will show you exactly how to do it, step by step, so you can start shooting smarter today.
The process is simpler than most people think. With a WiFi enabled camera and an Android phone, you can set up a wireless camera connection in under five minutes. You will learn about different connection methods, the best apps to use, and how to fix common problems. Let us dive right in.
Key Takeaways
- Wireless camera connection is easy: Most modern cameras support Wi Fi and can pair with Android phones in minutes using built-in settings or companion apps.
- Use the right app: Camera manufacturer apps like Canon Camera Connect, Sony Imaging Edge, and Nikon SnapBridge make the pairing process smooth and intuitive.
- Follow the steps carefully: Enable Wi Fi on your camera, select your network on your phone, and enter the password to complete the connection.
- Troubleshooting is straightforward: Common issues like connection drops or failed pairing can be fixed by updating firmware, restarting devices, or resetting network settings.
- Remote control is a game changer: Once connected, you can use your Android phone as a remote shutter, viewfinder, and photo transfer hub.
- Security matters: Always use strong passwords and keep your devices updated to protect your wireless camera connection.
📑 Table of Contents
- Understanding WiFi Camera Connectivity on Android
- Step-by-Step Guide to Connect Your Android Phone to Camera
- Best Apps for Wireless Camera Connection
- Troubleshooting Common WiFi Connection Problems
- Tips for a Seamless Wireless Camera Experience
- Expert Tips for Advanced Wireless Camera Users
- Comparison: Camera Connection Methods
- Frequently Asked Questions
- Conclusion
Understanding WiFi Camera Connectivity on Android
Before you start connecting devices, it helps to understand how Android camera WiFi pairing actually works. Most modern cameras come with built-in wireless features. These allow the camera to create its own hotspot or connect to your home network. Your Android phone then talks to the camera over this wireless connection.
There are two main ways cameras connect to phones:
- Camera-created hotspot: The camera broadcasts its own Wi Fi network. Your phone connects directly to it. This is the most common method.
- Home network connection: Both the camera and phone connect to the same Wi Fi router. They communicate through the local network.
Each method has its pros. The hotspot method works anywhere, even without internet. The home network method allows you to stay connected to the internet while controlling your camera. Wireless image transfer works on both, so you can move photos from your camera to your phone without cables.
What You Need Before Starting
Make sure you have these ready before you begin the camera to phone transfer process:
- A WiFi enabled camera with wireless capabilities turned on
- An Android phone running Android 8.0 or newer
- The camera manufacturer’s companion app installed on your phone
- A fully charged camera battery (wireless use drains power faster)
- Your camera’s user manual for model-specific steps
Step-by-Step Guide to Connect Your Android Phone to Camera
Now let us get into the actual setup. Follow these steps carefully to establish your wireless camera connection. The process is very similar across most camera brands, but we will cover the general steps that apply to all WiFi enabled cameras.
Step 1: Enable WiFi on Your Camera
Turn on your camera and navigate to the Wi Fi or Network menu. This is usually found in the settings or setup section. Select the Enable Wi Fi option. Your camera will start broadcasting a signal or look for available networks, depending on your chosen mode.
Most cameras will display a network name (SSID) on the screen. Write this down or remember it. You will need it on your phone. Some cameras also show a password on the screen for you to enter on your Android device.
Step 2: Connect Your Android Phone to the Camera Network
On your Android phone, open the Wi Fi settings. Look for the network name your camera is broadcasting. Tap on it and enter the password shown on your camera screen. Once connected, your phone will be linked to the camera.
At this point, you may see a message on your camera asking you to confirm the connection. Press OK or confirm on the camera screen. The Android phone camera pairing is now complete.
Step 3: Open the Camera Companion App
Launch the camera companion app on your phone. This app was likely installed when you first got your camera. Popular options include Canon Camera Connect, Sony Imaging Edge, Nikon SnapBridge, and Fujifilm Camera Remote.
The app should automatically detect your camera. If it does not, try refreshing the connection or restarting the app. Once detected, you will see options to remotely control your camera, view a live preview, and transfer photos.
Step 4: Start Controlling and Transferring Photos
Now for the fun part. You can use your phone screen as a remote viewfinder. Adjust settings like aperture, shutter speed, and ISO right from your phone. Press the shutter button on your app to take photos remotely.
To transfer photos, simply select the images in the app and choose download or import. Your photos will save directly to your Android phone’s gallery. This wireless photo transfer saves you from ever needing a USB cable or memory card reader again.
Best Apps for Wireless Camera Connection
Not all camera companion apps are created equal. Some offer more features than others. Here is a look at the top apps that make Android camera WiFi setup simple and reliable.
Canon Camera Connect
If you own a Canon camera, this is the go-to app. It supports wireless camera control and lets you transfer images seamlessly. The app also offers remote shooting, so you can use your phone as a shutter release. It works well with Canon’s EOS and PowerShot lines.
Sony Imaging Edge
Sony’s app is packed with features. Beyond basic remote camera control, it offers advanced settings for Sony Alpha cameras. You can adjust focus points, exposure settings, and even use your phone as a touch focus screen. The wireless photo transfer feature is fast and reliable.
Nikon SnapBridge
SnapBridge works with most Nikon cameras. It supports Bluetooth and Wi Fi, giving you flexible connection options. The app automatically transfers photos in the background when you are near your camera. This makes camera phone integration feel effortless.
Fujifilm Camera Remote
Fujifilm users will appreciate this clean and simple app. It provides mobile camera control with a user-friendly interface. You can browse your camera’s photo library and download images directly to your phone. It is lightweight and works smoothly on most Android devices.
Third-Party Apps Worth Trying
If your camera brand does not have a strong official app, consider these alternatives:
- CamFi – Supports many camera brands and offers robust file transfer
- Wifibooth – Great for event photography and instant sharing
- DSLR Controller – Advanced control options for power users
Troubleshooting Common WiFi Connection Problems
Sometimes the wireless camera connection does not work the first time. This is normal and easy to fix. Here are the most common issues and how to solve them.
Camera Does Not Show Up in Wi Fi List
If your phone cannot find the camera’s network, try these steps:
- Make sure Wi Fi is turned on in your camera settings
- Restart your camera and wait for the network to fully broadcast
- Check that your phone’s Wi Fi is scanning for new networks
- Move closer to the camera since the hotspot range is limited
Connection Keeps Dropping
A droping wireless connection is frustrating but fixable. Try these solutions:
- Turn off Bluetooth on your phone, as it can interfere with Wi Fi
- Make sure no other devices are connected to the camera’s network
- Restart both your camera and phone
- Update your camera firmware to the latest version
Photos Won Transfer to Phone
If the connection is live but wireless image transfer fails, check these:
- Ensure the app has permission to access storage on your phone
- Check that your phone has enough free space for new photos
- Try selecting fewer photos at once for the transfer
- Reconnect the devices and try again
App Crashes or Freezes During Use
Clear the app cache in your Android settings. Uninstall and reinstall the app if the problem persists. Also check that your phone meets the app minimum requirements. Android camera connectivity issues are often resolved with a simple app update.
Tips for a Seamless Wireless Camera Experience
Once you have your wireless camera workflow set up, you will want to keep it running smoothly. Here are practical tips to improve your experience.
Keep Your Devices Updated
Camera manufacturers release firmware updates that improve Wi Fi stability and add new features. Check for updates regularly through your camera menu or the companion app. Similarly, keep your Android phone updated to ensure compatibility.
Use a Strong Password
When setting up your camera’s Wi Fi network, choose a strong password. This prevents unauthorized devices from connecting to your camera and accessing your photos. A good password includes letters, numbers, and symbols.
Manage Battery Life
Wi Fi usage drains your camera battery much faster than normal shooting. Consider using a battery grip or carrying spare batteries. Some cameras have a power-saving mode that turns off Wi Fi when not in use.
Keep Your Phone Close
The camera hotspot range is typically around 5 to 10 meters. Stay within this range for a stable connection. If you move too far away, the connection will drop and you may lose control of your camera.
Use Both Wi Fi and Bluetooth Together
Many modern cameras support both Wi Fi and Bluetooth. Using Bluetooth for a low-energy background connection and Wi Fi for data transfer gives you the best of both worlds. Apps like Nikon SnapBridge use this dual-connection approach effectively.
Expert Tips for Advanced Wireless Camera Users
Ready to take your wireless camera connection to the next level? These expert tips will help you get more out of your setup.
Set Up Auto-Transfer for Every Shoot
Many companion apps let you set up automatic photo transfer. Every time you take a shot, the image is sent to your phone in the background. This is incredibly useful for event photographers and content creators who need to share images quickly.
Use Your Phone as a Second Screen
Connect multiple Android devices to the same camera for a dual-screen setup. One phone acts as the main viewfinder while the second serves as a backup monitor. This technique works well for studio photography and video recording.
Stream Live Footage to Your Phone
Some cameras support live streaming over Wi Fi. You can view real-time video on your Android phone and even record it. This is a powerful tool for vloggers and live streamers who want to use their camera as a high-quality webcam.
Build a Portable Studio Setup
With your phone connected wirelessly, you can review and edit photos on the go. Use mobile editing apps like Lightroom Mobile to adjust your images right after shooting. This creates a fast wireless camera workflow that keeps you productive in the field.
Secure Your Wireless Network
Always change the default camera Wi Fi password after setup. Disable the camera hotspot when you are not using it. These simple steps protect your photos and personal data from unauthorized access.
Comparison: Camera Connection Methods
Here is a quick comparison of the most common ways to connect your Android phone to your camera wirelessly.
- Camera Hotspot Method: Direct connection, works anywhere, no internet needed. Best for on-location shoots and remote control.
- Home Network Method: Both devices on the same router. Allows internet access while connected. Best for studio use and file transfers.
- Bluetooth Connection: Low power, always-on background link. Best for automatic photo syncing and quick sharing.
- Cloud-Based Transfer: Photos upload to cloud storage via camera Wi Fi. Best for professional workflows and team collaboration.
Each method has its place. For most users, the camera hotspot method is the easiest and most reliable way to start. As you get comfortable, you can explore other options to build a wireless photo sharing setup that fits your needs.
Frequently Asked Questions
Can I connect any Android phone to any WiFi camera?
Most Android phones can connect to WiFi enabled cameras as long as both devices support the same wireless standards. Check your camera manual for compatibility details. Nearly all cameras made after 2015 support Wi Fi and work with Android phones.
Do I need an internet connection to connect my phone to my camera via WiFi?
No, you do not need internet. The camera creates its own local network, and your phone connects directly to it. This means you can use this setup anywhere, even in remote locations without Wi Fi access.
Why is my camera WiFi connection slow for photo transfers?
Slow transfers are usually caused by distance, interference, or an outdated camera firmware. Move closer to the camera, reduce the number of connected devices, and update your camera software. Using the 5GHz band on supported cameras also speeds up transfers.
Can I control camera settings from my Android phone?
Yes, most companion apps let you adjust shutter speed, aperture, ISO, white balance, and focus remotely. Advanced apps even offer touch-to-focus and live histogram displays on your phone screen.
Is it safe to transfer photos wirelessly from my camera to my phone?
Yes, wireless transfers are safe as long as you use a secure password for your camera network. The data stays on a local network and is not uploaded to the internet unless you choose to do so. Always keep your devices updated for the best security.
What should I do if my camera WiFi keeps disconnecting?
Start by restarting both devices. Check for firmware updates on your camera. Make sure no other apps on your phone are interfering with the Wi Fi connection. If the problem continues, reset your camera network settings and try pairing again from scratch.
Conclusion
Connecting your Android phone to your camera via Wi Fi is one of the most useful upgrades you can make to your photography workflow. It gives you remote control, instant photo transfer, and a live preview right on your phone screen. The setup is straightforward, and the benefits are enormous.
Start with the basic hotspot connection method and your camera companion app. Once you see how easy it is, you will wonder how you ever shot without it. Use the troubleshooting tips when needed and explore advanced features as you grow more confident.
Wireless camera connection is not just a convenience, it is a creative tool. It lets you capture moments from angles you never could before and share your work instantly with friends, clients, or followers. Pick up your camera and phone today, follow the steps in this guide, and start experiencing the freedom of wireless photo transfer and remote camera control. You will not look back.